Canon MP370 MultiPASS MP370/360 Set-Up Sheet - Page 5
Align the print head from the operation panel. - user guide
 |
UPC - 013803037111
View all Canon MP370 manuals
Add to My Manuals
Save this manual to your list of manuals |
Page 5 highlights
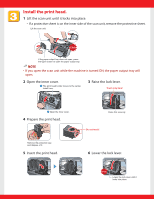
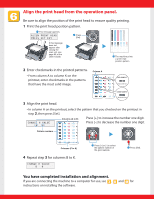
Align the print head from the operation panel. Be sure to align the position of the print head to ensure quality printing. 1 Print the print head position pattern. q This message appears. w Press [Set]. If this message does not appear after closing the scan unit, see page 86 of the User's Guide. e The machine prints a print head position pattern. 2 Enter checkmarks in the printed patterns. • From column A to column K on the printout, enter checkmarks in the patterns that have the most solid image. Column A BAD SAMPLE Least solid box GOOD SAMPLE Most solid box 3 Align the print head. • In column A on the printout, select the pattern that you checked on the printout in step 2, then press [Set]. Columns (A to E) Press [+] to increase the number one digit. Press [-] to decrease the number one digit. Pattern numbers Columns (F to K) 4 Repeat step 3 for columns B to K. q Press [+] or [-] to select the pattern number of the good sample. w Press [Set]. You have completed installation and alignment. If you are connecting the machine to a computer for use, see , and for instructions on installing the software.
-
 1
1 -
 2
2 -
 3
3 -
 4
4 -
 5
5 -
 6
6 -
 7
7 -
 8
8
 |
 |
