Canon MultiPASS F80 MultiPASS F80 Setup Sheet - Page 3
Load paper., Connect the telephone line and any necessary external device, and set the receive mode.
 |
View all Canon MultiPASS F80 manuals
Add to My Manuals
Save this manual to your list of manuals |
Page 3 highlights
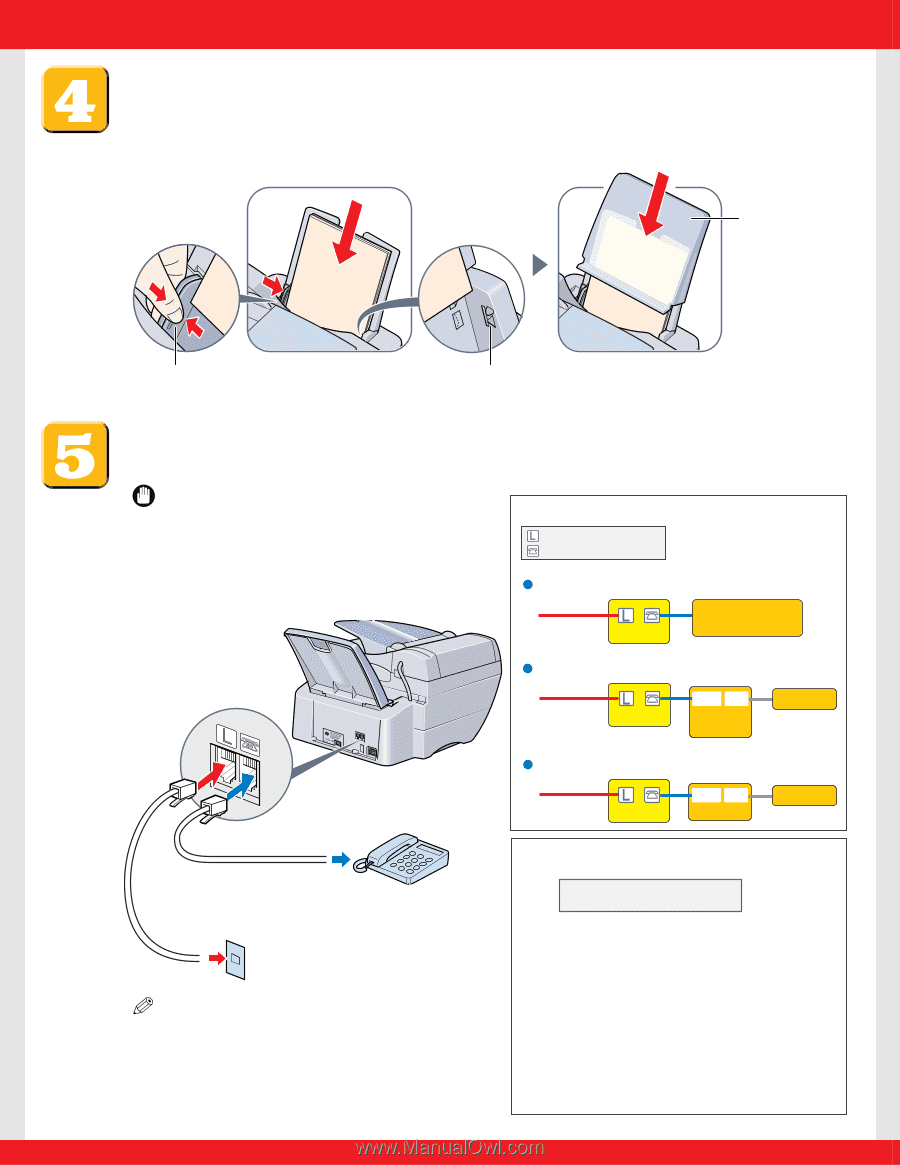
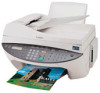
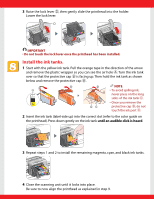
Load paper. Place a stack of paper (print side up) in the multi-purpose tray q and adjust the paper guide A to the width of the stack w. Make sure the stack does not exceed the paper limit mark B. Then place the tray cover C over the multi-purpose tray. q BC w A B Connect the telephone line and any necessary external device, and set the receive mode. IMPORTANT • Set the receive mode any time after the power cord is connected in step 6. Setting the receive mode is important for you to use the faxing capability of your machine. Connect external devices as follows: = Telephone line jack = External device jack l Telephone or answering machine Telephone line Machine Telephone or answering machine l Telephone and answering machine Telephone line Machine LINE TEL Answering machine Telephone l Built-in computer modem and telephone Telephone line Machine LINE TEL Computer Telephone You can connect an external device (telephone, answering machine) if necessary. Connect the telephone line cord to the wall jack. NOTE • Before using your machine, you need to make sure it is set for your telephone line type. For details, see p. 8-2 of the Basic Guide. Set the receive mode as follows: 1 On the operation panel, press [Fax], [Menu], then [Set]. Ex: R E C E I V E M O D E FAX/TEL AUTO SW 2 Use [2] or [3] to select the receive mode: • Select: - to receive both faxes and voice calls (a telephone must be connected to the machine). - to receive faxes only. - if you have subscribed to a DRP (Distinctive Ring Pattern) service offered by some companies. (For details, refer to the Comprehensive Guide.) - to answer all voice and fax calls manually (a telephone must be connected to the machine). - to receive faxes automatically and route voice calls to an answering machine connected to your machine. For more details on the different receive modes, refer to p. 8-7 of the Basic Guide.
-
 1
1 -
 2
2 -
 3
3 -
 4
4 -
 5
5 -
 6
6 -
 7
7 -
 8
8
 |
 |