Canon PIXMA MX410 MX410 series Getting Started
Canon PIXMA MX410 Manual
 |
View all Canon PIXMA MX410 manuals
Add to My Manuals
Save this manual to your list of manuals |
Canon PIXMA MX410 manual content summary:
- Canon PIXMA MX410 | MX410 series Getting Started - Page 1
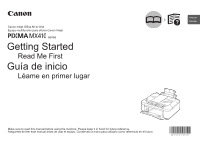
Inkjet Office All-In-One Equipo multifunción para oficina Canon Inkjet ENGLISH ESPAÑOL series Getting Started Read Me First Guía de inicio Léame en primer lugar Make sure to read this manual before using the machine. Please keep it in hand for future reference. Asegúrese de leer este manual - Canon PIXMA MX410 | MX410 series Getting Started - Page 2
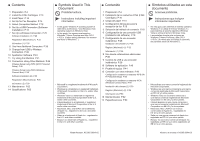
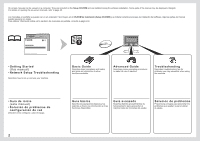
■ Contents 1 Preparation P.4 2 Install the FINE Cartridges P.10 3 Load Paper P.14 4 Set Up for Fax Reception P.15 5 Select Connection Method P.18 6 Set Up a USB Connection (Software Installation) P.19 7 Set Up a Wireless Connection P.25 Software Installation (1) P.26 Registration (Macintosh) (1) P. - Canon PIXMA MX410 | MX410 series Getting Started - Page 3
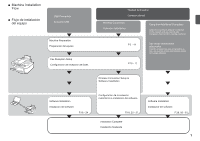
■ Machine Installation Flow ■ Flujo de instalación del equipo USB Connection Conexión USB Machine Preparation Preparación del equipo Fax Reception Setup Configuración de recepción de faxes Network Connection Conexión de red Wireless Connection Conexión inalámbrica Using from Additional - Canon PIXMA MX410 | MX410 series Getting Started - Page 4
be viewed on a computer. They are included on the Setup CD-ROM and are installed during the software installation. Some parts of the manual may be displayed in English. For details on opening the on-screen manuals, refer to page 40. Los manuales en pantalla se pueden ver en un ordenador. Se incluyen - Canon PIXMA MX410 | MX410 series Getting Started - Page 5
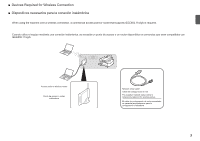
the machine over a wireless connection, a commercial access point or router that supports IEEE802.11n/g/b is required wireless router Punto de acceso o router inalámbrico Network setup cable Cable de configuración de red The supplied network setup cable is temporarily required for wireless setup - Canon PIXMA MX410 | MX410 series Getting Started - Page 6
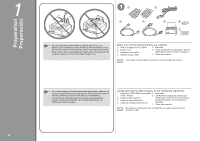
. 1. FINE cartridges (Color, Black) 5. Manuals 2. Power cord 3. Telephone line cable 6. Setup CD-ROM (containing the drivers, applications and on-screen manuals) 4. Network setup cable 7. Other documents • The network setup cable can also be used for USB connection. • No instale el equipo - Canon PIXMA MX410 | MX410 series Getting Started - Page 7
Do not connect the power cord yet. 2 3 B B 3 2 1 D A C Remove all the protective materials and orange tape from the outside of the machine. 1. Open the Paper Output Tray (A). 2. Make sure the Document Cover (B) is closed, then lift to open the Scanning Unit (Cover) (C). 3. Fix it with the - Canon PIXMA MX410 | MX410 series Getting Started - Page 8
5 1 2 3 E Remove both the orange tape (E) and the protective material (F) carefully. 1. Lift the Scanning Unit (Cover) slightly. 2. Fold the Scanning Unit Support. 3. Close the Scanning Unit (Cover) gently. Retire la cinta naranja (E) y el material protector (F) con cuidado. 1. Levante la unidad - Canon PIXMA MX410 | MX410 series Getting Started - Page 9
in parallel. The machine may not operate properly. • The basic connection method is described here. For other connection methods, refer to the on-screen manual: Basic Guide after installation is complete. ¿Utiliza las funciones de fax? Sí Vaya a . Conecte un extremo del cable de línea telef - Canon PIXMA MX410 | MX410 series Getting Started - Page 10
into the wall outlet firmly. • Do NOT connect the network setup cable (USB cable) at this stage. • Make sure that the Document Cover is closed. Press the ON button (J) to turn on the machine. • It takes about 5 seconds for the ON button to work after the power cord is plugged in. Use the [ or - Canon PIXMA MX410 | MX410 series Getting Started - Page 11
of the FINE Cartridges, resulting in poor printing. When using the fax features • Removing the power plug deletes all faxes stored in memory. Before removing the power plug, send faxes, print them, or save them to USB flash drive as necessary. • The specification of the power cord differs for each - Canon PIXMA MX410 | MX410 series Getting Started - Page 12
it with the Scanning Unit Support (E). • When you lift the Scanning Unit (Cover), do not touch the buttons on the Operation Panel (F) or the LCD (G). May result in unintended operation. H The FINE Cartridge Holder (H) moves to the installation position. If the FINE Cartridge Holder does not move - Canon PIXMA MX410 | MX410 series Getting Started - Page 13
J I Open the Ink Cartridge Locking Cover on the right side. Pinch (I) firmly and pull up the cover. J After removing the Black FINE Cartridge from its box, pull the orange protective tape (J) in the direction of the arrow and remove it carefully. • Handle the FINE Cartridges carefully. Do not drop - Canon PIXMA MX410 | MX410 series Getting Started - Page 14
the right slot . • Do not knock the FINE Cartridge against the sides of the holder. • Install in a well-lit environment. • Install the Black FINE Cartridge into the right slot , and the Color FINE Cartridge into the left slot . Push down of the Ink Cartridge Locking Cover until it snaps into place - Canon PIXMA MX410 | MX410 series Getting Started - Page 15
Black FINE Cartridge. 1. Lift the Scanning Unit (Cover) slightly. 2. Fold the Scanning Unit Support. 3. Close the Scanning Unit (Cover) gently. Wait for about 1 minute until the LCD changes as shown in the illustration, then proceed to the next step. • Once you have installed the FINE Cartridges - Canon PIXMA MX410 | MX410 series Getting Started - Page 16
the printing side facing up. Slide the left and right Paper Guides against both edges of the paper. Make sure that the height of the paper stack does not exceed the line (D). • For details on how to handle paper, refer to "Loading Paper" in the on-screen manual: Basic Guide after installation is - Canon PIXMA MX410 | MX410 series Getting Started - Page 17
, go to "5 Select Connection Method" on page 18. Depending on your needs, select one of the following three modes for receiving faxes. You can change the receive mode after installation is complete. For details, refer to "Setting the Receive Mode" in the on-screen manual: Basic Guide. En función de - Canon PIXMA MX410 | MX410 series Getting Started - Page 18
Si recibe una llamada de voz While the telephone's ringtone sounds, pick up the handset. When the fax reception starts, replace the handset. If an answering machine is connected, the fax is received automatically. Mientras suene el tono de llamada del teléfono, descuelgue el auricular. Cuando se - Canon PIXMA MX410 | MX410 series Getting Started - Page 19
mode is displayed. • For details on the advanced settings on the receive mode, refer to the onscreen manual: Basic Guide after installation is complete. Pulse el botón FAX (A) y, a continuación, Menú (Menu) (B). Utilice el botón [ o ] (C) para seleccionar Modo recep. ajust. (Receive mode set - Canon PIXMA MX410 | MX410 series Getting Started - Page 20
are not certain whether your device (access point, router, etc.) supports wireless connection, refer to the manual supplied with the device, or contact its manufacturer. If your device supports wireless connection, check if it supports IEEE802.11n/g/b. Si no sabe si el dispositivo (punto de acceso - Canon PIXMA MX410 | MX410 series Getting Started - Page 21
the installation process. • Internet connection may be required during the installation. Connection fees may apply. Consult the internet service provider. • It may be necessary to restart your computer during the installation process. Follow the on-screen instructions and do not remove the Setup CD - Canon PIXMA MX410 | MX410 series Getting Started - Page 22
Easy-WebPrint EX is Web print software that is installed on the computer when installing the supplied software. Internet Explorer 7 or later (Windows) or Safari 4 or later (Mac OS X v.10.5 or later) is required to use this software. An Internet connection is required for installation. Press the ON - Canon PIXMA MX410 | MX410 series Getting Started - Page 23
Setup CD-ROM) en la unidad de CD-ROM. Si usa Windows, el programa de instalación se inicia automáticamente. Para Windows • Si el programa no se inicia automáticamente, haga doble clic en el icono del CD-ROM en Equipo (Computer) o Mi PC on-screen instructions. Haga doble clic en el icono Setup de la - Canon PIXMA MX410 | MX410 series Getting Started - Page 24
4 5 6 Click Easy Install. The drivers, application software, and on-screen manuals are installed. • If you want to select particular items to install, click Custom Install. Click Install. Select Use the printer via USB, then click Next. Follow any on-screen instructions to proceed with the - Canon PIXMA MX410 | MX410 series Getting Started - Page 25
supplied network setup cable can be used as well. • If the power is on, the FINE Cartridge Holder will move when the Scanning Unit (Cover) (B) is opened. If you can agree to Extended Survey Program, click Agree. If you click Do not agree, the Extended Survey Program will not be installed. (This - Canon PIXMA MX410 | MX410 series Getting Started - Page 26
manual en pantalla, consulte la página 40. Para empezar a utilizar el equipo, consulte la página 41. Installing the XPS Printer Driver In Windows 7 and Windows Vista SP1 or later, the XPS Printer Driver can be installed additionally. To install, perform from on page 20 in "6 Set Up a USB Connection - Canon PIXMA MX410 | MX410 series Getting Started - Page 27
have trouble with the network connection, refer to the printed manual: Network Setup Troubleshooting. • When using a router, connect the machine and computer to the LAN side (same network segment). • To set up using WPS (Wi-Fi Protected Setup), go to page 46. To set up using WCN (Windows Connect Now - Canon PIXMA MX410 | MX410 series Getting Started - Page 28
installation process. • Internet connection may be required during the installation. Connection fees may apply. Consult the internet service provider. • It may be necessary to restart your computer during the installation process. Follow the on-screen instructions and do not remove the Setup Canon - Canon PIXMA MX410 | MX410 series Getting Started - Page 29
Explorer 7 or later (Windows) or Safari 4 or later (Mac OS X v.10.5 or later) is required to use this software. An Internet connection is required for installation. For Windows 7 1. Remove the network setup cable connected to your computer. 2. Proceed to . For Windows Vista/Windows XP This dialog - Canon PIXMA MX410 | MX410 series Getting Started - Page 30
Windows 7/Windows Vista Windows on-screen instructions. Haga doble clic en el icono Setup de la Install. The drivers, application software, and on-screen manuals are installed. • If you want to select particular items to install, click Custom Install. Haga clic en Instalación simple (Easy Install - Canon PIXMA MX410 | MX410 series Getting Started - Page 31
is not correctly selected in . − For Windows Click Cancel and start again from , then be sure to select Use the printer with wireless LAN connection in . − For Macintosh Follow on-screen instructions and proceed with the installation. Click Exit on the installation complete screen, then start again - Canon PIXMA MX410 | MX410 series Getting Started - Page 32
List screen appears, click Set Up New Printer. When the Connect Cable screen appears, connect the machine to the computer with the network setup cable. The USB Port is located near the center on the back of the machine. For Macintosh Follow the on-screen instructions and click Next. Asegúrese de - Canon PIXMA MX410 | MX410 series Getting Started - Page 33
WEP Key Number, then specify the WEP key number. 3. Click Connect. Go to on page 32. • If the target access point is not displayed on the Detected Access Points List or Access Points screen, refer to the printed manual: Network Setup Troubleshooting. • For details on how to check the access point - Canon PIXMA MX410 | MX410 series Getting Started - Page 34
Confirm Connection Access Point) 11 12 When the Disconnect Cable screen appears, remove When the Setup Completion screen the network setup cable target access point is not displayed in this screen, click No, then perform - on page 31. Asegúrese de que se muestre el punto de acceso de destino y, a - Canon PIXMA MX410 | MX410 series Getting Started - Page 35
1 Macintosh computer. Windows users: go to "Information (1)" on page 36. • The alphanumeric characters after Canon MX410 series is the machine's Bonjour service name or MAC address. • If the machine is not detected, make sure of the following. 2-A Mac OS X v.10.6.x/v.10.5.x Mac OS X v.10.4.11 - Canon PIXMA MX410 | MX410 series Getting Started - Page 36
Mac OS X v.10.4.11 1 2 3 4 When the Printer List window Click More Printers in the Printer appears, click Add. Browser window. • When the You have no printers available. screen appears, click Add. Select Canon IJ Network in the pop-up menu, select Canon MX410 series in the list of printers - Canon PIXMA MX410 | MX410 series Getting Started - Page 37
impresora y escáner (Register Printer and Scanner), haga clic en Registrar escáner (Register Scanner). Seleccione Canon MX410 series en la pantalla Canon IJ Network Scanner Selector EX y, a continuación, haga clic en Aceptar (OK). Next, go to "Information (1)" on page 36! Haga clic en Siguiente - Canon PIXMA MX410 | MX410 series Getting Started - Page 38
on-screen instructions to proceed with the software installation. If power is on, the FINE Cartridge Holder will move when the Scanning Unit (Cover) (A) is opened. If you can agree to Extended Survey Program, click Agree. If you click Do not agree, the Extended Survey Program will not be installed - Canon PIXMA MX410 | MX410 series Getting Started - Page 39
Driver can be installed additionally. To install, perform from on page 27 in "Software Installation (1)". Click Custom Install in , then select XPS Printer Driver in the Custom Install screen. For details on useful functions of the XPS Printer Driver, refer to the on-screen manual: Advanced Guide - Canon PIXMA MX410 | MX410 series Getting Started - Page 40
If the machine is already connected to a wireless connection, it can be used from Setup CD-ROM into the computer from which you want to use the machine. 2 Follow the on-screen instructions to install on the software installation procedure, refer to "Software Installation (2)" on page 50. Para obtener - Canon PIXMA MX410 | MX410 series Getting Started - Page 41
Cambio de USB a una conexión inalámbrica 9 To change to a wireless connection from a USB connection, start over from "7 Set Up a Wireless Connection" on page 25 to set up a wireless connection. Para cambiar a una conexión inalámbrica desde una conexión USB, vuelva a empezar desde "7 Configuraci - Canon PIXMA MX410 | MX410 series Getting Started - Page 42
, • Apertura del manual en pantalla. • Inicio de diverso software de aplicación. Use Easy-WebPrint EX to easily print web pages in Internet Explorer (Windows) or Safari (Macintosh). Some of its features include: • Printing a web page by reducing its size to fit the paper width automatically without - Canon PIXMA MX410 | MX410 series Getting Started - Page 43
stored on the computer. • For details, refer to "3 Load Paper" on page 14. Start Solution Menu EX from the Canon Solution Menu EX icon on the desktop (Windows) or on the Dock (Macintosh), click Photo Print, then click Photo Print (C). Easy-PhotoPrint EX starts. • For details on starting Solution - Canon PIXMA MX410 | MX410 series Getting Started - Page 44
you are using Windows, printing will start. If you are using Macintosh, click Print on the Print dialog box to start printing. • The machine may make operating noise when feeding paper. This is normal operation. For more information, refer to the on-screen manual: Advanced Guide. Seleccione una - Canon PIXMA MX410 | MX410 series Getting Started - Page 45
after printing. • Close the Document Cover gently, holding it firmly, because it is heavy. • When the machine is ready for copying, the Black button and Color button light up. For the procedure to copy on paper other than plain paper, refer to "Copying" in the on‑screen manual: Advanced Guide - Canon PIXMA MX410 | MX410 series Getting Started - Page 46
residence. Open the Document Tray (C), then move the Document Guides (D) to both edges. • For details on supported documents and settings for image quality, density (brightness), etc., refer to the on-screen manual: Basic Guide. Pulse el botón FAX (A). En esta sección se explica cómo enviar un - Canon PIXMA MX410 | MX410 series Getting Started - Page 47
again from on page 44. To connect the telephone line correctly, refer to to on page 7 in "1 Preparation". • For details on sender information, refer to "Specifying the Basic Settings for Faxing" in the onscreen manual: Basic Guide. • When the machine is ready for faxing, the Black button and Color - Canon PIXMA MX410 | MX410 series Getting Started - Page 48
con otros métodos Wireless Setup Using WPS (Wi-Fi Protected Setup) Configuración inalámbrica mediante WPS (Wi-Fi Protected Setup) 12 46 Read this section only when setting up a wireless 1 A connection by using the WPS (Wi-Fi Protected Setup). • For details on WPS, refer to the manual of your - Canon PIXMA MX410 | MX410 series Getting Started - Page 49
Select WLAN active/ inactive, then press the OK button. Select Wireless LAN active, then press the OK button. When wireless connection is enabled, the Wi-Fi lamp (C) lights blue. Select Wireless LAN Select WPS, then press setup, then press the OK the OK button. button. Seleccione WLAN activa - Canon PIXMA MX410 | MX410 series Getting Started - Page 50
another error appears, refer to the printed manual: Network Setup Troubleshooting. Next, read "Software Installation (2)" on page 50! code method for setup Para utilizar el método de código PIN en la instalación Select PIN code method in , then press the OK button. Follow the on-screen instructions - Canon PIXMA MX410 | MX410 series Getting Started - Page 51
Windows Connect Now) de Windows 7/Windows Vista. Wireless Setup Using WCN (Windows Connect Now) Configuración inalámbrica mediante WCN (Windows Connect Now) A Setup on the Computer Configuración en el ordenador Windows machine supports "WCN-UFD". • Canon assumes Installation (2)" on page 50! A - Canon PIXMA MX410 | MX410 series Getting Started - Page 52
installation process. • Internet connection may be required during the installation. Connection fees may apply. Consult the internet service provider. • It may be necessary to restart your computer during the installation process. Follow the on-screen instructions and do not remove the Setup Canon - Canon PIXMA MX410 | MX410 series Getting Started - Page 53
-WebPrint EX is Web print software that is installed on the computer when installing the supplied software. Internet Explorer 7 or later (Windows) or Safari 4 or later (Mac OS X v.10.5 or later) is required to use this software. An Internet connection is required for installation. Consulte la hoja - Canon PIXMA MX410 | MX410 series Getting Started - Page 54
Setup CD-ROM) en la unidad de CD-ROM. Si usa Windows, el programa de instalación se inicia automáticamente. Para Windows • Si el programa no se inicia automáticamente, haga doble clic en el icono del CD-ROM en Equipo (Computer) o Mi PC on-screen instructions. Haga doble clic en el icono Setup de la - Canon PIXMA MX410 | MX410 series Getting Started - Page 55
Click Easy Install. The drivers, application software, and on-screen manuals are installed. • If you want to select particular items to install, click Custom Install. Click Install. Select Use the printer with wireless LAN connection, then click Next. Follow any on-screen instructions to proceed - Canon PIXMA MX410 | MX410 series Getting Started - Page 56
is not correctly selected in . − For Windows Click Cancel and start again from , then be sure to select Use the printer with wireless LAN connection in . − For Macintosh Follow on-screen instructions and proceed with the installation. Click Exit on the installation complete screen, then start again - Canon PIXMA MX410 | MX410 series Getting Started - Page 57
9 10 When the Detected Printers List dialog box appears, select Canon MX410 series, then click Next. • If the machine is not detected, Set Up New Printer dialog box is displayed. Refer to the printed manual: Network Setup Troubleshooting. Make sure there is no problem, then click Redetect. When - Canon PIXMA MX410 | MX410 series Getting Started - Page 58
1 Macintosh computer. Windows users: go to "Information (2)" on page 59. • The alphanumeric characters after Canon MX410 series is the machine's Bonjour service name or MAC address. • If the machine is not detected, make sure of the following. 2-A Mac OS X v.10.6.x/v.10.5.x Mac OS X v.10.4.11 - Canon PIXMA MX410 | MX410 series Getting Started - Page 59
B Mac OS X v.10.4.11 1 2 3 4 When the Printer List window appears, click Add. • When the You have no printers available. screen appears, click Add. Click More Printers in the Printer Browser window. Select Canon IJ Network in the pop-up menu, select Canon MX410 series in the list of printers - Canon PIXMA MX410 | MX410 series Getting Started - Page 60
and Scanner screen appears, click Register Scanner. Select Canon MX410 series on the Canon IJ Network Scanner Selector EX screen, then click OK. Click Next on the Register Printer and Scanner screen. Next, go to "Information (2)" on page 59! Cuando aparezca la pantalla Registrar impresora y esc - Canon PIXMA MX410 | MX410 series Getting Started - Page 61
1 Click Next. Follow any on-screen instructions to proceed with the software installation. If the serial number is not displayed on el interior del equipo. A Serial No • If the power is on, the FINE Cartridge Holder will move when the Scanning Unit (Cover) (A) is opened. Haga clic en Siguiente - Canon PIXMA MX410 | MX410 series Getting Started - Page 62
the installation. For Macintosh It is necessary to restart the computer before scanning using the Operation Panel on the machine for the first time. For Windows Solution Menu EX starts. For Macintosh Solution Menu EX starts when clicking OK in the Canon Solution Menu EX dialog. Remove the Setup CD - Canon PIXMA MX410 | MX410 series Getting Started - Page 63
In Windows 7 and Windows Vista SP1 or later, the XPS Printer Driver can be installed additionally. To install, perform from select XPS Printer Driver in the Custom Install screen. For details on useful functions of the XPS Printer Driver, refer to the on-screen manual: Advanced Guide. on page 51 - Canon PIXMA MX410 | MX410 series Getting Started - Page 64
that you clean the Ink Cartridge Locking Cover (A) and the inside of the tray (B) with a facial tissue or the like as required. If the Scanning Unit (Cover) is left open for more than 10 minutes, the FINE Cartridge Holder moves to the right automatically. Después de un período de uso, la - Canon PIXMA MX410 | MX410 series Getting Started - Page 65
to PC *2 The wait time for standby cannot be changed. External dimensions Approx. 18.1 (W) X 16.4 (D) X 7.8 (H) inches Approx. 458 (W) X 415 (D) X 198 (H) mm * With the Paper Support and Paper Output Tray retracted. Weight Approx. 8.6 kg (Approx. 18.9 lb) * With the FINE Cartridges installed. Canon - Canon PIXMA MX410 | MX410 series Getting Started - Page 66
with the Canon inkjet printer. • Internet Explorer 7 or later (Windows), or Safari 4 or later (for Mac OS X v.10.5 or later) is required to install Easy-WebPrint EX. Specifications are subject to change without notice. About Consumables Consumables (ink tanks / FINE Cartridges) are available - Canon PIXMA MX410 | MX410 series Getting Started - Page 67
7 Procesador a 1 GHz o superior de 32 bits (x86) o 64 bits (x64) 1 GB (32 bits)/2 GB (64 bits) Windows Vista, Vista SP1, Vista SP2 Procesador a 1 GHz 512 MB Windows XP SP2, SP3 Procesador a 300 MHz 128 MB Mac OS X v.10.6 Procesador Intel 1 GB Mac OS X v.10.5 Procesador Intel, PowerPC G5, PowerPC - Canon PIXMA MX410 | MX410 series Getting Started - Page 68
"Support by Email" link under Service & Support. Toll-Free Tech Support- 1-800-OK-CANON This option provides live telephone technical support, free of service disponible en 1-866-251-3752. Ordering Information The following ink cartridges are compatible with this machine. Información de pedidos Los
-
 1
1 -
 2
2 -
 3
3 -
 4
4 -
 5
5 -
 6
6 -
 7
7 -
8
-
9
-
10
-
11
-
12
-
13
-
14
-
15
-
16
-
17
-
18
-
19
-
20
-
21
-
22
-
23
-
24
-
25
-
26
-
27
-
28
-
29
-
30
-
31
-
32
-
33
-
34
-
35
-
36
-
37
-
38
-
39
-
40
-
41
-
42
-
43
-
44
-
45
-
46
-
47
-
48
-
49
-
50
-
51
-
52
-
53
-
54
-
55
-
56
-
57
-
58
-
59
-
60
-
61
-
62
-
63
-
64
-
65
-
66
-
67
-
68
 |
 |
ESPAÑOL
ENGLISH
series
Asegúrese de leer este manual antes de usar el equipo. Consérvelo a mano para utilizarlo como referencia en el futuro.
Guía de inicio
Equipo multifunción para oficina Canon Inkjet
Léame en primer lugar
Make sure to read this manual before using the machine. Please keep it in hand for future reference.
Getting Started
Canon Inkjet Office All-In-One
Read Me First