Canon PIXMA MX512 MX512 Getting Started - Page 3
Start setup
 |
View all Canon PIXMA MX512 manuals
Add to My Manuals
Save this manual to your list of manuals |
Page 3 highlights
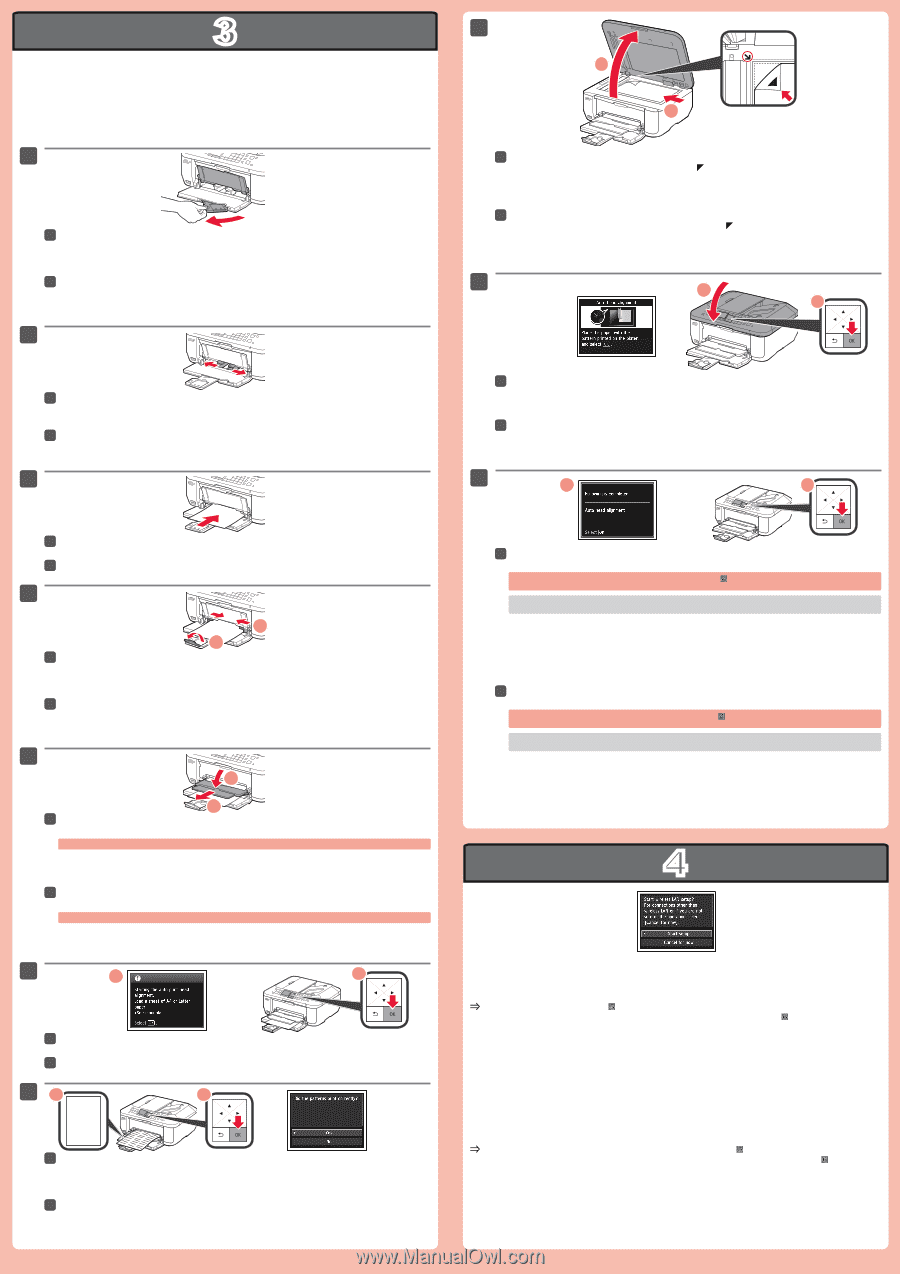
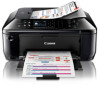
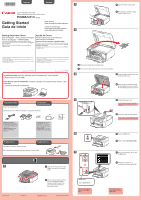
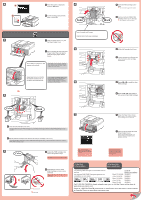
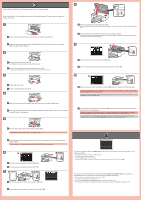
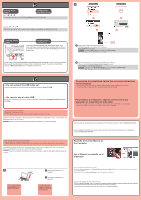
3 Perform the Print Head Alignment. Prepare a sheet of A4 or Letter-sized paper. Realice la Alineación de los cabezales de impresión (Print Head Alignment). Prepare una hoja de papel de tamaño A4 o Carta. 1 1 Check that the Paper Output Tray is closed, then pull out the Paper Support. 1 Asegúrese de que la bandeja de salida del papel (Paper Output Tray) está cerrada y extraiga el soporte del papel (Paper Support). 2 2 Slide the right Paper Guide to the end. The left Paper Guide moves simultaneously with the right guide. 2 Deslice la guía del papel (Paper Guide) derecha hacia el lado. La guía del papel (Paper Guide) izquierda se mueve al mismo tiempo que la derecha. 3 8 1 2 8 Open the Document Cover, then place the pattern. Place the pattern with the printed side facing down and align Mark. on the top left corner of the pattern with the Alignment 8 Abra la cubierta de documentos (Document Cover) y coloque el modelo. Coloque el modelo con la cara impresa hacia abajo y alinee la marca de la esquina superior izquierda del modelo con la marca de alineación (Alignment Mark). 9 1 2 9 Close the Document Cover, then press the OK button. 9 Cierre la cubierta de documentos (Document Cover) y pulse el botón OK. 10 1 2 3 Insert paper until it stops. 3 Inserte el papel hasta que se detenga. 4 1 2 4 Adjust the Paper Guide to fit the paper size used, then open the Output Tray Extension. 4 Ajuste la guía del papel (Paper Guide) al tamaño del papel utilizado y abra la extensión de la bandeja de salida (Output Tray Extension). 5 1 2 5 Open the Paper Output Tray and the Paper Output Support. Printing without opening the Paper Output Tray causes an error. 5 Abra la bandeja de salida del papel (Paper Output Tray) y el soporte de la salida del papel (Paper Output Support). Si imprime sin abrir la bandeja de salida del papel (Paper Output Tray), provocará un error. 10 When the screen as shown is displayed, press the OK button to complete Print Head Alignment. If an error message appears, press the OK button, then proceed to . After installation is complete, refer to the Onscreen Manual to redo Print Head Alignment. The LCD turns off if the machine is not operated for about 5 minutes. To restore the display, press any button (except the ON button) on the Operation Panel. 10 Cuando aparezca esta pantalla, pulse el botón OK para finalizar la Alineación de los cabezales de impresión (Print Head Alignment). Si aparece un mensaje de error, pulse el botón OK y continúe con . Cuando finalice la instalación, consulte el Manual en pantalla para repetir la Alineación de los cabezales de impresión (Print Head Alignment). Cuando el equipo no se utiliza durante unos 5 minutos, la pantalla LCD se desconecta. Para reactivarla, pulse cualquier botón (excepto el botón ACTIVADO (ON)) en el panel de control (Operation Panel). 4 6 1 2 6 When this screen is displayed, press the OK button. 6 Cuando aparezca esta pantalla, pulse el botón OK. 71 2 7 Check that the pattern is printed, then press the OK button. To connect to wireless LAN, select Start setup on the screen, then follow the on-screen instruction. In the following conditions: • If you want to use wired connection or USB connection • If you have difficulty with the procedure Select Cancel for now, then proceed to . * You can perform network connection by following the instruction shown on the computer screen in . Para conectar una LAN inalámbrica, seleccione Iniciar configuración (Start setup) en la pantalla y, a continuación siga las instrucciones en pantalla. En las siguientes condiciones: • Si desea utilizar una conexión cableada o una conexión USB • Si le surge alguna dificultad con el procedimiento Seleccione Cancelar por ahora (Cancel for now) y, a continuación continue con . * Puede realizar la conexión de red siguiendo las instrucciones que se muestran en la pantalla del ordenador en . 7 Compruebe que se ha impreso el modelo y pulse el botón OK.
-
 1
1 -
 2
2 -
 3
3 -
 4
4
 |
 |