Canon PIXMA SELPHY CP600 SELPHY CP600 User Guide - Page 35
mobile phone to the printer.
 |
View all Canon PIXMA SELPHY CP600 manuals
Add to My Manuals
Save this manual to your list of manuals |
Page 35 highlights
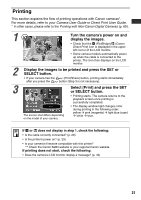
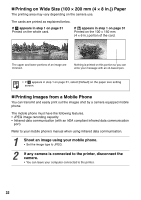
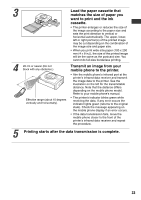
3 Load the paper cassette that matches the size of paper you want to print and the ink cassette. • The printer enlarges or reduces the size of the image according to the paper size and sets the print direction to vertical or horizontal automatically. The upper, lower, left or right portion(s) of the printed image may be cut depending on the combination of the image size and paper size. • When you print wide size paper (100 x 200 mm (4 × 8 in.)), the size of the printed image will be the same as the postcard size. You cannot do full-size borderless printing. 4 20 cm or nearer (Do not block with any obstacles.) Transmit an image from your mobile phone to the printer. • Aim the mobile phone's infrared port at the printer's infrared data receiver and transmit the image data to the printer. See the illustration on the left for the transmittable distance. Note that the distance differs depending on the mobile phone model. Refer to your mobile phone's manual. Effective range (about 10 degrees vertically and horizontally). • The printer's indicator blinks green while receiving the data. If any error occurs the indicator lights green (returns to the original state). Check the message appearing on the mobile phone display if an error occurs. • If the data transmission fails, move the mobile phone closer to the front of the printer's infrared data receiver and repeat the procedure. 5 Printing starts after the data transmission is complete. 33
-
 1
1 -
2
-
3
-
4
-
5
-
6
-
7
-
8
-
9
-
10
-
11
-
12
-
13
-
14
-
15
-
16
-
17
-
18
-
19
-
20
-
21
-
22
-
23
-
24
-
25
-
26
-
27
-
28
-
29
-
 30
30 -
 31
31 -
 32
32 -
 33
33 -
 34
34 -
 35
35 -
 36
36 -
 37
37 -
 38
38 -
 39
39 -
 40
40 -
41
-
42
-
43
-
44
-
45
-
46
-
47
-
48
-
49
-
50
-
51
-
52
-
53
-
54
-
55
-
56
-
57
-
58
-
59
-
60
-
61
-
62
-
63
-
64
-
65
-
66
-
67
-
68
 |
 |
