Canon PIXMA iP1700 Quick Start Guide
Canon PIXMA iP1700 Manual
 |
View all Canon PIXMA iP1700 manuals
Add to My Manuals
Save this manual to your list of manuals |
Canon PIXMA iP1700 manual content summary:
- Canon PIXMA iP1700 | Quick Start Guide - Page 1
Photo Printer Series Quick Start Guide - Canon PIXMA iP1700 | Quick Start Guide - Page 2
self-help in an intuitively guided interactive troubleshooting environment, the place to start is our helpful tech support web site. In addition, the latest driver downloads, answers to frequently asked questions, product information, and "where to buy" instructions are found here. 2. Email Tech - Canon PIXMA iP1700 | Quick Start Guide - Page 3
Photo Printer Quick Start Guide - Canon PIXMA iP1700 | Quick Start Guide - Page 4
part, without the prior written consent of Canon U.S.A., Inc. © 2006 Canon U.S.A., Inc. Disclaimer Canon U.S.A., Inc. has reviewed this manual thoroughly in order that it will be an easy-to-use guide to your Canon PIXMA iP1700 Photo Printer. All statements, technical information and recommendations - Canon PIXMA iP1700 | Quick Start Guide - Page 5
34 Replacing a FINE Cartridge 39 Troubleshooting Cannot Install the Printer Driver 48 The USB Connection Does Not Work Properly 49 Print Quality is Poor or Contains Errors 50 Printer Does Not Start or Stops During Print Jobs 53 Paper Does Not Feed Properly 54 Paper Jams 55 The ALARM Lamp - Canon PIXMA iP1700 | Quick Start Guide - Page 6
click the feature you want to know more about. Also, click the Instructions button to display the Printer Driver Guide. Detailed information is provided. The Instructions button is not displayed unless the On-screen Manual is installed. While in the Page Setup dialog box or Print dialog box, click - Canon PIXMA iP1700 | Quick Start Guide - Page 7
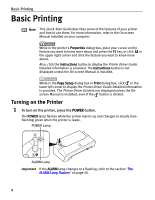
turned off. Basic Printing Important About the Power Plug When removing the power plug after you have turned off the printer, be sure to check that the POWER lamp is not lit. If the power plug is removed from the wall outlet when the POWER lamp - Canon PIXMA iP1700 | Quick Start Guide - Page 8
unsatisfactory results, but they may also cause the printer to jam or malfunction. • Folded, curled or wrinkled paper • Damp paper • Paper that is too thin (less than 64 gsm/17 lb) • Paper that is too thick (more than 105 gsm/28 lb)* • Paper with holes (For example: loose leaf) • Picture postcards - Canon PIXMA iP1700 | Quick Start Guide - Page 9
specialty media Canon provides for use with its various printers, refer to the section "Using Specialty Media" on page 9. • Consult "Printing Media" in the User's Guide for detailed instructions on how to load specialty media into the printer. 1 Flatten the four corners of the paper before loading - Canon PIXMA iP1700 | Quick Start Guide - Page 10
Sheet Feeder. (3) Slide the Paper Guide against the left side of the stacked papers. Note • Remove the printed papers as necessary from the Paper Output Slot. • Do not touch the printed surfaces until the ink dries. For specific drying times, refer to the instructions packaged with your media. 6 - Canon PIXMA iP1700 | Quick Start Guide - Page 11
either DL Env. (Windows) / DL Envelope (Macintosh) or Comm. Env. #10 (Windows) / #10 Envelope (Macintosh) in the printer driver according to the the left side. A maximum of 10 envelopes can be loaded at one time. Printing direction (2) Slide the Paper Guide against the left side of the envelope - Canon PIXMA iP1700 | Quick Start Guide - Page 12
. A maximum of 20 sheets of size in 4" x 6" paper can be loaded at one time. (2) Slide the Paper Guide against the left side of the papers. (3) Select 4 x 6 in 101.6 x 152.4 mm in Page Size. For the printer driver setting, refer to "Printing with Windows" on page 11, or "Printing with Macintosh" on - Canon PIXMA iP1700 | Quick Start Guide - Page 13
you use genuine Canon media to ensure optimal print quality. „ Photo Quality Media „ Media for Business Documents • Glossy Photo Paper • High Resolution Paper • Matte Photo Paper • Photo Paper Plus Double Sided • Photo Paper Plus Glossy • Photo Paper Plus Semi-Gloss • Photo Paper Pro 9 - Canon PIXMA iP1700 | Quick Start Guide - Page 14
CD-ROM. For instructions on how to print from the software applications, refer to the Photo Application Guide. Note • When using plain paper (64 gsm/17 lb), up to 100 sheets can be loaded at one time. Set the Paper Thickness Lever to the left and select Plain Paper under printer driver Media Type - Canon PIXMA iP1700 | Quick Start Guide - Page 15
® XP Service Pack 2 installed (hereafter called Windows XP SP2). 1 Turn your printer on, then set papers. 2 Create a document or open a file to print. 3 Open the Printer Properties dialog box. (1) Select Print from the application's File menu. The Print dialog box opens. (2) Ensure that Canon iP1700 - Canon PIXMA iP1700 | Quick Start Guide - Page 16
in the Custom dialog box. • For details about other printer driver functions, click the Help button or Instructions button and refer to Help or Printer Driver Guide. The Instructions button is not displayed unless the On-screen Manual is installed. • Click the check box to select Preview before - Canon PIXMA iP1700 | Quick Start Guide - Page 17
Mac® OS X v.10.4.x installed (hereafter called Macintosh®). • You can use Easy-PhotoPrint to easily do print operations when printing photographs. Easy-PhotoPrint is provided on the Setup CD-ROM. For details on how to use Easy-PhotoPrint, refer to the Photo Application Guide. 1 Turn your printer - Canon PIXMA iP1700 | Quick Start Guide - Page 18
Print dialog box opens. (2) Ensure that iP1700 is selected. (3) Select Quality & Media Printing a top-quality photo: Select when printing printer driver functions, click the button to see Printer Driver Guide. The Printer Driver Guide is not displayed unless the On-screen Manual is installed - Canon PIXMA iP1700 | Quick Start Guide - Page 19
IJ Status Monitor, click Canon iP1700 on the taskbar. The Canon IJ Status Monitor opens automatically whenever a printer error occurs. 1 Click the printer's icon in the Dock and display the list of print jobs in progress. If you are using Mac OS X v.10.2.8, click on the printer icon in the Dock to - Canon PIXMA iP1700 | Quick Start Guide - Page 20
common to all application programs. 1 Click Start and select Control Panel, Printers and Other Hardware, and then Printers and Faxes. For non-Windows XP users, click Start, select Settings, and then Printers. 2 Select the Canon iP1700 icon. 3 Open the File menu and select Printing Preferences (or - Canon PIXMA iP1700 | Quick Start Guide - Page 21
These tabs do not appear, when opening the Printer Properties dialog box from Printing Preferences or applications. For details about the tabs related to the Windows function, refer to the manual of Windows. Note For details on how to set each function, refer to the Printer Driver Guide or Help. 17 - Canon PIXMA iP1700 | Quick Start Guide - Page 22
install applications, refer to Easy Setup Instructions. • For details about photo applications, refer to the Photo Application Guide. „ Easy-PhotoPrint (Windows or night scene mode, etc. Canon PIXMA Printers support Exif Print and use a suitable photo application to read the camera data precisely - Canon PIXMA iP1700 | Quick Start Guide - Page 23
after performing Print Head Cleaning twice Step 3 "Print Head Deep Cleaning" on page 29 If the problem still remains after performing Print Head Deep Cleaning twice Step 4 "Replacing a FINE Cartridge" on page 39 Note If ruled lines appear misaligned when printed, adjust the Print Head position - Canon PIXMA iP1700 | Quick Start Guide - Page 24
check pattern to determine whether the ink ejects properly from the Print Head Nozzles. Use this function when printed results are blurred or a color is incorrect. „ Printing the Nozzle Check Pattern 1 With the printer on, load a sheet of Letter size plain paper in the Auto Sheet Feeder. 2 Open - Canon PIXMA iP1700 | Quick Start Guide - Page 25
of Letter size plain paper in the Auto Sheet Feeder. 2 Open the Canon IJ Printer Utility dialog box. (1) Select Applications from the Go menu. (2) Double-click the Utilities folder, and then double-click the Printer Setup Utility icon. If you are using Mac OS X v.10.2.8, double-click the Utilities - Canon PIXMA iP1700 | Quick Start Guide - Page 26
Printing Maintenance 3 Print the Nozzle Check Pattern. (1) Select Test Print from the pop-up menu. (2) Click Nozzle Check. (3) Click Print Check Pattern. Note Click the Initial Check Items button and a confirmation message for printing the nozzle check pattern will appear. (4) Confirm the nozzle - Canon PIXMA iP1700 | Quick Start Guide - Page 27
. Examine the nozzle check pattern printed by the printer. Note If the ink level is low, the nozzle check pattern cannot be printed properly. Stop printing the nozzle check pattern, and replace a FINE Cartridge. See "Replacing a FINE Cartridge" on page 39. 1 Confirm the printed nozzle check - Canon PIXMA iP1700 | Quick Start Guide - Page 28
Head Cleaning. See "Print Head Cleaning" on page 25. If there are neither missing lines nor white stripes in the nozzle check pattern, click Exit (Windows) or Quit (Macintosh) to finish the nozzle check. 24 - Canon PIXMA iP1700 | Quick Start Guide - Page 29
unclog the Print Head Nozzles. Cleaning the Print Head Nozzles will consume ink, so proceed with a Print Head Cleaning only when necessary. Note If 3-(2). 1 Ensure that the printer is turned on. 2 Open the Printer Properties dialog box. See "Opening the Printer Properties Dialog Box Directly from - Canon PIXMA iP1700 | Quick Start Guide - Page 30
the Nozzle Check Pattern" on page 23. (3) If the problem persists even after you have performed the normal Print Head Cleaning iP1700 from the Name list and then click Utility. If you are using Mac OS X v.10.2.8, select iP1700 from Name in Printer List and then click Configure. (4) Select iP1700 - Canon PIXMA iP1700 | Quick Start Guide - Page 31
3 Start Print Head Cleaning. Printing Maintenance (1) Select Cleaning from the pop-up menu. (2) Click Cleaning. (3) Click OK. Note Click the Initial Check Items button and a confirmation message for Print Head Cleaning will appear. Print Head Cleaning starts when the POWER lamp starts flashing. - Canon PIXMA iP1700 | Quick Start Guide - Page 32
of the nozzle check pattern to evaluate the condition of the Print Head. See "Examining the Nozzle Check Pattern" on page 23. (3) If the problem persists even after you have performed the normal Print Head Cleaning procedure twice, execute Print Head Deep Cleaning. See "Print Head Deep Cleaning" on - Canon PIXMA iP1700 | Quick Start Guide - Page 33
process. Print Head Deep Cleaning consumes more ink than standard Print Head Cleaning, so perform this procedure only when necessary. 1 Ensure that the printer is turned on. 2 Open the Printer Properties dialog box. See "Opening the Printer Properties Dialog Box Directly from the Start Menu - Canon PIXMA iP1700 | Quick Start Guide - Page 34
Printing Maintenance 3 Start Print Head Deep Cleaning. (1) Click the Maintenance tab. (2) Click Deep Cleaning. (3) Click Execute. Note Click the Initial Check Items button and a confirmation message for Print Head Deep Cleaning will appear. (4) When the confirmation message is displayed, click OK - Canon PIXMA iP1700 | Quick Start Guide - Page 35
a FINE Cartridge" on page 39. 1 Ensure that the printer is turned on. 2 Open the Canon IJ Printer Utility dialog box. (1) Select Applications from the Go menu. (2) Double-click the Utilities folder, and then double-click the Printer Setup Utility icon. If you are using Mac OS X v.10.2.8, double - Canon PIXMA iP1700 | Quick Start Guide - Page 36
Printing Maintenance 3 Start Print Head Deep Cleaning. (1) Select Cleaning from the pop-up menu. (2) Click Deep Cleaning. (3) Click OK. Note Click the Initial Check Items button and a confirmation message for Print Head Deep Cleaning will appear. Print Head Deep Cleaning starts when the POWER - Canon PIXMA iP1700 | Quick Start Guide - Page 37
. (1) Print a nozzle check pattern to evaluate a Print Head condition. See "Printing the Nozzle Check Pattern" on page 20. (2) If the problem persists, perform step 3 again. (3) If the problem still persists, the printer may have run out of ink. See "Replacing a FINE Cartridge" on page 39. 33 - Canon PIXMA iP1700 | Quick Start Guide - Page 38
Print Head Alignment is required. ì 1 With the printer on, load a sheet of Letter size plain paper in the Auto Sheet Feeder. Move the Paper Thickness Lever to the left position. 2 Open the Printer Properties dialog box. See "Opening the Printer Properties Dialog Box Directly from the Start Menu" on - Canon PIXMA iP1700 | Quick Start Guide - Page 39
Printing Maintenance 4 Align the Print Head. (1) Look at the printout. From the patterns, select the most even and least irregular patterns. * (2) Enter the numbers. (3) Click OK. * If it is difficult to determine the best pattern on Column E, then pick a setting that has the least noticeable white - Canon PIXMA iP1700 | Quick Start Guide - Page 40
Feeder. Move the Paper Thickness Lever to the left position. 2 Open the Canon IJ Printer Utility dialog box. (1) Select Applications from the Go menu. (2) Double-click the Utilities folder, and then double-click the Printer Setup Utility icon. If you are using Mac OS X v.10.2.8, double-click the - Canon PIXMA iP1700 | Quick Start Guide - Page 41
3 Print the pattern. Printing Maintenance (1) Select Test Print from the pop-up menu. (2) Click Print Head Alignment. (3) Click OK. The Pattern will be printed. 37 - Canon PIXMA iP1700 | Quick Start Guide - Page 42
Printing Maintenance 4 Align the Print Head. (1) Look at the print out. From the patterns, select the most even and least irregular patterns. * (2) Enter the numbers. (3) Click Send. * If it is difficult to determine the best pattern on Column E, then pick a setting that has the least noticeable - Canon PIXMA iP1700 | Quick Start Guide - Page 43
will not print properly if a wrong FINE Cartridge is used, or installed improperly. Black: PG-40 Color: CL-41 „ Replacing a FINE Cartridge When a FINE Cartridge runs out of ink, replace it using the following steps. 1 Ensure that the printer is turned on, and then open the Front Cover. The - Canon PIXMA iP1700 | Quick Start Guide - Page 44
Printing Maintenance 2 Remove the empty FINE Cartridge. (1) Push down the FINE Cartridge. (2) Remove the FINE Cartridge. Important • Handle FINE Cartridges carefully to avoid staining your clothes or surrounding area. • Discard empty FINE Cartridges according to local laws and disposal regulations. - Canon PIXMA iP1700 | Quick Start Guide - Page 45
or Print Head Nozzles on a FINE Cartridge. The printer may not print out properly if you touch it. Electrical Contacts Print Head Nozzles 4 Insert the new FINE Cartridge. The Black FINE Cartridge should be installed into the left slot (B) and the Color FINE Cartridge should be into the right slot - Canon PIXMA iP1700 | Quick Start Guide - Page 46
head cleaning which are necessary to maintain the printer's capabilities. • When a FINE Cartridge runs out of ink, you can continue printing with either Black or Color ink only by Ink Cartridge Settings. In this case, print with leaving the empty FINE Cartridge installed. If either of the Color FINE - Canon PIXMA iP1700 | Quick Start Guide - Page 47
page 16. Open the Canon IJ Printer Utility dialog box, and then select Ink Level Information from the pop-up menu. 1. Select Applications from the Go menu. 2. Double-click the Utilities folder, and then double-click the Printer Setup Utility icon. If you are using Mac OS X v.10.2.8, double-click the - Canon PIXMA iP1700 | Quick Start Guide - Page 48
perform the following settings without removing the empty cartridge. If the FINE Cartridge is removed, an error occurs. You cannot print regardless of the Ink Cartridge Settings. 1. Open the Printer Properties dialog box. See "Opening the Printer Properties Dialog Box Directly from the Start Menu - Canon PIXMA iP1700 | Quick Start Guide - Page 49
Center icon. 3. Select iP1700 from Name in Printer List and then click Utility. If you are using Mac OS X v.10.2.8, select iP1700 from Name in Printer List and then click Configure. 4. Select iP1700 from the Product list and then click Maintenance. 5. Choose Ink Cartridge Settings from the pull - Canon PIXMA iP1700 | Quick Start Guide - Page 50
button cancels the error indication and enables continuation of printing. However, error detection function is disabled after the error indication is canceled, therefore, Low Ink Warning message does not appear later on. When you install new FINE Cartridge, Low Ink Warning is enabled automatically - Canon PIXMA iP1700 | Quick Start Guide - Page 51
on page 55 • "The ALARM Lamp Flashes" on page 56 • "An Error Message Appears on the Screen" on page 58 When an Error Occurs When an error occurs in printing pertaining to such problems as low ink or paper jams, a troubleshooting message is displayed automatically. The message may vary depending on - Canon PIXMA iP1700 | Quick Start Guide - Page 52
Troubleshooting Cannot Install the Printer Driver Problem Possible Cause Cannot Install the Installation Printer Driver procedure not followed correctly Try This Follow the Easy Setup Instructions for proper printer driver installation. If the printer driver was not installed correctly, - Canon PIXMA iP1700 | Quick Start Guide - Page 53
Troubleshooting The USB Connection Does Not Work Properly Problem The Printer is not Recognized Properly Possible Cause You connect to the computer through a USB hub A USB expansion card may not be installed correctly The USB driver may not be installed correctly Try This Connect the printer - Canon PIXMA iP1700 | Quick Start Guide - Page 54
Appear/ Printed Ruled Lines are Misaligned FINE Cartridge is not installed properly/ there is no ink left Try This First, check the Page Size setting in the application. Then, check the Page Size setting in the Page Setup tab of the printer driver for Windows or the Page Setup dialog box of the - Canon PIXMA iP1700 | Quick Start Guide - Page 55
Guide for detailed instructions on how to load and use your media. Align the Print Head. See "Aligning the Print Head" on page 34. Set the Paper Thickness Lever in suitable position for your media. See "Canon Specialty Media" on page 10. Be sure to set the Print Quality setting to High for Windows - Canon PIXMA iP1700 | Quick Start Guide - Page 56
fed into the printer one sheet at a time. *1 *2 Paper Thickness Lever position is not proper Set the Paper Thickness Lever in suitable position for your media. See "Canon Specialty Media" on page 10. If the paper is scratched even when printing on plain paper (left), set the Paper Thickness Lever - Canon PIXMA iP1700 | Quick Start Guide - Page 57
the problem. are spooled/ Delete any undesired print jobs. Use Canon IJ Status Monitor in Windows or click Troubles in your the printer's icon using Mac OS X v.10.2.8, click on the printer icon in the Dock to start up the Print Center and double-click on the name of your printer in the Printer - Canon PIXMA iP1700 | Quick Start Guide - Page 58
tab, then click Roller Cleaning. The confirmation message is displayed. Follow the on-screen instructions. 1. Ensure that the printer is turned on, and remove papers loaded in the printer. 2. Open the Canon IJ Printer Utility to ensure that Cleaning is displayed in the pull- down menu. 3. Click - Canon PIXMA iP1700 | Quick Start Guide - Page 59
remove the paper or if the paper tears inside the printer or the paper jam error (See "The ALARM Lamp Flashes" on page 56) continues after removing the paper, contact the Customer Care Center. Check to see if the paper is loaded correctly, and set the Paper Guide for the loaded paper correctly. See - Canon PIXMA iP1700 | Quick Start Guide - Page 60
Possible Cause Out of paper or paper feed error Paper jam The ink may have run out The FINE Cartridge cannot be recognized The FINE Cartridge is not installed in the appropriate position Ink absorber is almost full The FINE Cartridge cannot be recognized The FINE Cartridge cannot be recognized Try - Canon PIXMA iP1700 | Quick Start Guide - Page 61
recommends to use new genuine Canon cartridges in order to obtain optimum quality. Note The POWER Lamp (green) and ALARM Lamp (orange) Flashes Alternately: Disconnect the printer cable from the printer, and then turn the printer off and then unplug the printer from the power supply for a while - Canon PIXMA iP1700 | Quick Start Guide - Page 62
the check box is selected in the screen that is displayed. When using Mac OS X v.10.2.8, ensure that Canon iP1700 is displayed in the Printer List. If Canon iP1700 is not displayed in Printer, follow the procedures described in the Easy Setup Instructions and reinstall the printer driver. 58 - Canon PIXMA iP1700 | Quick Start Guide - Page 63
Troubleshooting Problem "Error No.:1700" Possible Cause The ink absorber is almost full Try This Ink used for cleaning is absorbed in a ink absorber inside the machine. Press the RESUME/CANCEL button to dismiss the error message and continue printing. You can continue printing for a while, but - Canon PIXMA iP1700 | Quick Start Guide - Page 64
Printer Maximum resolution (dpi): Print speed * *Print speed will vary depending on system configuration, software Paper Support retracted): Weight: Canon FINE Cartridges: 4800 (horizontal)* x 1200 (vertical) (*Ink mode on Photo Paper Pro) Temperature: 5 to 35°C (41 to 95°F) Humidity: 10 to 90%RH - Canon PIXMA iP1700 | Quick Start Guide - Page 65
Operation can only be guaranteed on a PC with built-in USB or USB 2.0 Hi-Speed port and pre-installed Windows XP, 2000, Me, 98 or Mac OS X v.10.2.8-v.10.4. *3 Including compatible processors. • CD-ROM drive • Display: 800 x 600 Color (16bit) • Display: 800 x 600 Thousands Colors • Macintosh File - Canon PIXMA iP1700 | Quick Start Guide - Page 66
injure yourself or damage the printer. Do not attempt to disassemble or modify the printer. There are no user serviceable parts inside the printer. The printer contains high-voltage components. Never attempt any maintenance procedure which is not described in this guide. Do not use flammable sprays - Canon PIXMA iP1700 | Quick Start Guide - Page 67
(metal or liquid) fall into the printer, unplug the power cord and call for service. When installing or transporting this printer, do not incline it, lay it down on its side, or turn it upside down. Ink can leak. For safety reasons, store FINE Cartridges (Ink Cartridges) out of the reach of small - Canon PIXMA iP1700 | Quick Start Guide - Page 68
Printer installation. This equipment generates, uses and can radiate radio frequency energy and, if not installed and used in accordance with the instructions manual. If such changes or modifications should be made, you could be required to stop operation of the equipment. Canon U.S.A., Inc. One Canon - Canon PIXMA iP1700 | Quick Start Guide - Page 69
, or any consumables, such as paper or ink cartridges, as to which there shall be no warranty or replacement. This limited warranty shall only apply if the Product is used in conjunction with compatible computers, peripheral equipment and software. Canon USA shall have no responsibility for - Canon PIXMA iP1700 | Quick Start Guide - Page 70
Appendix Canon USA offers a range of customer technical support* options: • Interactive troubleshooting, e-mail technical support, the latest driver downloads and answers to frequently asked questions (www.canontechsupport.com) • Toll-free live technical support Monday-Saturday (excluding holidays) - Canon PIXMA iP1700 | Quick Start Guide - Page 71
21 CANON U.S.A., INC. LIMITED WARRANTY --- (USA Only) ..65 CL-41 39 Cleaning 25, 29 D Deep Cleaning 29, 31 Driver settings 12, 14 uninstalling 58 E Easy-PhotoPrint 18 Easy-WebPrint 18 Examining the Nozzle Check Pattern 23 Exif Print 18 F FINE Cartridge 39 G Glossy Photo Paper 10 H High - Canon PIXMA iP1700 | Quick Start Guide - Page 72
a FINE Cartridge 39 RESUME/CANCEL button 13 S Safety Precautions 62 Specialty Media 10 Specifications 60 Status Monitor 53 Super White Paper 10 T Troubleshooting 47 T-Shirt Transfers 10 Turning off the Printer 3 Turning on the Printer 2 U Uninstalling the printer driver 58 Using - Canon PIXMA iP1700 | Quick Start Guide - Page 73
69 - Canon PIXMA iP1700 | Quick Start Guide - Page 74
70 - Canon PIXMA iP1700 | Quick Start Guide - Page 75
numbers. Description FINE Cartridges PG-40 CL-41 Order # 0615B002 0617B002 Canon Specialty Papers Photo Paper Plus Glossy (4" x 6"/20 sheets) Photo Paper Plus Glossy (4" x 6"/50 sheets) Photo Paper Plus Glossy (4" x 6"/120 sheets) Photo Paper Plus Glossy (5" x 7"/20 sheets) Photo Paper Plus Glossy - Canon PIXMA iP1700 | Quick Start Guide - Page 76
400, Miami, FL 33126, U.S.A. Canon Mexicana Boulevard Manuel Avila Camacho No. 138 PB y Pisos 15, 16 y 17, Colonia Lomas de Chapultepec Delegación Miguel Hidalgo, CP 11000, Mexico D.F. The following FINE Cartridges are compatible with iP1700. QT5-0297-V01 XXXXXXXX ©CANON INC.2006 PRINTED IN
-
 1
1 -
 2
2 -
 3
3 -
 4
4 -
 5
5 -
 6
6 -
 7
7 -
8
-
9
-
10
-
11
-
12
-
13
-
14
-
15
-
16
-
17
-
18
-
19
-
20
-
21
-
22
-
23
-
24
-
25
-
26
-
27
-
28
-
29
-
30
-
31
-
32
-
33
-
34
-
35
-
36
-
37
-
38
-
39
-
40
-
41
-
42
-
43
-
44
-
45
-
46
-
47
-
48
-
49
-
50
-
51
-
52
-
53
-
54
-
55
-
56
-
57
-
58
-
59
-
60
-
61
-
62
-
63
-
64
-
65
-
66
-
67
-
68
-
69
-
70
-
71
-
72
-
73
-
74
-
75
-
76
 |
 |

Photo Printer
Series
Quick Start Guide