Canon PowerShot A2600 User Guide - Page 94
Cropping Images Before Printing Cropping
 |
View all Canon PowerShot A2600 manuals
Add to My Manuals
Save this manual to your list of manuals |
Page 94 highlights
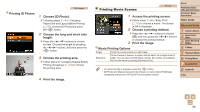
Configuring Print Settings Still Images Cropping Paper Settings 1 Access the printing screen. Follow steps 1 - 6 in "Easy Print" (=93) to access the screen at left. 2 Configure the settings. Press the buttons to choose an item, and then press the buttons to choose an option. Default Date File No. Both Off Default Off On Red-Eye 1 Matches current printer settings. Prints images with the date added. Prints images with the file number added. Prints images with both the date and file number added. - Matches current printer settings. - Uses information from the time of shooting to print under optimal settings. Corrects red-eye. No. of Copies Choose the number of copies to print. - Specify a desired image area to print (=94). - Specify the paper size, layout, and other details (=95). Still Images Cropping Images Before Printing (Cropping) By cropping images before printing, you can print a desired image area instead of the entire image. Cover Preliminary Notes and Legal Information Contents: Basic Operations Basic Guide 1 Choose [Cropping]. After following step 1 in "Configuring Print Settings" (=94) to access the printing screen, choose [Cropping] and press the button. A cropping frame is now displayed, indicating the image area to print. 2 Adjust the cropping frame as needed. To resize the frame, move the zoom lever. To move the frame, press the buttons. To rotate the frame, press the button. Press the button, press the buttons to choose [OK], and then press the button. 3 Print the image. Follow step 7 in "Easy Print" (=93) to print. Advanced Guide 1 Camera Basics 2 Smart Auto Mode 3 Other Shooting Modes 4 P Mode 5 Playback Mode 6 Setting Menu 7 Accessories 8 Appendix Index 94
-
 1
1 -
2
-
3
-
4
-
5
-
6
-
7
-
8
-
9
-
10
-
11
-
12
-
13
-
14
-
15
-
16
-
17
-
18
-
19
-
20
-
21
-
22
-
23
-
24
-
25
-
26
-
27
-
28
-
29
-
30
-
31
-
32
-
33
-
34
-
35
-
36
-
37
-
38
-
39
-
40
-
41
-
42
-
43
-
44
-
45
-
46
-
47
-
48
-
49
-
50
-
51
-
52
-
53
-
54
-
55
-
56
-
57
-
58
-
59
-
60
-
61
-
62
-
63
-
64
-
65
-
66
-
67
-
68
-
69
-
70
-
71
-
72
-
73
-
74
-
75
-
76
-
77
-
78
-
79
-
80
-
81
-
82
-
83
-
84
-
85
-
86
-
87
-
88
-
 89
89 -
 90
90 -
 91
91 -
 92
92 -
 93
93 -
 94
94 -
 95
95 -
 96
96 -
 97
97 -
 98
98 -
 99
99 -
100
-
101
-
102
-
103
-
104
-
105
-
106
-
107
-
108
-
109
-
110
-
111
-
112
-
113
-
114
-
115
-
116
-
117
-
118
-
119
-
120
-
121
-
122
-
123
 |
 |
