Canon PowerShot A2600 User Guide - Page 98
Clearing All Images from the Print List
 |
View all Canon PowerShot A2600 manuals
Add to My Manuals
Save this manual to your list of manuals |
Page 98 highlights
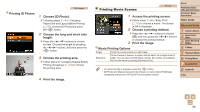
Still Images Setting Up Printing for Individual Images 1 Choose [Select Images & Qty.]. Press the button, choose [Select Images & Qty.] on the [2] tab, and then press the button. 2 Choose an image. Press the buttons to choose an image, and then press the button. You can now specify the number of copies. If you specify index printing for the image, it is labeled with a [ ] icon. To cancel index printing for the image, press the button again. [ ] is no longer displayed. 3 Specify the number of prints. Press the buttons to specify the number of prints (up to 99). To set up printing for other images and specify the number of prints, repeat steps 2 - 3. Printing quantity cannot be specified for index prints. You can only choose which images to print, by following step 2. When finished, press the button to return to the menu screen. Still Images Setting Up Printing for All Images Following step 1 in "Setting Up Printing for Individual Images" (=98), choose [Select All Images] and press the button. Press the buttons to choose [OK], and then press the button. Still Images Clearing All Images from the Print List Following step 1 in "Setting Up Printing for Individual Images" (=98), choose [Clear All Selections] and press the button. Press the buttons to choose [OK], and then press the button. Cover Preliminary Notes and Legal Information Contents: Basic Operations Basic Guide Advanced Guide 1 Camera Basics 2 Smart Auto Mode 3 Other Shooting Modes 4 P Mode 5 Playback Mode 6 Setting Menu 7 Accessories 8 Appendix Index 98
-
 1
1 -
2
-
3
-
4
-
5
-
6
-
7
-
8
-
9
-
10
-
11
-
12
-
13
-
14
-
15
-
16
-
17
-
18
-
19
-
20
-
21
-
22
-
23
-
24
-
25
-
26
-
27
-
28
-
29
-
30
-
31
-
32
-
33
-
34
-
35
-
36
-
37
-
38
-
39
-
40
-
41
-
42
-
43
-
44
-
45
-
46
-
47
-
48
-
49
-
50
-
51
-
52
-
53
-
54
-
55
-
56
-
57
-
58
-
59
-
60
-
61
-
62
-
63
-
64
-
65
-
66
-
67
-
68
-
69
-
70
-
71
-
72
-
73
-
74
-
75
-
76
-
77
-
78
-
79
-
80
-
81
-
82
-
83
-
84
-
85
-
86
-
87
-
88
-
89
-
90
-
91
-
92
-
 93
93 -
 94
94 -
 95
95 -
 96
96 -
 97
97 -
 98
98 -
 99
99 -
 100
100 -
 101
101 -
 102
102 -
 103
103 -
104
-
105
-
106
-
107
-
108
-
109
-
110
-
111
-
112
-
113
-
114
-
115
-
116
-
117
-
118
-
119
-
120
-
121
-
122
-
123
 |
 |
