Canon PowerShot ELPH 350 HS User Guide - Page 105
Uploading Images to Web Services
 |
View all Canon PowerShot ELPH 350 HS manuals
Add to My Manuals
Save this manual to your list of manuals |
Page 105 highlights
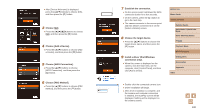
Registering Other Web Services You can also add Web services besides CANON iMAGE GATEWAY to the camera. Note that CANON iMAGE GATEWAY must be registered on the camera first (=103). 1 Access the Web service settings screen. ●●Follow step 1 in "Registering CANON iMAGE GATEWAY" (= 103) to log in to CANON iMAGE GATEWAY, and then access the Web service settings screen. 2 Configure the Web service you want to use. ●●Follow the instructions displayed on the smartphone or computer to set up the Web service. 3 Choose [ ]. ●●In Playback mode, press the [ ] button to access the Wi-Fi menu. ●●Press the buttons to choose [ ], and then press the [ ] button. ●●The Web service settings are now updated. ●● If any configured settings change, follow these steps again to update the camera settings. Uploading Images to Web Services 1 Access the Wi-Fi menu. ●●Press the [ ] button to turn the camera on. ●●Press the [ ] button. 2 Choose the destination. ●●Press the buttons to choose the icon of the Web service to connect to, and then press the [ ] button. ●●If multiple recipients or sharing options are used with a Web service, choose the desired item on the [Select Recipient] screen by pressing the [ ][ ] buttons, and then press the [ ] button. 3 Send an image. ●●Press the buttons to choose [Select and send], and then press the [ ] button. ●●Press the [ ][ ] buttons to choose [Select], and then press the [ ] button. ●●Press the buttons to choose an image to send, press the [ ] button to mark it as selected ([ ]), and then press the [ ] button. ●●Press the [ ][ ] buttons to choose [OK], and then press the [ ] button. ●●Press the buttons to choose [Send], and then press the [ ] button. Before Use Basic Guide Advanced Guide Camera Basics Auto Mode / Hybrid Auto Mode Other Shooting Modes P Mode Playback Mode Wi-Fi Functions Setting Menu Accessories Appendix Index 105
-
 1
1 -
2
-
3
-
4
-
5
-
6
-
7
-
8
-
9
-
10
-
11
-
12
-
13
-
14
-
15
-
16
-
17
-
18
-
19
-
20
-
21
-
22
-
23
-
24
-
25
-
26
-
27
-
28
-
29
-
30
-
31
-
32
-
33
-
34
-
35
-
36
-
37
-
38
-
39
-
40
-
41
-
42
-
43
-
44
-
45
-
46
-
47
-
48
-
49
-
50
-
51
-
52
-
53
-
54
-
55
-
56
-
57
-
58
-
59
-
60
-
61
-
62
-
63
-
64
-
65
-
66
-
67
-
68
-
69
-
70
-
71
-
72
-
73
-
74
-
75
-
76
-
77
-
78
-
79
-
80
-
81
-
82
-
83
-
84
-
85
-
86
-
87
-
88
-
89
-
90
-
91
-
92
-
93
-
94
-
95
-
96
-
97
-
98
-
99
-
 100
100 -
 101
101 -
 102
102 -
 103
103 -
 104
104 -
 105
105 -
 106
106 -
 107
107 -
 108
108 -
 109
109 -
 110
110 -
111
-
112
-
113
-
114
-
115
-
116
-
117
-
118
-
119
-
120
-
121
-
122
-
123
-
124
-
125
-
126
-
127
-
128
-
129
-
130
-
131
-
132
-
133
-
134
-
135
-
136
-
137
-
138
-
139
-
140
-
141
-
142
-
143
-
144
-
145
-
146
-
147
-
148
-
149
-
150
-
151
-
152
-
153
-
154
-
155
-
156
-
157
-
158
-
159
-
160
-
161
-
162
 |
 |
