Canon SELPHY CP710 SELPHY CP710/CP510 User Guide - Page 34
Disconnect the camera, Printing on the separately sold wide size 100 x 200 mm, x 8 in. paper
 |
View all Canon SELPHY CP710 manuals
Add to My Manuals
Save this manual to your list of manuals |
Page 34 highlights
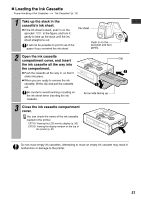
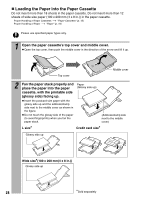
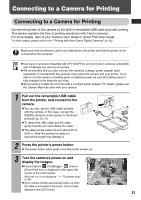
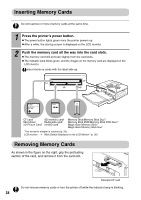
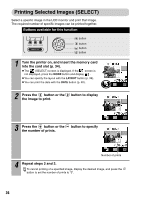
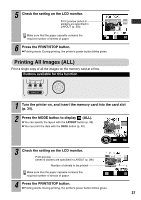
4 Display the images to be printed and press the SET or SELECT button. z If your camera has a (Print/Share) or (Direct print) button, printing starts immediately after you press the or button (Step 5 is not necessary). 5 Select [Print] and press the SET or SELECT button. z Printing starts. During printing, the printer's power button blinks green. z The camera returns to the playback screen once printing is successfully completed. If printing does not start, check the camera's LCD monitor for any messages (p. 61). The screen shot differs depending on the model of your camera. „ Disconnect the camera Before you disconnect the camera from the printer, turn off the printer by holding down the power button until the green indicator goes out. „ Printing on the separately sold wide size (100 x 200 mm (4 x 8 in.)) paper The printing area may vary depending on the camera use. If appears in step 3 on page 31 Printed on the whole card. If appears in step 3 on page 31 Printed on the 100 x 150 mm (4 x 6 in.) portion of the card. The upper and lower portions of an image are trimmed. Nothing is printed on this portion so you can write your message with an oil-based pen. If appears in step 3 on page 31, select [Default] on the paper size setting screen. 32
-
 1
1 -
2
-
3
-
4
-
5
-
6
-
7
-
8
-
9
-
10
-
11
-
12
-
13
-
14
-
15
-
16
-
17
-
18
-
19
-
20
-
21
-
22
-
23
-
24
-
25
-
26
-
27
-
28
-
 29
29 -
 30
30 -
 31
31 -
 32
32 -
 33
33 -
 34
34 -
 35
35 -
 36
36 -
 37
37 -
 38
38 -
 39
39 -
40
-
41
-
42
-
43
-
44
-
45
-
46
-
47
-
48
-
49
-
50
-
51
-
52
-
53
-
54
-
55
-
56
-
57
-
58
-
59
-
60
-
61
-
62
-
63
-
64
-
65
-
66
-
67
-
68
-
69
 |
 |
