Canon SELPHY CP900 User Guide - Page 19
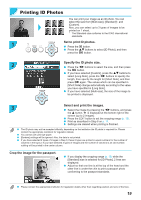
Printing ID Photos, Set to print ID photos., Specify the ID photo size., Select and print the images. - paper size
 |
View all Canon SELPHY CP900 manuals
Add to My Manuals
Save this manual to your list of manuals |
Page 19 highlights
Printing ID Photos You can print your image as an ID photo. You can select the size from [Multi-size], [Standard]*, and [Custom]. Also, you can select up to 2 types of images to be printed on 1 sheet. * The Standard size conforms to the ICAO international standards. 1 Set to print ID photos. OO Press the k button. OO Press the ud buttons to select [ID Photo], and then press the o button. 2 Specify the ID photo size. OO Press the lr buttons to select the size, and then press the o button. OO If you have selected [Custom], press the ud buttons to select [Long Side], press the lr buttons to specify the length, then specify the length for [Short Side], and then press o again. The values which can be specified in [Short Side] change automatically according to the value you have specified in [Long Side]. OO If you have selected [Multi-size], the size of the image to be printed is displayed. 3 Select and print the images. OO Select the image by pressing the lr buttons, and press the u button. is displayed at the bottom right of the screen (up to 2 images). OO Press the EDIT button to set the cropping range (p. 18). OO Print as described in Step 6 on p. 14. XX Settings are cleared when printing is finished. OO The ID photo may not be accepted officially, depending on the institution the ID photo is required for. Please contact the appropriate institution for regulation details. OO You cannot use card size paper. OO [Borders] settings will be ignored. Also, the date is not printed. OO If you have selected 2 types of images in Step 3, these 2 types are printed in equal numbers for the number of columns in the layout. If you have selected 2 types of images and the number of columns is an odd number, nothing will be printed in the center column. Crop the image for the passport. OO If you display the cropping range (p. 18) while the [Standard] size is selected for [ID Photo], 2 lines are displayed. OO Adjust so that one line is at the top of the head and the other line is under the chin to print a passport photo conforming to the passport standards. OO Please contact the appropriate institution for regulation details other than regarding position and size of the face. 19
-
 1
1 -
2
-
3
-
4
-
5
-
6
-
7
-
8
-
9
-
10
-
11
-
12
-
13
-
 14
14 -
 15
15 -
 16
16 -
 17
17 -
 18
18 -
 19
19 -
 20
20 -
 21
21 -
 22
22 -
 23
23 -
 24
24 -
25
-
26
-
27
-
28
-
29
-
30
-
31
-
32
-
33
-
34
-
35
-
36
-
37
-
38
-
39
-
40
-
41
-
42
-
43
-
44
-
45
-
46
-
47
-
48
-
49
-
50
-
51
-
52
-
53
-
54
-
55
-
56
 |
 |
