Canon imageCLASS MF6550 MF6500 Series Scanner Drivere Guide - Page 29
Exif Settings
 |
View all Canon imageCLASS MF6550 manuals
Add to My Manuals
Save this manual to your list of manuals |
Page 29 highlights
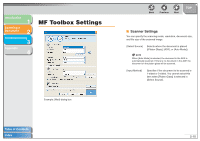
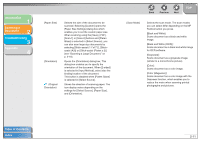
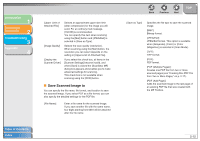
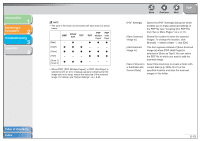
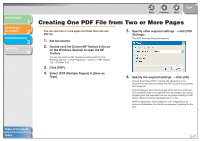
Introduction 1 Scanning a Document 2 Troubleshooting 3 Appendix 4 [PDF Settings] Opens the [PDF Settings] dialog box which enables you to make advanced settings of the PDF file (see "Creating One PDF File from Two or More Pages," on p. 2-17). This button appears when [PDF], [PDF (Multiple Pages)] or [PDF (Add Page)] is selected in [Save as Type]. [Save Scanned Specifies the location to save the scanned Image to] image. [Add Scanned Image to] This item appears instead of [Save Scanned Image to] when [PDF (Add Page)] is selected in [Save as Type]. You can select the PDF file to which you want to add the scanned image. [Save Pictures to a Subfolder with Current Date] Select this check box to create a folder with current date in the specified location and save the scanned images in this folder. This check box is not available when [PDF (Add Page)] is selected in [Save as Type]. [Save] Press to save the scanned images in the specified location. Back Previous Next TOP [Forward] [Cancel] This button appears instead of [Save] when an application is specified in the [Mail Program] or the [External Program] setting. You can forward the scanned images to the application. Cancels the operation and returns to the previous window. Deletes all the images scanned in the operation. Exif Settings You can attach extra information in the EXIF format, such as the description of the image, the date when the image was scanned, etc., to the JPEG files. Select a scanned image from the drop-down list to view and add information for the image. [Basic Information] Displays the information automatically acquired by scanning. [Advanced Information] Displays the extra information you enter. [Apply the Same Setting of Input Items Automatically] Select this check box to use the same values you have specified in the previous scanning operation. Table of Contents Index 2-15
-
 1
1 -
2
-
3
-
4
-
5
-
6
-
7
-
8
-
9
-
10
-
11
-
12
-
13
-
14
-
15
-
16
-
17
-
18
-
19
-
20
-
21
-
22
-
23
-
 24
24 -
 25
25 -
 26
26 -
 27
27 -
 28
28 -
 29
29 -
 30
30 -
 31
31 -
 32
32 -
 33
33 -
 34
34 -
35
-
36
-
37
-
38
-
39
-
40
-
41
-
42
-
43
-
44
-
45
-
46
-
47
-
48
-
49
-
50
-
51
-
52
-
53
-
54
-
55
-
56
-
57
-
58
-
59
-
60
-
61
-
62
-
63
-
64
-
65
-
66
-
67
-
68
-
69
-
70
-
71
-
72
-
73
-
74
-
75
-
76
-
77
-
78
-
79
-
80
 |
 |