Canon imageCLASS MF6550 MF6500 Series Scanner Drivere Guide - Page 36
in [Output Size]., Select Purpose].
 |
View all Canon imageCLASS MF6550 manuals
Add to My Manuals
Save this manual to your list of manuals |
Page 36 highlights
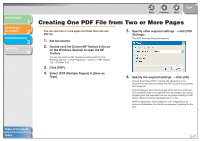
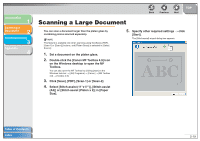
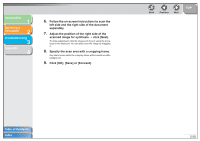
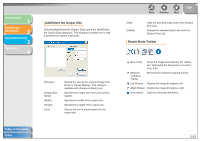
Introduction 1 Scanning a Document 2 Troubleshooting 3 Appendix 4 2. Select the document type in [Select Source]. [Photo (Color)]: To scan color photos. [Magazine (Color)]: To scan color magazines with the Descreen function. [Newspaper (B&W)]: To scan text and line drawings. [Document (Grayscale)]: To scan color images or text in monochrome. Appropriate for scanning high-resolution monochrome images. [Document (Color) ADF]: To scan color documents on the ADF. [Document (Grayscale) ADF]: To scan Grayscale documents on the ADF. If you select [Document (Color) ADF] or [Document (Grayscale) ADF], skip to step 4. NOTE On how to turn off the automatic color correction for the document type other than [Newspaper (B&W)], see "[Color Settings] Tab," on p. 2-40. 3. Click [Preview]. A preview of the scanned image appears in the preview window. 4. Select the use for the scanned image in [Select Purpose]. You can select from [Print (300dpi)], [Image display (150dpi)], or [OCR (300dpi)], depending on the document type you selected in step 2. For details, see "Determining Resolution," on p. 2-42. Back Previous Next TOP 5. Select the output size of the scanned image in [Output Size]. The options you can select vary depending on what you selected in step 4. Click to switch the orientation of the output size (landscape or portrait). 6. Adjust the cropping frame and select the [Fading Correction] check box as needed. To adjust the cropping frame, click (Auto Crop) or drag the corner or edge of the frame. For details, see "Specifying the Parameters of a Scan," on p. 2-25. NOTE - The [Fading Correction] check box can be selected only when scanning color documents. - When the preview image is not displayed, the [Fading Correction] check box is disabled. 7. Click [Scan]. Table of Contents Index 2-22
-
 1
1 -
2
-
3
-
4
-
5
-
6
-
7
-
8
-
9
-
10
-
11
-
12
-
13
-
14
-
15
-
16
-
17
-
18
-
19
-
20
-
21
-
22
-
23
-
24
-
25
-
26
-
27
-
28
-
29
-
30
-
 31
31 -
 32
32 -
 33
33 -
 34
34 -
 35
35 -
 36
36 -
 37
37 -
 38
38 -
 39
39 -
 40
40 -
 41
41 -
42
-
43
-
44
-
45
-
46
-
47
-
48
-
49
-
50
-
51
-
52
-
53
-
54
-
55
-
56
-
57
-
58
-
59
-
60
-
61
-
62
-
63
-
64
-
65
-
66
-
67
-
68
-
69
-
70
-
71
-
72
-
73
-
74
-
75
-
76
-
77
-
78
-
79
-
80
 |
 |
