Canon imageFORMULA CR-150 imageFORMULA CR-150 / CR-120 Setup and Operation Gui - Page 7
Connecting the Scanner to a Computer
 |
View all Canon imageFORMULA CR-150 manuals
Add to My Manuals
Save this manual to your list of manuals |
Page 7 highlights
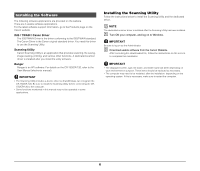
Connecting the Scanner to a Computer The way to connect the scanner to your computer is with a USB cable. CAUTION • Do not turn OFF the scanner or remove the interface cable when an application is running. • Turn OFF the computer and the scanner before changing the cable. USB Connections Computer peripherals Connect the scanner and the computer with the USB cable provided or a HiSpeed USB 2.0 cable. Type A Plug Type B Plug Connect the scanner and the computer peripherals Connect the scanner and the computer peripherals with the USB cable provided or a Hi-Speed USB 2.0 cable. USB Hub Type B Plug USB Cable USB Cable USB Connector NOTE Connect the type B plug (square) to the scanner and connect the type A plug (flat) to the USB port on the computer. Type A Plug 7
-
 1
1 -
 2
2 -
 3
3 -
 4
4 -
 5
5 -
 6
6 -
 7
7 -
 8
8 -
 9
9 -
 10
10 -
 11
11 -
 12
12 -
13
-
14
-
15
 |
 |
