Casio PX330 User Guide - Page 31
ENTER, To edit the chord progression
 |
View all Casio PX330 manuals
Add to My Manuals
Save this manual to your list of manuals |
Page 31 highlights
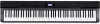
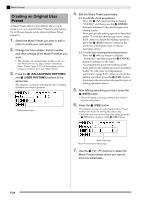
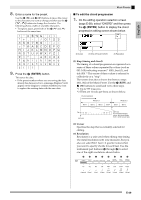
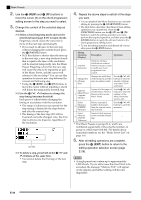
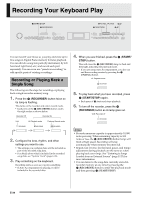
8. Enter a name for the preset. Use the ct (u) and dk (i) buttons to move the cursor to the character you want to change and then use the bt (w, q) buttons to change the character. The following shows a table of available characters. • To input a space, press both of the bt (w and q) buttons at the same time. Music Presets ■ To edit the chord progression 1. On the editing operation selection screen (page E-28), select "CHORD" and then press the dl (ENTER) button to display the chord progression editing screen shown below. English (2) Cursor (1) Step (timing and chord) (3) Resolution 9. Press the dl (ENTER) button. This saves the data. • If the preset number where you are saving the data already has data saved to it, a message (Replace?) will appear on the display to confirm whether you want to replace the existing data with the new data. (1) Step (timing and chord) The timing of a chord progression is expressed as a series of three values separated by colons (such as 001:1:00) indicating measure*1 (001), beat (1), and tick (00).*2 This series of three values is referred to collectively as a "step". The screen shot above shows the first two steps (001, 002) of the Music Preset. Use the 3 (REW) and 4 (FF) buttons to scroll and view other steps. *1 Up to 999 measures *2 There are 12 ticks per beat, as shown below. Chord progression Beat 1 Measure 1 Beat 2 Beat 3 Beat 4 Measure 2 Beat 1 Beat 2 Tick 00 01 02 001:1:00 09 10 11 002:1:00 For the sample display above, the chord change from C to Bm occurs here. (2) Cursor Specifies the step that is currently selected for editing. (3) Resolution Resolution is a unit used when editing step timing. The initial resolution is R1 (one measure), but you also can select R4 (1 beat = 4 quarter notes) when you want to specify chords for each beat. Use the instrument part buttons (ck through cr) to select one of the eight resolutions shown below. ck cl cm cn co cp cq cr R1 R2 R4 R8 R8T R16 R16T R32T 3 3 (1 measure) (2 beats) (1 beat) (1/2 beat) (1/3 beat) (1/4 beat) (1/6 beat) (1/8 beat) E-29
-
 1
1 -
2
-
3
-
4
-
5
-
6
-
7
-
8
-
9
-
10
-
11
-
12
-
13
-
14
-
15
-
16
-
17
-
18
-
19
-
20
-
21
-
22
-
23
-
24
-
25
-
 26
26 -
 27
27 -
 28
28 -
 29
29 -
 30
30 -
 31
31 -
 32
32 -
 33
33 -
 34
34 -
 35
35 -
 36
36 -
37
-
38
-
39
-
40
-
41
-
42
-
43
-
44
-
45
-
46
-
47
-
48
-
49
-
50
-
51
-
52
-
53
-
54
-
55
-
56
-
57
-
58
-
59
-
60
-
61
-
62
-
63
-
64
-
65
-
66
-
67
-
68
-
69
-
70
-
71
-
72
 |
 |