Celestron CGE Pro 1400 FASTAR Computerized Telescope CGE Pro Series Manual - Page 11
Installing the Star Diagonal, Installing the Eyepiece, Installing the Finderscope
 |
View all Celestron CGE Pro 1400 FASTAR Computerized Telescope manuals
Add to My Manuals
Save this manual to your list of manuals |
Page 11 highlights
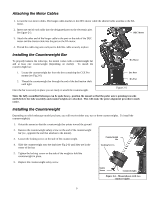
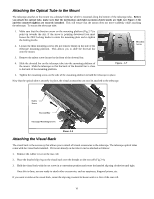
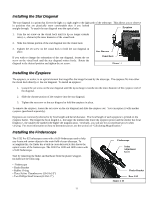
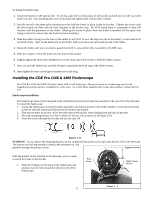
Installing the Star Diagonal The star diagonal is a prism that diverts the light at a right angle to the light path of the telescope. This allows you to observe in positions that are physically more comfortable than if you looked straight through. To attach the star diagonal onto the optical tube: Eyepiece 1. Turn the set screw on the visual back until its tip no longer extends into (i.e., obstructs) the inner diameter of the visual back. 2. Slide the chrome portion of the star diagonal into the visual back. 3. Tighten the set screw on the visual back to hold the star diagonal in place. If you wish to change the orientation of the star diagonal, loosen the set screw on the visual back until the star diagonal rotates freely. Rotate the diagonal to the desired position and tighten the set screw. Star Diagonal Visual Back Figure 2-9 Installing the Eyepiece The eyepiece, or ocular, is an optical element that magnifies the image focused by the telescope. The eyepiece fits into either the visual back directly or the star diagonal. To install an eyepiece: 1. Loosen the set screw on the star diagonal until the tip no longer extends into the inner diameter of the eyepiece end of the diagonal. 2. Slide the chrome portion of the eyepiece into the star diagonal. 3. Tighten the set screw on the star diagonal to hold the eyepiece in place. To remove the eyepiece, loosen the set screw on the star diagonal and slide the eyepiece out. You can replace it with another eyepiece (purchased separately). Eyepieces are commonly referred to by focal length and barrel diameter. The focal length of each eyepiece is printed on the eyepiece barrel. The longer the focal length (i.e., the larger the number) the lower the eyepiece power and the shorter the focal length (i.e., the smaller the number) the higher the magnification. Generally, you will use low-to-moderate power when viewing. For more information on how to determine power, see the section on "Calculating Magnification." Installing the Finderscope The CGE Pro 925 telescopes come with a 6x30 finderscope used to help you locate and center objects in the main field of your telescope. To accomplish this, the finder has a built-in cross-hair reticle that shows the optical center of the finderscope. The CGE Pro 1100 and 1400 comes with a 9x50 finderscope. Start by removing the finder and hardware from the plastic wrapper. Included are the following: Finderscope Nylon Adjustment Screw • Finderscope • Finder Bracket • Rubber O-ring • Three Nylon Thumbscrews (10-24x1/2") • Two Phillips Head Screws (8-32x1/2") Figure 2-10 Finder Bracket Rear Cell 11
-
 1
1 -
2
-
3
-
4
-
5
-
 6
6 -
 7
7 -
 8
8 -
 9
9 -
 10
10 -
 11
11 -
 12
12 -
 13
13 -
 14
14 -
 15
15 -
 16
16 -
17
-
18
-
19
-
20
-
21
-
22
-
23
-
24
-
25
-
26
-
27
-
28
-
29
-
30
-
31
-
32
-
33
-
34
-
35
-
36
-
37
-
38
-
39
-
40
-
41
-
42
-
43
-
44
-
45
-
46
-
47
-
48
-
49
-
50
-
51
-
52
-
53
-
54
-
55
-
56
-
57
-
58
-
59
-
60
-
61
-
62
-
63
-
64
-
65
-
66
-
67
-
68
-
69
-
70
-
71
-
72
 |
 |
