Celestron COSMOS 3 MP LCD Handheld Digital Microscope COSMOS LCD Portable Micr - Page 5
Set Up Functions, Operating The Microscope
 |
View all Celestron COSMOS 3 MP LCD Handheld Digital Microscope manuals
Add to My Manuals
Save this manual to your list of manuals |
Page 5 highlights
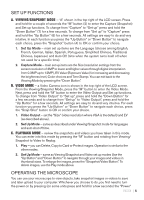
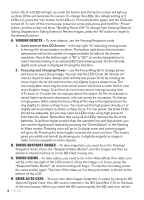
SET UP FUNCTIONS A. VIEWING/SNAPSHOT MODE - "A" shown in the top right of the LCD screen. Press and hold for a couple of seconds the "M" button (2) to enter the Capture (Snapshot) and Set up functions. To change from "Capture" to "Set up" press and hold the "Down Button" (7) for a few seconds. To change from "Set up" to "Capture" press and hold the "Up Button" (6) for a few seconds. All settings are easy to do and very intuitive. In each function you press the "Up Button" or "Down Button" to navigate each choice, press the "Snapshot" button (4) to OK or confirm your choice. 1. Set Up Mode - main set up items are the Language (choose among English, French, German, Italian, Spanish, Portuguese, Simplified Chinese, Traditional Chinese, Japanese) and Auto Off (time when the system turns itself off when not used for a specific time). 2. Capture Mode - main set up items are the Size (resolution settings from the sensor resolution of 3MP to lower and higher values through digital interpolation from 0.3MP up to 12MP), EV Value (Exposure Value) for increasing and decreasing the brightness level, Color choices and Time Stamp. You can exit back to the Viewing Mode by pressing the "Down Button." B. VIDEO MODE - a Video Camera icon is shown in the top right of the LCD screen. From the Viewing/Snapshot Mode, press the "M" button to enter the Video Mode. Next, press and hold the "M" button to enter the Video Output and Set up functions. To change from "Video Output" to "Set up", press and hold the "Down Button" for a few seconds and to change from "Set up" to "Video Output", press and hold the "Up Button" for a few seconds. All settings are easy to do and very intuitive. For each function you press the "Up Button" or "Down Button" to navigate each choice, press the "Snap Shot" button to OK or confirm your choice. 1. Video Output - set the "Size" (video resolution where VGA is the default) and EV (as described above). 2. Set Up Mode - same as described under Viewing/Snapshot mode for languages and auto shut off time. C. PLAYBACK MODE - review the snapshots and videos you have taken in this mode. You can enter into this mode by pressing the "M" button and rotating from Viewing/ Snapshot to Video to Replay. 1. Play - you can Delete, Copy to Card or Protect images. Operation is similar to the other modes. 2. Set Up Mode - same as Viewing/Snapshot and Video set up modes Use the "Up Button" and "Down Button" to navigate through your images and videos in thumbnail sizes. To enlarge the images, press the "Snapshot/Video Button". To delete images, use the Play mode above. OPERATING THE MICROSCOPE You can use your microscope to view objects, take snapshot images or videos to save and later upload to your computer. Whichever you choose to do, you first need to turn the power on by pressing (on some units press and hold for a few seconds) the "Power" ENGLISH | 5
-
 1
1 -
 2
2 -
 3
3 -
 4
4 -
 5
5 -
 6
6 -
 7
7 -
 8
8 -
 9
9 -
 10
10 -
 11
11 -
12
-
13
-
14
-
15
-
16
-
17
-
18
-
19
-
20
-
21
-
22
-
23
-
24
-
25
-
26
-
27
-
28
-
29
-
30
-
31
-
32
-
33
-
34
-
35
-
36
-
37
-
38
-
39
-
40
 |
 |
