Celestron COSMOS 3 MP LCD Handheld Digital Microscope COSMOS LCD Portable Micr - Page 6
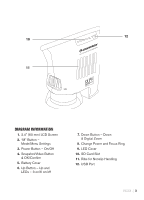
A. Viewing Objects, B. Taking Snapshot Images, C. Taking Videos, D. Using An Sd Card
 |
View all Celestron COSMOS 3 MP LCD Handheld Digital Microscope manuals
Add to My Manuals
Save this manual to your list of manuals |
Page 6 highlights
button (3). A red LED will light up under the button and shortly the screen will light up as three LEDs will illuminate the screen. To change the LEDs (the default setting is 3 LEDs on), press the "Up" button for 6 LEDs on. Press the button again, and the LEDs are turned off. To turn off the microscope, press (on some units press and hold) the "Power" button, and the screen will show "Shutting Power Off". To change from Viewing Objects/ Taking Snapshots to Taking Videos to Review Images, press the "M" button to rotate to the desired function. A. VIEWING OBJECTS - To view objects, use the Viewing/Snapshot mode. 1. Icons seen on the LCD Screen - in the top right, "A" indicating viewing mode. In the top left, shows battery condition. The bottom right shows the resolution selected as well as the number of images available (to take) at the chosen resolution. Also at the bottom right, is "M" or "SD" (or similar designations) to note if internal memory or an optional SD Card is being used. On the left side, digital zoom power is displayed (if using this function). 2. Focusing and changing Power - use the Focus Ring (8) to change power and focus to see a sharp image. You can rest the LED Cover (9) directly on/ over an object to view. Always start with the low power (3.7x) by rotating the focus ring to the far left and move the ring slightly to get a sharp focus. The most enjoyable views may be seen at low power which has a wider field of view and a brighter image. To achieve an even lower power setting (varying from 3.7x down to 1x),raise the microscope above the object. As the microscope is raised higher and power decreases, refocusing may be necessary. To change to high power (54x), rotate the Focus Ring all the way to the right and turn the ring slightly to obtain a sharp focus. You must use the high power directly on or slightly above an object to obtain a sharp focus. For low power, the three LEDs should be adequate, but you may need six LEDs when using high power to illuminate the object. Remember that using all six LEDs reduces the life of the batteries. To achieve higher powers than the standard low and high power, you can use the digital zoom feature by pressing the "Down Button" in the Viewing or Video modes. Pressing once will go to 2x digital zoom and pressing again will go to 4x. Pressing the button again reverses the zoom function. This feature gives you additional benefit by allowing you to digitally magnify an image to make it more enjoyable on some objects. B. TAKING SNAPSHOT IMAGES - To take snapshots, you must be in the Viewing/ Snapshot mode. Press the "Snapshot/Video Button", and the images will then be stored in internal memory or on an SD Card if using one. C. TAKING VIDEOS - To take videos, you need to be in the Video Mode (the video icon will be in the top right of the LCD screen). Once the image is in focus, press the "Snapshot/Video Button" (4) and recording will begin. To stop the recording, press the same button again. The time of the video as it is being recorded, is shown at the bottom of the LCD. D. USING AN SD CARD - You can also take images (snapshot or video) by using an SD (Secure Digital) Card. Your SD card is inserted in the SD Card Slot (10) on the back of the microscope. When you insert the SD card properly, the SD card icon will be 6 | ENGLISH
-
 1
1 -
 2
2 -
 3
3 -
 4
4 -
 5
5 -
 6
6 -
 7
7 -
 8
8 -
 9
9 -
 10
10 -
 11
11 -
 12
12 -
13
-
14
-
15
-
16
-
17
-
18
-
19
-
20
-
21
-
22
-
23
-
24
-
25
-
26
-
27
-
28
-
29
-
30
-
31
-
32
-
33
-
34
-
35
-
36
-
37
-
38
-
39
-
40
 |
 |
