Cisco 16OC3/POS-SM Hardware Installation Guide
Cisco 16OC3/POS-SM - et-over-SONET Line Card Expansion Module Manual
 |
View all Cisco 16OC3/POS-SM manuals
Add to My Manuals
Save this manual to your list of manuals |
Cisco 16OC3/POS-SM manual content summary:
- Cisco 16OC3/POS-SM | Hardware Installation Guide - Page 1
Guide For the Cisco 1600 Series, Cisco 1700 Series, Cisco 1800 Series, Cisco 2600 Series, Cisco 2800 Series, Cisco 3600 Series, Cisco 3700 Series, and Cisco 3800 Series Routers, the Cisco ICS 7750, and the Cisco MWR 1941-DC Mobile Wireless Edge Router Corporate Headquarters Cisco Systems - Cisco 16OC3/POS-SM | Hardware Installation Guide - Page 2
DATA ARISING OUT OF THE USE OR INABILITY TO USE THIS MANUAL, EVEN IF CISCO OR ITS SUPPLIERS HAVE BEEN ADVISED OF THE POSSIBILITY OF SUCH DAMAGES. CCVP, the Cisco logo, and Welcome to the Human Network are trademarks of Cisco Systems, Inc.; Changing the Way We Work, Live, Play, and Learn is a service - Cisco 16OC3/POS-SM | Hardware Installation Guide - Page 3
Cisco interface cards used in Cisco access routers, and contains the following sections: • Introduction to Cisco Interface Cards, page 1 • Cisco Access Routers and Cisco Interface Cards, page 2 • Cisco IOS Software Releases and Cisco Interface Cards, page 10 • Cisco Network Modules Supporting Cisco - Cisco 16OC3/POS-SM | Hardware Installation Guide - Page 4
cards can be installed in interface card slots on supported Cisco access routers, in 1- or 2-slot network modules to be installed in network module slots on supported Cisco access routers, and in interface card slots on Cisco 1800 (modular) series, Cisco 2800 series, and Cisco 3800 series routers - Cisco 16OC3/POS-SM | Hardware Installation Guide - Page 5
for Cisco Access Routers Cisco Access Routers and Cisco Interface Cards Note Cisco 3600 series routers do not have built-in interface card slots. However, interface cards are supported when installed in a 1- or 2-slot network module. • The Cisco 3700 series, including the Cisco 3725 and Cisco 3745 - Cisco 16OC3/POS-SM | Hardware Installation Guide - Page 6
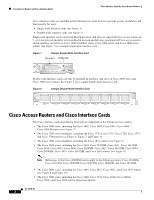
OK 3 4 1 Interface card slot 0 3 VIC slot 2 2 Interface card slot 1 4 VIC slot 3 Figure 7 Interface Card Slot Locations on Cisco 1800 Series (Modular) Series Routers (Cisco 1841 Router Shown) 1 2 122219 1 WIC, VWIC-data only, or HWIC slot 1 2 WIC, VWIC-data only, or HWIC slot 0 OL-12796 - Cisco 16OC3/POS-SM | Hardware Installation Guide - Page 7
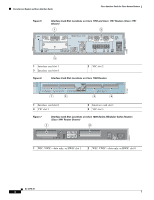
1 Network module slot 3 WIC slot 0 2 WIC slot 1 Figure 9 Interface Card Slot Locations on Cisco 2801 Routers 1 2 3 4 6 1 WIC/VIC/VWIC/HWIC slot 3 3 WIC/VIC/VWIC/HWIC slot 1 5 Interface card slot divider 5 2 WIC/VIC/VWIC slot 2 4 VIC/VWIC (voice only) slot 0 6 Interface card slot divider - Cisco 16OC3/POS-SM | Hardware Installation Guide - Page 8
AIM1 AIM0 0 EVM 2 ONLY 122214 1 6 1 HWIC slot 3 3 HWIC slot 2 5 Extension voice module (EVM) slot 2 HWIC slot 1 4 HWIC slot 0 6 Network module enhanced (NME) slot Note To install double-wide interface cards in Cisco 2811, Cisco 2821, and Cisco 2851 routers, remove the slot divider. When the - Cisco 16OC3/POS-SM | Hardware Installation Guide - Page 9
AUX SPD GE 0/0 LNK SFP 1 Network module slot 2 (extended double-wide) 3 HWIC slot 0 5 HWIC slot 1 2 HWIC slot 2 4 HWIC slot 3 6 Network module slot 1 (extended single-wide) Note To install double-wide interface cards in Cisco 3800 series routers, remove the slot divider. When the slot dividers - Cisco 16OC3/POS-SM | Hardware Installation Guide - Page 10
not support certain interface cards. See Table 1 for information about the interface card slots available on Cisco access routers. Table 1 Interface Card Slots Available on Cisco Access Routers Cisco Router Cisco 1600 series Cisco 1720 routers Cisco 1750 and Cisco 1751 routers Cisco 1760 routers - Cisco 16OC3/POS-SM | Hardware Installation Guide - Page 11
support HWICs. To install an interface card in a Cisco 3600 series router, use a 1- or 2-slot network module (see the "Cisco Network Modules Supporting Cisco Interface Cards" section on page 11). Cisco 3600 series routers do not have interface card slots on the chassis. Routers do not support HWICs - Cisco 16OC3/POS-SM | Hardware Installation Guide - Page 12
System Description document for more information about these cards. Routers do not support HWICs. Cisco IOS Software Releases and Cisco Interface Cards Cisco interface cards are often supported on multiple Cisco IOS releases. Cisco IOS release information is documented in the product data sheet - Cisco 16OC3/POS-SM | Hardware Installation Guide - Page 13
Modules Supporting Cisco Interface Cards Cisco Network Modules Supporting Cisco Interface Cards Some Cisco network modules have interface card slots to allow installation of Cisco interface cards. These network modules have either one or two interface card slots, supporting either voice or data - Cisco 16OC3/POS-SM | Hardware Installation Guide - Page 14
modules is determined by the installed interface cards. Note For network-end connectors and pinout specifications of the cables connecting the voice cards, refer to the Cisco Modular Access Router Specifications. Look under the type of interface card. Table 2 Cabling for Cisco Interface Cards - Cisco 16OC3/POS-SM | Hardware Installation Guide - Page 15
wavelength data sheet Note A single fiber link should not mix 62.5- and 50-micron cable. ISDN Connections BRI S/T (external NT1) RJ-48C RJ-48C straight-through WIC36-1B-S/T WIC-1B-S/T WIC-1B-S/T-V3 WIC-1B-S/T-LL BRI S/T (external NT1) RJ-45 RJ-45 Straight-through HWIC-ADSL-B/ST HWIC-ADSLI - Cisco 16OC3/POS-SM | Hardware Installation Guide - Page 16
Cards for Cisco Access Routers Table 2 Cabling for Cisco Interface Cards Technology Connection Type Voice Connections Digital voice, T1/E1 Connector Type, Cable Color Cable RJ-48C/CA81A, tan RJ-48C straight-through Digital voice/data, T1/E1 Analog voice, FXS RJ-11, gray Analog voice, FXO - Cisco 16OC3/POS-SM | Hardware Installation Guide - Page 17
Voice and WAN Interface Cards • Voice Interface Cards • Wireless Interface Cards Table 4 Platform Support for Cisco Interface Cards Product Description Cisco Product ID Analog Modem WAN Interface Cards 1-port analog modem WIC WIC-1AM 2-port analog modem WIC WIC-2AM Supported on Cisco Routers - Cisco 16OC3/POS-SM | Hardware Installation Guide - Page 18
version HWIC-CABLE-E/J-2 Cisco 1800 series (modular) Cisco 2691 Cisco 2800 series Cisco 3700 series Cisco 3800 series Channel Service Unit/Data Service Unit (CSU/DSU) WAN Interface Cards 1-port T1/fractional T1 DSU/CSU WIC WIC-1DSU-T1 Cisco 1600 series Cisco 1721 Cisco 1751 Cisco 1760 Cisco - Cisco 16OC3/POS-SM | Hardware Installation Guide - Page 19
for Cisco Access Routers Platform Support for Cisco Interface Cards Table 4 Platform Support for Cisco Interface Cards (continued) Product Description 1-port 4-wire 56/64 kbps CSU/DSU WIC DSL WAN Interface Cards 1-port ADSL-over-POTS WIC 1-port ADSL-over-POTS with dying gasp WIC 1-port ADSL-over - Cisco 16OC3/POS-SM | Hardware Installation Guide - Page 20
Switch WAN Interface Cards 4-port 10/100BASE-T Ethernet switch WIC WIC-4ESW 4-port 10/100BASE-T Ethernet switch HWIC HWIC-4ESW 4-port Ethernet switch HWIC with inline power 9-port 10/100BASE-T Ethernet switch HWIC HWIC-4ESW-POE HWIC-D-9ESW Supported on Cisco Routers Cisco 1800 series (modular - Cisco 16OC3/POS-SM | Hardware Installation Guide - Page 21
Cards 1-port ISDN BRI WIC with integrated NT1-U interface WIC-1B-U 1-port ISDN BRI WIC with integrated NT1-U interface, version 2 WIC-1B-U-V2 1-port ISDN BRI WIC with S/T interface WIC-1B-S/T 1-port ISDN BRI WIC WIC-1B-S/T-V3 with S/T interface, version 3 Supported on Cisco Routers Cisco - Cisco 16OC3/POS-SM | Hardware Installation Guide - Page 22
for Cisco Interface Cards Cisco Interface Cards for Cisco Access Routers Table 4 Platform Support for Cisco Interface Cards (continued) Product Description 1-port ISDN BRI leased line WIC Serial WAN Interface Cards 1-port serial WIC Cisco Product ID WIC-1B-S/T-LL WIC-1T 2-port serial WIC WIC - Cisco 16OC3/POS-SM | Hardware Installation Guide - Page 23
Platform Support for Cisco Interface Cards Table 4 Platform Support for Cisco Interface Cards (continued) Product Description Cisco Product ID Supported on Cisco Routers 16-port asynchronous serial HWIC HWIC-16A Cisco 2800 series Cisco 3800 series T1, E1, and G.703 Multiflex Trunk Voice and - Cisco 16OC3/POS-SM | Hardware Installation Guide - Page 24
Platform Support for Cisco Interface Cards Cisco Interface Cards for Cisco Access Routers Table 4 Platform Support for Cisco Interface Cards (continued) Product Description Cisco Product ID 2-port E1 RJ-48 multiflex VWIC-2MFT-E1 trunk VWIC 1-port T1/E1 RJ-48 VWIC2-1MFT-T1/E1 multiflex trunk - Cisco 16OC3/POS-SM | Hardware Installation Guide - Page 25
and integrated DSU 2-port T1/E1 radio access VWIC-2T1/E1-RAN network optimization VWIC Voice Interface Cards 2-port Direct Inward Dial VIC-2DID (DID) VIC 1-port digital VIC for Japan VIC-1J1 Supported on Cisco Routers Cisco 17215 Cisco 1751 Cisco 1760 Cisco 1800 series (modular) Cisco 2600 - Cisco 16OC3/POS-SM | Hardware Installation Guide - Page 26
Support for Cisco Interface Cards Cisco Interface Cards for Cisco Access Routers Table 4 Platform Support for Cisco Interface Cards (continued) Product Description 4-port FXS or DID VIC Cisco Product ID VIC-4FXS/DID 2-port FXS VIC VIC-2FXS6 2-port FXS VIC, version 2 VIC2-2FXS6 2-port FXO - Cisco 16OC3/POS-SM | Hardware Installation Guide - Page 27
Cisco Interface Cards for Cisco Access Routers Platform Support for Cisco Interface Cards Table 4 Platform Support for Cisco Interface Cards (continued) Product Description 2-port FXO VIC Cisco Product ID VIC-2FXO6 2-port FXO (universal) VIC, version 2 VIC2-2FXO6 4-port FXO VIC for the - Cisco 16OC3/POS-SM | Hardware Installation Guide - Page 28
Interface Cards Access point HWIC for North America HWIC-AP-G-A Access point HWIC for Europe HWIC-AP-G-E Access point HWIC for Japan HWIC-AP-G-J Supported on Cisco Routers Cisco 1751 Cisco 1760 Cisco 2600XM series Cisco 2800 series Cisco 3660 routers Cisco 3800 series Cisco ICS 7750 Cisco 2600 - Cisco 16OC3/POS-SM | Hardware Installation Guide - Page 29
1604 routers only. 5. Cisco 1721 router supports these cards in data mode only. 6. In Cisco 1751 and Cisco 1760 routers, can be directly installed into a router interface slot. For other routers, cannot be installed directly into Cisco router interface card slots. Install in a voice network module - Cisco 16OC3/POS-SM | Hardware Installation Guide - Page 30
Cisco router, access the documents located at Products and Solutions > Routers and Routing Systems > Router series you are using > Technical Documentation > Installation Guides. To find installation instructions for Cisco network modules, access the Cisco Network Modules Hardware Installation Guide - Cisco 16OC3/POS-SM | Hardware Installation Guide - Page 31
information-Supported products, caveats • Software release tools-Cisco Feature Navigator II, Cisco IOS Upgrade Planner, software downloads, security notices and advisories Cisco IOS Software Configuration Documents To find initial configuration instructions specific to the Cisco router you are using - Cisco 16OC3/POS-SM | Hardware Installation Guide - Page 32
to Go Next Cisco Interface Cards for Cisco Access Routers To plan for a Cisco IOS upgrade, access the Cisco IOS Upgrade Planner, located at Technical Support > Downloads > Cisco IOS Upgrade Planner. To view Cisco IOS security advisories that might apply to your product, access the Cisco Product - Cisco 16OC3/POS-SM | Hardware Installation Guide - Page 33
for Cisco Interface Cards, page 1 • Installing Cisco Interface Cards in Cisco Access Routers, page 5 • Installing Cisco Interface Cards in Cisco Network Modules, page 18 • Removing or Replacing Cisco Interface Cards for Cisco Access Routers, page 20 • Installing Cisco Interface Cards on the Cisco - Cisco 16OC3/POS-SM | Hardware Installation Guide - Page 34
discharge damage (ESD) prevention procedures when installing, removing, and replacing Cisco network modules, Cisco interface cards, Cisco expansion modules, or other electronic printed circuit cards: • Make sure that the router chassis is electrically connected to earth ground. • Wear an ESD - Cisco 16OC3/POS-SM | Hardware Installation Guide - Page 35
handles on the power supplies or on the interface processors, or by the plastic panels on the front of the chassis. These handles were not designed to support the weight of the chassis. Statement 194 Warning Only trained and qualified personnel should be allowed to install or replace this equipment - Cisco 16OC3/POS-SM | Hardware Installation Guide - Page 36
Cisco Interface Cards Installing Cisco Interface Cards in Cisco Access Routers The following warnings apply in Australia: Warning Do not touch the power supply when the power cord is connected. For systems with a power switch, line voltages are present within the power supply even when the power - Cisco 16OC3/POS-SM | Hardware Installation Guide - Page 37
for Cisco interface cards used on Cisco access routers, and contains the following subsections: • Preparing to Install Cisco Interface Cards - Do not install an ISDN BRI WAN interface card or an ISDN BRI network module in the same chassis as an ISDN PRI network module. • Preparing Cisco Router Slots - Cisco 16OC3/POS-SM | Hardware Installation Guide - Page 38
wrist strap • (For routers using DC power) Tape to secure DC circuit breaker handle • (For certain Cisco access routers) Voice network module for voice interface card installation On some Cisco access routers, voice interface cards must be installed in voice network modules before being installed in - Cisco 16OC3/POS-SM | Hardware Installation Guide - Page 39
Installing Cisco Interface Cards in Cisco Access Routers Installing Cisco Interface Cards in Cisco Access Routers Tip For an introduction to Cisco interface card form factors, see the "Introduction to Cisco Interface Cards" section in Cisco Interface Cards for Cisco Access Routers. To prepare an - Cisco 16OC3/POS-SM | Hardware Installation Guide - Page 40
Installing Cisco Interface Cards in Cisco Access Routers Installing Cisco Interface Cards in Cisco Access Routers Figure 17 Installing a Blank Interface Card Faceplate 121073 1 1 Blank interface card faceplate Step 3 Repeat for every empty interface card slot. Step 4 Continue with hardware - Cisco 16OC3/POS-SM | Hardware Installation Guide - Page 41
Installing Cisco Interface Cards in Cisco Access Routers Installing Cisco Interface Cards in Cisco Access Routers Installing Interface Card Slot Dividers Interface card slot dividers are used to customize interface card slots for different Cisco interface card form factors. (See Figure 19 and - Cisco 16OC3/POS-SM | Hardware Installation Guide - Page 42
Installing Cisco Interface Cards in Cisco Access Routers Installing Cisco Interface Cards in Cisco Access Routers Figure 20 Slot Divider for Interface Cards Slots on Cisco 2801 and Cisco 3845 Routers 1 2 121101 OL-12842-01 10 - Cisco 16OC3/POS-SM | Hardware Installation Guide - Page 43
to use. Guide the two halves of the slot divider between the two rails in the bottom of the interface card slot. (See Figure 21.) Push the slot divider in until it seats and locks into place. When the slot divider is fully seated, its outer end is flush with the front panel of the router - Cisco 16OC3/POS-SM | Hardware Installation Guide - Page 44
Installing Cisco Interface Cards in Cisco Access Routers Installing Cisco Interface Cards in Cisco Access Routers Figure 22 Slot Divider Installed in an Interface Card Slot Slot divider flush with external surface of router 117043 OL-12842-01 12 - Cisco 16OC3/POS-SM | Hardware Installation Guide - Page 45
When the slot divider is fully seated, its outer end is flush with the front panel of the router. Figure 23 Inserting a Slot Divider into an Interface Card Slot on a Cisco 2801 or Cisco 3845 Router 1 2 121201 1 Slot divider 2 Slot divider rails Step 2 Tighten the retention screw on the slot - Cisco 16OC3/POS-SM | Hardware Installation Guide - Page 46
slot. To remove slot dividers from network module slots from Cisco 2801 and Cisco 3845 routers, perform the following steps: Step 1 Step 2 Step 3 Remove any installed interface cards and blank faceplates from the router slot you plan to use. Loosen the retention screw on the slot divider. Pull - Cisco 16OC3/POS-SM | Hardware Installation Guide - Page 47
cannot be installed in voice network modules. To prevent damage to the card, confirm that the slot or network module you intend to use supports the kind of interface card you intend to install. Interface cards can be installed either before or after mounting the router, whichever is most convenient - Cisco 16OC3/POS-SM | Hardware Installation Guide - Page 48
Cards in Cisco Access Routers 2 121080 1 Interface card 2 Card guides Step 6 Using the faceplate, push the interface card into place until you feel the edge connector seat securely into the connector on the router backplane. The interface card faceplate should contact the chassis rear panel - Cisco 16OC3/POS-SM | Hardware Installation Guide - Page 49
in Cisco Access Routers 1 2 121079 1 Interface card 2 Card guides Caution Do not touch the interface card board. Handle the interface card by the edges of the faceplate to reduce the risk of damage to the card. Step 6 Using the faceplate, push the interface card into place until you feel - Cisco 16OC3/POS-SM | Hardware Installation Guide - Page 50
use supports the kind of interface card you intend to install. Some Cisco network modules have one or two interface card slots, which support a variety of voice and data interface cards. To determine which interface cards are supported in your network module, see the Cisco Network Modules Hardware - Cisco 16OC3/POS-SM | Hardware Installation Guide - Page 51
Cisco Interface Cards in Cisco Network Modules Step 3 Using a number 1 Phillips or flat-blade screwdriver, loosen the screws on the blank interface card faceplate. (See Figure 27.) Remove the blank faceplate. Figure 27 Blank Interface Card Faceplate DO NOT INSTALL WAN INTERFACE CARDS WITH POWER - Cisco 16OC3/POS-SM | Hardware Installation Guide - Page 52
or Replacing Cisco Interface Cards for Cisco Access Routers Caution WAN interface cards and voice interface cards are not interchangeable. To prevent damage to the card, confirm that you are installing the correct type of interface card for the slot or network module you intend to use. To - Cisco 16OC3/POS-SM | Hardware Installation Guide - Page 53
to two additional packet voice data modules (PVDMs) on each MRP or ASI 81 card to provide more processing power. Timesaver To configure digital voice ports correctly, any additional PVDMs must be installed before the interface card is installed on the MRP or ASI 81 card, or the Cisco ICS 7750 will - Cisco 16OC3/POS-SM | Hardware Installation Guide - Page 54
, go to Step 7. Caution Do not power down the chassis using the power supply switch or by unplugging the power supply. Doing so may cause the Cisco ICS 7750 to lose important configuration data and interrupts any applications or functions running on other cards in the chassis. Timesaver You do - Cisco 16OC3/POS-SM | Hardware Installation Guide - Page 55
Installing Cisco Interface Cards in Cisco Access Routers Installing Cisco Interface Cards on the Cisco ICS 7750 Step 7 If you are replacing an interface card, or if there is a blank interface card faceplate already installed in the MRP or ASI 81 card, use either a number 2 Phillips screwdriver or - Cisco 16OC3/POS-SM | Hardware Installation Guide - Page 56
the Cisco ICS 7750 Installing Cisco Interface Cards in Cisco Access Routers Tip If an interface card slot on the ASI 81 or MRP is unoccupied, install a filler panel to enable proper airflow. Step 11 Step 12 Step 13 Step 14 Step 15 Align the ASI 81 or MRP with the upper and lower card guides in - Cisco 16OC3/POS-SM | Hardware Installation Guide - Page 57
Installing Cisco Interface Cards in Cisco Access Routers Installing Other Accessories in Cisco Interface Cards Installing Other Accessories in Cisco Interface Cards Certain Cisco interface cards support a variety of additional modules, such as small form-factor pluggable modules (SFPs). Installing - Cisco 16OC3/POS-SM | Hardware Installation Guide - Page 58
card, install the interface card (see Chapter , "Installing Cisco Interface Cards in Cisco Access Routers") before connecting the interface card to the network. To remove a SFP from an interface card apertures. Statement 125 Caution The latching mechanism used on many SFPs locks the SFP into place - Cisco 16OC3/POS-SM | Hardware Installation Guide - Page 59
, see the Cisco Network Modules and Interface Cards Regulatory Compliance and Safety Information document. To locate hardware information about specific interface cards, go to the "Platform Support for Cisco Interface Cards" section in Cisco Interface Cards for Cisco Access Routers. Obtaining - Cisco 16OC3/POS-SM | Hardware Installation Guide - Page 60
Obtaining Documentation, Obtaining Support, and Security Guidelines Installing Cisco Interface Cards in Cisco Access Routers OL-12842-01 28 - Cisco 16OC3/POS-SM | Hardware Installation Guide - Page 61
Documentation, Obtaining Support, and Security Guidelines, page 13 For an overview of Cisco interface cards used for Cisco access routers see the Cisco Interface Cards for Cisco Access Routers document. Serial WAN Interface Cards This section describes serial WAN interface cards (WICs) and how - Cisco 16OC3/POS-SM | Hardware Installation Guide - Page 62
/NRZI) serial interface to a Cisco modular router. Figure 32 1-Port Serial WIC Front Panel (WIC-1T) Serial port CONN LED 41210 CONN SERIAL Figure 33 2-Port Serial WIC Front Panel (WIC-2T) Serial ports SERIAL 1 CONN SERIAL 0 WIC CONN 2T SEE MANUAL BEFORE INSTALLATION 41213 CONN LEDs - Cisco 16OC3/POS-SM | Hardware Installation Guide - Page 63
kbps) data rates. Note The 2-port A/S WIC is not supported in Cisco 1600 series routers. Finding Support Information for Platforms and Cisco IOS Software Images Use Cisco Feature Navigator to find information about platform support and Cisco IOS software image support. Access Cisco Feature Navigator - Cisco 16OC3/POS-SM | Hardware Installation Guide - Page 64
equipment you are working with is properly grounded according to the instruction in Installing Cisco Interface Cards in Cisco Access Routers. Cables After you install the serial WIC, use the appropriate serial cable to connect the WIC's serial port to one of the following types of equipment. (See - Cisco 16OC3/POS-SM | Hardware Installation Guide - Page 65
2, and the "2-Port Asynchronous/Synchronous Serial WIC" section on page 2. To connect the serial card to the WAN, follow these steps: Step 1 Confirm that the router is turned off. On the Cisco MWR 1941-DC router, turn off power by turning OFF the DC power source at the circuit breaker and taping - Cisco 16OC3/POS-SM | Hardware Installation Guide - Page 66
-DC router, turn on power to the router by turning ON the DC power source at the circuit breaker. Check that the CONN LED goes on, which indicates that the card's serial port detects the WAN serial connection. 41189 Serial High Speed WICs There are five Cisco serial high speed WICs (HWICs). This - Cisco 16OC3/POS-SM | Hardware Installation Guide - Page 67
Serial Interface Cards Serial High Speed WICs Interfaces supported are as follows: • In both DTE and DCE formats: V35, X21, RS-232, and RS-449 • In DTE format only: EIA-530 and EIA-530A The maximum data rate supported is 8 Mbps per port. Caution To comply with the Telcordia GR-1089 NEBS standard - Cisco 16OC3/POS-SM | Hardware Installation Guide - Page 68
ends. Figure 40 8-Port Asynchronous HWIC Front Panel (HWIC-8A) Serial ports 117621 HWIC-8A 0-7 CONN CONN LED 16-Port Asynchronous HWIC The 16-port asynchronous HWIC (HWIC-16A), illustrated in Figure 41, provides 16 asynchronous RS-232 interfaces in DTE format, at data rates of up to 230.4 kbps - Cisco 16OC3/POS-SM | Hardware Installation Guide - Page 69
platforms supported by a Cisco interface card refer to Platform Support for Cisco Interface Cards. Finding Support Information for Platforms and Cisco IOS Software Images Use Cisco Feature Navigator to find information about platform support and Cisco IOS software image support. Access Cisco Feature - Cisco 16OC3/POS-SM | Hardware Installation Guide - Page 70
Interface Cards in Cisco Access Routers. Cables After you install the serial HWIC, use the appropriate serial cable to connect the HWIC ports to the following types of equipment: • Asynchronous modems, if connecting to analog telephone lines • Synchronous modems, data service units/channel service - Cisco 16OC3/POS-SM | Hardware Installation Guide - Page 71
Interface Cards Serial High Speed WICs Cables for 8-Port and 16-Port Serial HWICs The following cables are available from Cisco Systems for the 8-port and 16-port serial HWICs. Cable for the 8-Port RS-232 Asynchronous/Synchronous HWIC The 8-port RS-232 asynchronous/synchronous HWIC uses a quad - Cisco 16OC3/POS-SM | Hardware Installation Guide - Page 72
Cable for the 8-Port and 16-Port Asynchronous HWICs The 8-port and 16-port asynchronous HWICs use an octal cable, consisting of a 68-pin connector on the interface card end and eight RJ45 connectors on the system end. See Figure 43. This cable is available in DTE format only. Figure 43 Octal - Cisco 16OC3/POS-SM | Hardware Installation Guide - Page 73
Series Router Software Configuration Guide • "Configuring Serial Interfaces" chapter of the Cisco IOS Interface Configuration Guide for your Cisco IOS software release • Cisco Signaling Link Terminal G.732 Support, Cisco IOS Release 12.2(2)T feature module • Cisco Signaling Link Terminal, Cisco IOS - Cisco 16OC3/POS-SM | Hardware Installation Guide - Page 74
Obtaining Documentation, Obtaining Support, and Security Guidelines Serial Interface Cards OL-12843-01 14 - Cisco 16OC3/POS-SM | Hardware Installation Guide - Page 75
ISDN BRI WAN interface cards (WICs) and how to connect ISDN BRI WICs to a network. It contains the following sections: • ISDN BRI S/T WAN Interface Cards, page 1 • ISDN BRI U WAN Interface Cards, page 5 • ISDN BRI S/T Leased-Line WAN Interface Card, page 9 • Supported Platforms, page 12 • Related - Cisco 16OC3/POS-SM | Hardware Installation Guide - Page 76
BRI S/T port LEDs 41225 B1 B2 SEE MANUAL BEFORE INSTALLATION BRI S/T Figure 45 WIC-1B-S/T Front Panel BRI S/T port B1 B2 OK 41221 SEE MANUAL BEFORE INSTALLATION BRI S/T Figure 46 WIC-1B-S/T-V3 Front Panel BRI S/T port WIC 1B-S/T V3 SEE MANUAL BEFORE INSTALLATION B1 B2 ISDN BRI S/T OK - Cisco 16OC3/POS-SM | Hardware Installation Guide - Page 77
BRI network modules, see the Cisco Network Modules Hardware Installation Guide. Grounding Ensure that the equipment you are working with is properly grounded. For instructions on grounding your WIC, refer to Installing Cisco Interface Cards in Cisco Access Routers. Cables Use a straight-through - Cisco 16OC3/POS-SM | Hardware Installation Guide - Page 78
WIC36-1B-U, CPAWIC36-1B-S/T, or CPAWIC36-1B-U interface card, ensure that the termination jumpers are set appropriately for your installation. The jumpers are factory-configured in the B position. Keep the jumpers in this position to use the ISDN BRI WIC in a point-to-point connection or as the - Cisco 16OC3/POS-SM | Hardware Installation Guide - Page 79
came with the NT1 device. Turn on power to the router. Check that the OK LED goes on, which indicates that the ISDN port has established a connection with the central office switch. ISDN BRI U WAN Interface Cards This section describes how to connect ISDN BRI U WICs to a network and contains the - Cisco 16OC3/POS-SM | Hardware Installation Guide - Page 80
BRI WIC with integrated NT1 device (WIC-1B-U) (see Figure 50) • 1-port ISDN BRI WIC with integrated NT1 device, version 2(WIC-1B-U-V2) (see Figure 51) Figure 49 WIC36-1B-U Front Panel BRI U port LEDs LED NT1 41226 B1 B2 SEE MANUAL BEFORE INSTALLATION BRI U Figure 50 WIC-1B-U Front Panel - Cisco 16OC3/POS-SM | Hardware Installation Guide - Page 81
slot of a 2-slot network module. For more information on BRI network modules, see the Cisco Network Modules Hardware Installation Guide. Grounding For instructions on grounding your WIC, refer to Installing Cisco Interface Cards in Cisco Access Routers. Cables Use a straight-through RJ-48C-to - Cisco 16OC3/POS-SM | Hardware Installation Guide - Page 82
ISDN BRI U WAN Interface Cards ISDN BRI WAN Interface Cards The jumpers are factory-configured in the B position. Keep the jumpers in this position to use the ISDN BRI WIC in a point-to-point connection or as the last device on the line of a passive-bus connection. Set the termination jumpers to - Cisco 16OC3/POS-SM | Hardware Installation Guide - Page 83
an ISDN Wall Jack BRI U port (RJ-48C) SEE MANUAL BEFORE INSTALLATION BRI U Straight-through RJ-48C-to-RJ-48C cable B1 B2 NT1 41192 RJ-48C jack Step 4 Step 5 Turn on power to the router. Check that the OK LED goes on, which indicates that the ISDN port has established a connection with - Cisco 16OC3/POS-SM | Hardware Installation Guide - Page 84
Card ISDN BRI WAN Interface Cards ISDN BRI S/T Leased-Line WICs Overview The 1-port ISDN BRI S/T leased-line WIC (WIC-1B-S/T-LL) provides a single B channel operating in leased-line mode at 64-kbps. (See Figure 54.) Figure 54 WIC-1B-S/T-LL Front Panel ISDN BRI port 41216 BRI S/T LL SEE MANUAL - Cisco 16OC3/POS-SM | Hardware Installation Guide - Page 85
WAN Interface Card Cables Use a straight-through RJ-48C-to-RJ-48C BRI cable (not included) to connect an ISDN BRI S/T leased-line WIC to a network. Connecting an ISDN BRI S/T Leased-Line WIC to a Network Warning Hazardous network voltages are present in WAN ports regardless of whether power to - Cisco 16OC3/POS-SM | Hardware Installation Guide - Page 86
3800 Series, data sheet • Cisco Network Modules and Interface Cards Regulatory Compliance and Safety Information • "Configuring ISDN BRI" chapter of the Cisco IOS Dial Technologies Configuration Guide for your Cisco IOS software release • Configuring a Router to Dial Multiple Sites using ISDN BRI - Cisco 16OC3/POS-SM | Hardware Installation Guide - Page 87
Learn is a service mark of Cisco Systems, Inc.; and Access Registrar, Aironet, Catalyst, CCDA, CCDP, CCIE, CCIP, CCNA, CCNP, CCSP, Cisco, the Cisco Certified Internetwork Expert logo, Cisco IOS, Cisco Press, Cisco Systems, Cisco Systems Capital, the Cisco Systems logo, Cisco Unity, Enterprise/Solver - Cisco 16OC3/POS-SM | Hardware Installation Guide - Page 88
Obtaining Documentation, Obtaining Support, and Security Guidelines ISDN BRI WAN Interface Cards OL-12844-01 14 - Cisco 16OC3/POS-SM | Hardware Installation Guide - Page 89
Obtaining Documentation, Obtaining Support, and Security Guidelines, page 8 For an overview of Cisco interface cards used for Cisco access routers refer to Cisco Interface Cards for Cisco Access Routers. 56/64-kbps DSU/CSU WAN Interface Card This section describes 56/64-kbps DSU/CSU WICs and how to - Cisco 16OC3/POS-SM | Hardware Installation Guide - Page 90
/CSU and can be configured to provide circuit-switched, dedicated, or leased-line service at 56 kbps. This WIC also supports 64-kbps dedicated lines. (See Figure 56.) Figure 56 WIC-1DSU-56K4 Front Panel 56- or 64-kbps port LEDs LED TD RD LP AL CD 41224 SEE MANUAL BEFORE INSTALLATION DSU 56K - Cisco 16OC3/POS-SM | Hardware Installation Guide - Page 91
56/64-kbps DSU/CSU WIC to a 56/64-kbps Services Wall Jack Switched 56/64-kbps port (RJ-48S) SEE MANUAL BEFORE INSTALLATION DSU 56K Straight-through RJ-48S-to-RJ-48S cable TD RD LP AL CD 43737 Step 4 Step 5 RJ-48S jack Turn on power to the router. Check that the CD - Cisco 16OC3/POS-SM | Hardware Installation Guide - Page 92
/CSU WAN Interface Card DSU/CSU WAN Interface Cards T1/FT1 DSU/CSU WICs Overview The 1-port T1/fractionalized T1 (FT1) DSU/CSU WIC includes an integrated data service unit/channel service unit (DSU/CSU). The WIC can be configured for either full T1 services or fractionalized T1 services. There are - Cisco 16OC3/POS-SM | Hardware Installation Guide - Page 93
place the WIC into loopback mode. The service provider can send a signal to test the connection from your site to the central office switch. Push this button again to turn off loopback mode. Enabling Wetting Current on T1/FT1 DSU/CSU WICs The WIC-1DSU-T1-V2 interface card supports wetting current - Cisco 16OC3/POS-SM | Hardware Installation Guide - Page 94
to the instructions in Installing Cisco Interface Cards in Cisco Access Routers. Grounding Ensure that the equipment you are working with is properly grounded. For instructions on grounding your serial WIC, refer to Installing Cisco Interface Cards in Cisco Access Routers. Cables Use a straight - Cisco 16OC3/POS-SM | Hardware Installation Guide - Page 95
DSU/CSU at the T1 service provider's central office. Supported Platforms For a list of the platforms supported by a Cisco interface card refer to Platform Support for Cisco Interface Cards. Finding Support Information for Platforms and Cisco IOS Software Images Use Cisco Feature Navigator to find - Cisco 16OC3/POS-SM | Hardware Installation Guide - Page 96
Cisco Integrated Data Service Unit/Channel Service Unit (DSU/CSU) Modules and WAN Interface Cards, tech note • "Configuring Serial Interfaces" chapter in the Cisco IOS Interface Configuration Guide for your Cisco IOS software release • 56K CSU Support for the Cisco Signaling Link Terminal, Cisco IOS - Cisco 16OC3/POS-SM | Hardware Installation Guide - Page 97
and Security Guidelines, page 19 For an overview of Cisco interface cards used for Cisco access routers see the Cisco Interface Cards for Cisco Access Routers document. ADSL WICs The DSL wide area network (WAN) interface cards (WICs) support one DSL line between a single customer premises equipment - Cisco 16OC3/POS-SM | Hardware Installation Guide - Page 98
Cards Note The term dying gasp refers to power status as defined in ITU-T standard G.991.2, section 7.1.2.5.3. LEDs on ADSL WICs ADSL WICs have three LEDs, which are shown in Figure 62 and are described in Table 14. Figure 62 ADSL and G.SHDSL WIC Front Panels ADASDLSL SEE MANUAL BEFORE - Cisco 16OC3/POS-SM | Hardware Installation Guide - Page 99
63 G.SHDSL WIC Front Panels ADASDLSL SEE MANUAL BEFORE INSTALLATION CD LP OK WIC 1ADSL SHDSL SEE MANUAL BEFORE INSTALLATION CD LP OK WIC 1SHDSL ADSL SEE MANUAL BEFORE INSTALLATION WIC 1ADSL IDG CD LP OK ADSL SEE MANUAL BEFORE INSTALLATION CD LP OK WIC 1ADSL DG 95231 WIC 1SHDSL V2 - Cisco 16OC3/POS-SM | Hardware Installation Guide - Page 100
cards. Supported Platforms Table 16 lists the Cisco router platforms that are compatible with each mode available on the WIC-1SHDSL-V2 interface card. Table 16 Cisco router platforms compatible with WIC-1SHDSL-V2 interface card Mode 2-wire ATM 2-wire T1/E1 in back-to-back configurations - Cisco 16OC3/POS-SM | Hardware Installation Guide - Page 101
• Cisco 1751 • Cisco 1760 • Cisco 1841 • Cisco 26xxXM • Cisco 2691 • Cisco 28xx • Cisco 37xx • Cisco 38xx For a list of the platforms supported by a Cisco interface card refer to Platform Support for Cisco Interface Cards. Finding Support Information for Platforms and Cisco IOS Software Images Use - Cisco 16OC3/POS-SM | Hardware Installation Guide - Page 102
over ATM (IMA) lines, and two ATM segmentation and reassembly (SAR) lines. The four DSL pairs are bundled in groups and configured in the Cisco IOS command-line interface (CLI) by using the dsl-group command. - The HWIC-2SHDSL provides two ports of connectivity through one RJ-11 connector. It - Cisco 16OC3/POS-SM | Hardware Installation Guide - Page 103
and follow the instructions that appear. ADSL High Speed WICs (HWICs) ADSL high speed WICs (HWICs) provide ADSL support to platforms with HWIC-enabled interface slots, such as the Cisco 1800 series (modular), Cisco 2800 series, and Cisco 3800 series integrated services routers. Standard ADSL, ADSL2 - Cisco 16OC3/POS-SM | Hardware Installation Guide - Page 104
straight-through RJ-45 cable, not supplied. LEDs on ADSL HWICs ADSL HWICs have 3 LEDs that indicate DSL functionality. Those ADSL HWICs with a backup ISDN port have three additional LEDs that indicate ISDN functionality. Figure 66 and Figure 67 show the front panels and LEDs for the ADSLoPOTS and - Cisco 16OC3/POS-SM | Hardware Installation Guide - Page 105
platforms supported by a Cisco interface card refer to Platform Support for Cisco Interface Cards. Finding Support Information for Platforms and Cisco IOS Software Images Use Cisco Feature Navigator to find information about platform support and Cisco IOS software image support. Access Cisco Feature - Cisco 16OC3/POS-SM | Hardware Installation Guide - Page 106
the RJ-11 pinouts on the WIC-1SHDSL-V2 and WIC-1SHDSL-V3 interface cards. Table 22 WIC-1SHDSL-V2 RJ-11 Pinouts router is turned off. Warning To comply with the Telcordia GR-1089 NEBS standard for electromagnetic compatibility and safety, connect the HWIC-2SHDSL and HWIC-4SHDSL interface cards - Cisco 16OC3/POS-SM | Hardware Installation Guide - Page 107
port (RJ-11) WIC 1SHDSL V2 SHDSL SEE MANUAL BEFORE INSTALLATION CD LP OK Patch panel RJ-11 twisted-pair cables 10 11 12 13 14 103235 Step 4 Step 5 Turn on power to the router. To connect the card to the network, you must configure the DSL interface card in the router to the no shutdown - Cisco 16OC3/POS-SM | Hardware Installation Guide - Page 108
Card to the Network DSL Interface Cards Connecting the ISDN Ports on HWICs Use an RJ-45-to-RJ-45 BRI cable (not included) to connect the ISDN BRI port to an ISDN NT1 device. Refer to the online document Cisco Modular Access Router Cable Specifications OK B2 SEE MANUAL OK BEFORE ADSL ISDN BRI - Cisco 16OC3/POS-SM | Hardware Installation Guide - Page 109
HWIC-4SHDSL interface cards only to intra-building or unexposed wiring or cable. The intra-building port(s) of the equipment or subassembly must not be metallically connected to interfaces that connect to the OSP or its wiring. These interfaces are designed for use into the Cisco HWIC-4SHDSL port - Cisco 16OC3/POS-SM | Hardware Installation Guide - Page 110
and Microfilters with an ADSL-over-POTS WIC (WIC-1ADSL) POTS splitters and microfilters apply to the ADSL-over-POTS WIC only. They are used on telephone lines to ensure voice- and data-call quality. POTS splitters result in the best data and voice performance when the router and the telephone are - Cisco 16OC3/POS-SM | Hardware Installation Guide - Page 111
Cards Using POTS Splitters and Microfilters with an ADSL-over-POTS WIC (WIC DATA VOICE 41199 To Cisco router To phone Microfilters Microfilters are installed on telephones to improve voice-call quality when voice and data equipment are using the same telephone line (twisted pair). You should use - Cisco 16OC3/POS-SM | Hardware Installation Guide - Page 112
39196 Optional microfilters Cisco router Customer-Installed Splitter This scenario is described below and illustrated in Figure 77. • The telephone company has provisioned a single copper pair to be used by both the telephone (POTS) service and the router with a DSL interface card, so a POTS - Cisco 16OC3/POS-SM | Hardware Installation Guide - Page 113
Interface Cards Using POTS Splitters and Microfilters with an ADSL-over-POTS WIC (WIC-1ADSL) Figure 77 To telco Customer-Installed Splitter Actual wall of building Splitter Required microfilter Cisco router Optional microfilters Optional telephones, if supported by your telco 39275 Router - Cisco 16OC3/POS-SM | Hardware Installation Guide - Page 114
Voice and Quality of Service Features for ADSL and G.SHDSL on Cisco 1700, Cisco 2600, and Cisco 3600 Series Routers, Cisco IOS Releases 12.2(4)XL and 12.2(13)T Sample Configurations - Configuring IPSec Over ADSL on a Cisco 2600/3600 With ADSL-WIC and Hardware Encryption Modules - Configuring a Cisco - Cisco 16OC3/POS-SM | Hardware Installation Guide - Page 115
/2600/3600 ADSL WIC With AAL5MUX IP Routing, Multiple PVCs, and Terminating on a Cisco 6400 UAC-NRP - Configuring a Cisco 1700/2600/3600 ADSL WIC to Support PPPoE Clients, Terminating on a Cisco 6400 UAC - Configuring a Cisco 1700/2600/3600 ADSL WIC and a Cisco 6400 Configured With IRB Using RFC1483 - Cisco 16OC3/POS-SM | Hardware Installation Guide - Page 116
Obtaining Documentation, Obtaining Support, and Security Guidelines DSL Interface Cards OL-12846-01 20 - Cisco 16OC3/POS-SM | Hardware Installation Guide - Page 117
for Voice Interface Cards This section tells where to find instructions on how to properly ground voice interface cards on the following platforms: • Cisco 1700 Series Routers • Cisco 2600 Series, Cisco 3600 Series, and Cisco 3700 Series Routers • Cisco ICS 7750 Warning Do not work on the system or - Cisco 16OC3/POS-SM | Hardware Installation Guide - Page 118
. See the "Installing the Cisco ICS 7750" chapter in the Cisco ICS 7750 Hardware Installation Guide. Pinout and Cabling Specifications Note Refer to the Cisco Modular Access Router Specifications for network-end connectors and pinouts of the cables connecting voice cards. Look under the type of - Cisco 16OC3/POS-SM | Hardware Installation Guide - Page 119
The Cisco ICS 7750 also supports 8 FXS ports on the analog station interface 81 (ASI 81), and 16 FXS ports on the ASI 160. See the "Processor Cards Feature Summary" chapter in the Cisco ICS 7750 System Description document. Figure 79 2-Port FXS Card Front Panel (VIC-2FXS) VIC FXS 1 SEE MANUAL - Cisco 16OC3/POS-SM | Hardware Installation Guide - Page 120
Station (FXS) Interface Cards Figure 80 2-Port FXS Card Front Panel (VIC2-2FXS) IN USE 89041 IN USE VIC22FXS ! 1 SEE MANUAL BEFORE INSTALLATION 0 Figure 81 4-Port FXS/DID Card Front Panel (VIC-4FXS/DID) Voice Interface Cards 65683 VIC 4FXS/DID 3 2 1 0 IN USE Connecting FXS Cards Use - Cisco 16OC3/POS-SM | Hardware Installation Guide - Page 121
Voice Interface Cards Figure 82 Connecting an FXS Card RJ-11 ports IN USE IN USE VIC FXS 1 SEE MANUAL BEFORE INSTALLATION 0 Straight-through RJ-11-to-RJ-11 cable Foreign Exchange Office (FXO) Interface Cards 41197 Step 3 Fax machine Connect the other end of the cable to the RJ-11 port on - Cisco 16OC3/POS-SM | Hardware Installation Guide - Page 122
integral circuit protection. FXO Figure 83 2-Port FXO Card Front Panel (VIC-2FXO) IN USE 41217 IN USE VIC FXO 1 SEE MANUAL BEFORE INSTALLATION 0 Figure 84 2-Port FXO Card Front Panel (VIC2-2FXO) VIC22FXO SEE MANUAL BEFORE INSTALLATION 1 0 IN USE 89038 Figure 85 4-Port FXO Card Front - Cisco 16OC3/POS-SM | Hardware Installation Guide - Page 123
. Step 2 Connect one end of the straight-through RJ-11 cable to an RJ-11 port on the card. (See Figure 86.) Figure 86 Connecting an FXO Card RJ-11 ports IN USE IN USE VIC FXS 1 SEE MANUAL BEFORE INSTALLATION 0 Straight-through RJ-11-to-RJ-11 cable 41195 Step 3 RJ-11 wall jack Connect the - Cisco 16OC3/POS-SM | Hardware Installation Guide - Page 124
Cards Voice Interface Cards Figure 87 2-Port E&M Card Front Panel (VIC-2E/M) IN USE 41219 IN USE VIC E&M 1 SEE MANUAL BEFORE INSTALLATION 0 Figure 88 2-Port E&M Card Front Panel (VIC2-2E/M) IN USE 89039 IN USE VIC22E/M 1 SEE MANUAL BEFORE INSTALLATION 0 Connecting E&M Interface Cards - Cisco 16OC3/POS-SM | Hardware Installation Guide - Page 125
IN USE IN USE VIC E&M 1 SEE MANUAL BEFORE INSTALLATION 0 FXS, FXO, and E&M Interface Card LEDs Straight-through RJ-48C-to-RJ-48C cable 41194 Step 3 RJ-48C wall jack Connect the other end of the cable to an RJ-48C wall outlet. FXS, FXO, and E&M Interface Card LEDs Each voice interface card - Cisco 16OC3/POS-SM | Hardware Installation Guide - Page 126
ISDN BRI S/T 0 Figure 92 2-Port ISDN BRI Card Front Panel (VIC2-2BRI-NT/TE) B1 SEE VIC22BRI-NT/TE B2 OK MANUAL BEFORE INSTALLATION ISDN BRI S/T 1 ISDN BRI S/T 0 89037 ISDN BRI Card Considerations Note Cisco ISDN BRI interface cards support voice ISDN traffic only. Note The ISDN BRI - Cisco 16OC3/POS-SM | Hardware Installation Guide - Page 127
configurations, the Cisco IOS software disables certain ports, as shown in Table 24: • An ISDN BRI voice interface card in a 1-slot voice network module (NM-1V) • Two ISDN BRI voice interface cards in a 2-slot voice network module (NM-2V) • One ISDN BRI voice interface card and one analog voice - Cisco 16OC3/POS-SM | Hardware Installation Guide - Page 128
93.) Figure 93 Connecting the 2-Port ISDN BRI Card RJ-45 ports VIC 2B-S/T TE ISDN BRI S/T 1 B1 B2 SEE OK MANUAL BEFORE ISDN BRI S/T 0 INTALLATION Straight-through RJ-45-to-RJ-45 cable 41198 S/T port NT1 device Note When the interface is configured as NT and is connecting to a TE - Cisco 16OC3/POS-SM | Hardware Installation Guide - Page 129
, Cisco 2691, Cisco 2800 series, Cisco 3600 series, Cisco 3700 series, and Cisco 3800 series routers support DID on the 4-port FXS/DID cards in Cisco IOS Release 12.3(14)T and later. Figure 94 2-Port Analog DID Voice Interface Card VIC 2DID 1 SEE MANUAL BEFORE INSTALLATION 0 IN USE IN USE 36014 - Cisco 16OC3/POS-SM | Hardware Installation Guide - Page 130
Card Use a standard straight-through RJ-11 modular telephone cable to connect the VIC-2DID or VIC-4FXS/DID interface card to a PSTN or PBX. Step 1 Install the grounding lug on the router. See the hardware installation guide for your router for detailed instructions. (Grounding on the Cisco - Cisco 16OC3/POS-SM | Hardware Installation Guide - Page 131
trunk interface cards support generic 1- or 2-port T1 or E1 trunk interfaces for voice, data, and integrated voice and data applications. These cards provide basic structured and unstructured service for T1 or E1 networks. They can be used as trunk interfaces for voice and data services, as - Cisco 16OC3/POS-SM | Hardware Installation Guide - Page 132
Interface Cards Voice Interface Cards • 1-port E1 multiflex trunk interface card with G.703 support (VWIC2-1MFT-G703) • 2-port multiflex trunk interface card with G.703 support (VWIC2-2MFT-G703) Note The VWIC-1MFT-G703, VWIC2-1MFT-G703, VWIC-2MFT-G703 and VWIC2-2MFT-G703 interface cards allow - Cisco 16OC3/POS-SM | Hardware Installation Guide - Page 133
Connecting a Multiflex Trunk Interface Card For this connection, use the straight-through RJ-48C-to-RJ-48C cable that came with your card. Note Refer to the Cisco Modular Access Router Specifications for network-end connectors and pinouts of the cables connecting voice cards. Look under the type - Cisco 16OC3/POS-SM | Hardware Installation Guide - Page 134
services. The CAMA card provides the software features voice network modules, or with the Cisco 1751 or Cisco 1760 routers. CAMA Interface Cards The 2-port CAMA card is illustrated in Figure 100. Figure 100 V2-Port CAMA Card Front Panel (VIC-2CAMA) IN USE IN USE 62331 VIC2CAMA 1 SEE MANUAL - Cisco 16OC3/POS-SM | Hardware Installation Guide - Page 135
, data sheet • Digital J1 Packet Voice Network Module, data sheet • FXO, FXS, and E&M Voice Interface Card Support on Cisco 1700 Series Routers • Understanding 1-Port and 2-Port E1 Multiflex Trunk Voice/WAN Interface Cards (VWICs), tech note • Cisco Digital 1-port and 2-port T1 Multi-Flex Voice WICs - Cisco 16OC3/POS-SM | Hardware Installation Guide - Page 136
Software Enhancements for the Cisco 1750 and Cisco 1751 Routers, configuration note • Configuring and Troubleshooting the VIC-2DID, how-to • Analog DID for Cisco 2600 and Cisco 3600 Series Routers, Cisco IOS Release 12.1(5)XM feature module • 4-Port FXS/DID Voice Interface Card Support on the Cisco - Cisco 16OC3/POS-SM | Hardware Installation Guide - Page 137
Learn is a service mark of Cisco Systems, Inc.; and Access Registrar, Aironet, BPX, Catalyst, CCDA, CCDP, CCIE, CCIP, CCNA, CCNP, CCSP, Cisco, the Cisco Certified Internetwork Expert logo, Cisco IOS, Cisco Press, Cisco Systems, Cisco Systems Capital, the Cisco Systems logo, Cisco Unity, Enterprise - Cisco 16OC3/POS-SM | Hardware Installation Guide - Page 138
Obtaining Documentation, Obtaining Support, and Security Guidelines Voice Interface Cards OL-12847-01 22 - Cisco 16OC3/POS-SM | Hardware Installation Guide - Page 139
5 • Obtaining Documentation, Obtaining Support, and Security Guidelines, page 6 For an overview of Cisco interface cards used for Cisco access routers see the Cisco Interface Cards for Cisco Access Routers document. Analog Modem WICs The analog modem WAN interface cards originate or terminate analog - Cisco 16OC3/POS-SM | Hardware Installation Guide - Page 140
WICs Analog Modem WAN Interface Cards 52504 Figure 102 WIC-1AM Front Panel Modem WIC-1AM PHONE SP CN OH LINE 0 SEE MANUAL BEFORE INSTALLATION Figure 103 WIC-2AM Front Panel Modem WIC-2AM SP CN OH LINE 1 SP CN OH LINE 0 SEE MANUAL BEFORE INSTALLATION Figure 104 WIC-1AM-V2 Front Panel - Cisco 16OC3/POS-SM | Hardware Installation Guide - Page 141
about configuring the WIC-1AM-V2 and WIC-2AM-V2 interface cards, and upgrading the modem firmware, see the Cisco WIC-1AM-V2 and WIC-2AM-V2 Analog Modem WAN Interface Card feature document. The WIC-1AM-V2 and WIC-2AM-V2 interface cards support the following protocols: • All standard data rates - Cisco 16OC3/POS-SM | Hardware Installation Guide - Page 142
Analog Modem WAN Interface Cards Understanding Interface Numbering on Analog Modem WICs Cisco IOS software identifies each modem uniquely by its slot number and port number. Some Cisco IOS configuration commands identify asynchronous ports by an interface number (or a line number, which is the - Cisco 16OC3/POS-SM | Hardware Installation Guide - Page 143
WAN Interface Cards • Analog Modem Interface Card Configuration Notes for Cisco 1700 Series Routers • Cisco Network Modules and Interface Cards Regulatory Compliance and Safety Information • Cisco WIC-1AM-V2 and WIC-2AM-V2 Analog Modem WAN Interface Card • Modem-Router Connection Guide, tech note - Cisco 16OC3/POS-SM | Hardware Installation Guide - Page 144
Modems on Cisco Access Servers, tech note • Understanding Analog Modem WAN Interface Cards (WIC-1AM or WIC-2AM), tech note • WAN Interface Card (WIC)/Platform Hardware Compatibility Matrix for 1600, 1700, 2600, 3600, and 3700 Series Routers, tech note Obtaining Documentation, Obtaining Support, and - Cisco 16OC3/POS-SM | Hardware Installation Guide - Page 145
WIC-4ESW Card, page 1 • WIC-1ENET Interface Card, page 4 • Supported Platforms, page 6 • Obtaining Documentation, Obtaining Support, and Security Guidelines, page 7 For an overview of Cisco interface cards used for Cisco access routers see the Cisco Interface Cards for Cisco Access Routers document - Cisco 16OC3/POS-SM | Hardware Installation Guide - Page 146
of VLANs supported by the router. Although the router supports more VLANs, the WIC-4ESW interface card supports a maximum of 16 VLANs. There are no new or modified commands for use with the WIC-4ESW interface card. All commands used with the switch are documented in the Cisco IOS command reference - Cisco 16OC3/POS-SM | Hardware Installation Guide - Page 147
) is required for using the Cisco WIC-4ESW card. WIC-4ESW Interface Card Supported Standards The WIC-4ESW interface card supports IEEE 802.3 Ethernet on unknown unicast or multicast flooding • Multicast groups • IP multicast support • Cisco Group Management Protocol (CGMP) client, CGMP fast-leave • - Cisco 16OC3/POS-SM | Hardware Installation Guide - Page 148
is on when the Cisco IOS software recognizes the WIC-1ENET card and the connection is up. The FDX LED is on when the port is operating in full-duplex mode, and off when operating in half-duplex mode. Additionally, the Activity LED on the front of the router indicates that data is being transmitted - Cisco 16OC3/POS-SM | Hardware Installation Guide - Page 149
WIC-1ENET Interface Card WIC-1ENET Requirements This section describes the requirements and supported standards for the WIC-1ENET card. WIC-1ENET Memory Requirements To run Cisco IOS images that support the WIC-1ENET card, the router must have a minimum amount of Flash memory and dynamic RAM (DRAM - Cisco 16OC3/POS-SM | Hardware Installation Guide - Page 150
set Keepalive set (10 sec) Half-duplex, 10BaseT .... Supported Platforms For a list of the platforms supported by a Cisco interface card refer to Platform Support for Cisco Interface Cards. Finding Support Information for Platforms and Cisco IOS Software Images Use Cisco Feature Navigator to find - Cisco 16OC3/POS-SM | Hardware Installation Guide - Page 151
Learn is a service mark of Cisco Systems, Inc.; and Access Registrar, Aironet, Catalyst, CCDA, CCDP, CCIE, CCIP, CCNA, CCNP, CCSP, Cisco, the Cisco Certified Internetwork Expert logo, Cisco IOS, Cisco Press, Cisco Systems, Cisco Systems Capital, the Cisco Systems logo, Cisco Unity, Enterprise/Solver - Cisco 16OC3/POS-SM | Hardware Installation Guide - Page 152
Obtaining Documentation, Obtaining Support, and Security Guidelines LAN Interface Cards OL-12849-01 8 - Cisco 16OC3/POS-SM | Hardware Installation Guide - Page 153
8 For an overview of Cisco interface cards used for Cisco access routers see the Cisco Interface Cards for Cisco Access Routers document. Cisco 10/100BASE-T Ethernet Switch HWICs The Cisco 10/100BASE-T Ethernet switch HWIC is available as a 4-port single-wide HWIC (HWIC-4ESW), and as an (8+1)-port - Cisco 16OC3/POS-SM | Hardware Installation Guide - Page 154
The daughter card distributes the -48 volt power to the ports of the HWIC. Note In order for the HWIC to distribute inline power, the router must be provisioned with an optional -48 volt power supply. Cisco 10/100BASE-T Ethernet Switch HWIC LEDs The Cisco 10/100BASE-T Ethernet switch HWIC uses two - Cisco 16OC3/POS-SM | Hardware Installation Guide - Page 155
the installation of inline power daughter cards on HWIC-4ESW and HWIC-D-9ESW Ethernet switch HWICs. Table 31 shows the inline power card mapping for the two HWICs. Table 31 HWIC and Inline Power Card Mapping HWIC Part Number HWIC-4ESW HWIC-D-9ESW Inline Power Part Number ILPM-4 ILPM-8 Note The - Cisco 16OC3/POS-SM | Hardware Installation Guide - Page 156
/100BASE-T Ethernet Switch High-Speed WAN Interface Cards Installing Inline Power Daughter Cards on Cisco 10/100BASE-T Ethernet Switch HWICs Installing a Daughter Card on the HWIC-4ESW Card To install an inline power daughter card on the HWIC-4ESW card, perform the following steps: Step 1 Install - Cisco 16OC3/POS-SM | Hardware Installation Guide - Page 157
-T Ethernet Switch High-Speed WAN Interface Cards Installing Inline Power Daughter Cards on Cisco 10/100BASE-T Ethernet Switch HWICs Installing a Daughter Card on the HWIC-D-9ESW Card To install an inline power daughter card on the HWIC-D-9ESW card, perform the following steps: Step 1 Install - Cisco 16OC3/POS-SM | Hardware Installation Guide - Page 158
WAN Interface Cards Step 3 Read the status of the -48 volt power supply and the ports that support inline power. Scenarios for Cisco 10/100BASE-T Ethernet Switch HWICs Cisco 10/100BASE-T Ethernet switch HWICs are designed for use in the following scenarios: • Multiproduct WAN gateway routers for - Cisco 16OC3/POS-SM | Hardware Installation Guide - Page 159
Integrated Services Routers, data sheet • Cisco EtherSwitch 4- and 9-Port High-Speed WAN Interface Cards for Cisco 1800 (Modular), Cisco 2800, and Cisco 3800 Series Integrated Services Routers, Q&A • Cisco Network Modules and Interface Cards Regulatory Compliance and Safety Information • Cisco HWIC - Cisco 16OC3/POS-SM | Hardware Installation Guide - Page 160
Learn is a service mark of Cisco Systems, Inc.; and Access Registrar, Aironet, Catalyst, CCDA, CCDP, CCIE, CCIP, CCNA, CCNP, CCSP, Cisco, the Cisco Certified Internetwork Expert logo, Cisco IOS, Cisco Press, Cisco Systems, Cisco Systems Capital, the Cisco Systems logo, Cisco Unity, Enterprise/Solver - Cisco 16OC3/POS-SM | Hardware Installation Guide - Page 161
the Cisco Interface Cards for Cisco Access Routers document. Cisco 1- and 2-Port Fast Ethernet HWICs The Cisco Fast Ethernet HWICs are single-wide interface cards, available as a 1-port HWIC (HWIC-1FE) and as a 2-port HWIC (HWIC-2FE), that provide Cisco modular and integrated services routers with - Cisco 16OC3/POS-SM | Hardware Installation Guide - Page 162
Install the Fast Ethernet HWICs in the following Cisco routers: • Cisco 1841 integrated services router • Cisco 2800 series integrated services routers • Cisco 3800 series integrated services routers Note Insert Fast Ethernet HWICs into HWIC slots only. They do not fit into WIC/VIC slots. Table 32 - Cisco 16OC3/POS-SM | Hardware Installation Guide - Page 163
Cards Cisco 1- and 2-Port Fast Ethernet HWICs Fast Ethernet HWICs Port Numbering Port numbers identify the interfaces on the modules and interface cards installed in the router. Modules and interface cards are identified by three digits: slot number/subslot number/port number. For example, HWIC - Cisco 16OC3/POS-SM | Hardware Installation Guide - Page 164
Fast Ethernet HWIC into an HWIC slot on the router. (See Chapter , "Installing Cisco Interface Cards in Cisco Access Routers.") Note Insert Fast Ethernet HWICs into HWIC slots only. They do not fit into WIC/VIC slots. Step 3 Using the appropriate cables, connect the HWIC to your system. Caution - Cisco 16OC3/POS-SM | Hardware Installation Guide - Page 165
Port Fast Ethernet High-Speed WAN Interface Cards Obtaining Documentation, Obtaining Support, and Security Guidelines Related Topic Document Title Cisco IOS software website and reference Cisco IOS Software documentation http://www.cisco.com/en/US/products/sw/iosswrel/tsd_products_support_cate - Cisco 16OC3/POS-SM | Hardware Installation Guide - Page 166
Obtaining Documentation, Obtaining Support, and Security Guidelines 1- and 2-Port Fast Ethernet High-Speed WAN Interface Cards OL-12851-01 6 - Cisco 16OC3/POS-SM | Hardware Installation Guide - Page 167
Modules, page 6 • Connecting Cisco Gigabit Ethernet High-Speed WAN Interface Cards to the Network, page 7 • Related Documentation, page 8 • Obtaining Documentation, Obtaining Support, and Security Guidelines, page 9 For an overview of Cisco interface cards used for Cisco access routers see the Cisco - Cisco 16OC3/POS-SM | Hardware Installation Guide - Page 168
100 km Note Only Cisco-certified SFPs are supported on the Cisco Gigabit Ethernet high-speed WAN interface card. Tip When switching from one type of SFP to another, connection problems, including connection failure, may result. Use the show controller command at the Cisco IOS command-line interface - Cisco 16OC3/POS-SM | Hardware Installation Guide - Page 169
Card LEDs The Cisco Gigabit Ethernet high-speed WAN interface card uses LEDs to indicate card status and activity. (See Figure 116.) Figure 116 Cisco Gigabit Ethernet High-Speed WAN Interface Card Faceplate (HWIC that the card is available to the router. connection is available to the router. 3 - Cisco 16OC3/POS-SM | Hardware Installation Guide - Page 170
SFPs supported on the Cisco Gigabit Ethernet high-speed WAN interface card. To install an SFP into the Cisco Gigabit Ethernet high-speed WAN interface card, perform the following steps: Step 1 Install the interface card in the router. (See Chapter , "Installing Cisco Interface Cards in Cisco Access - Cisco 16OC3/POS-SM | Hardware Installation Guide - Page 171
page 7.) Removing Small Form-Factor Pluggable Modules from Cisco Gigabit Ethernet High-Speed WAN Interface Cards This section describes a generic removal procedure. Small form-factor pluggable modules (SFPs) use various latch designs (see Figure 118) to secure the module in the SFP port. Note Latch - Cisco 16OC3/POS-SM | Hardware Installation Guide - Page 172
small form-factor pluggable modules (SFPs) supported by the Cisco Gigabit Ethernet high-speed WAN interface card, see Table 35. Table 35 Cabling Requirements for Gigabit Ethernet Small Form-Factor Pluggable Modules GE SFP Transceiver Type 1000BASE-T 1000BASE-SX Cisco Part Number GLC-T= GLC-SX-MM - Cisco 16OC3/POS-SM | Hardware Installation Guide - Page 173
WAN gateway routers for LANs • In same-building or same-campus wiring closets to achieve high-speed connectivity for high-demand network segments Tip For more information on possible network configurations using the Cisco Gigabit Ethernet high-speed WAN interface card, see Cisco product - Cisco 16OC3/POS-SM | Hardware Installation Guide - Page 174
2800 and 3800 Series Routers, data sheet • Cisco Gigabit Ethernet High-Speed WAN Interface Card, Q&A • Cisco Network Modules and Interface Cards Regulatory Compliance and Safety Information • "Configuring LAN Interfaces" chapter of the Cisco IOS Interface Configuration Guide, Release 12.2 OL-12852 - Cisco 16OC3/POS-SM | Hardware Installation Guide - Page 175
Learn is a service mark of Cisco Systems, Inc.; and Access Registrar, Aironet, Catalyst, CCDA, CCDP, CCIE, CCIP, CCNA, CCNP, CCSP, Cisco, the Cisco Certified Internetwork Expert logo, Cisco IOS, Cisco Press, Cisco Systems, Cisco Systems Capital, the Cisco Systems logo, Cisco Unity, Enterprise/Solver - Cisco 16OC3/POS-SM | Hardware Installation Guide - Page 176
Obtaining Documentation, Obtaining Support, and Security Guidelines Gigabit Ethernet High-Speed WAN Interface Cards OL-12852-01 10 - Cisco 16OC3/POS-SM | Hardware Installation Guide - Page 177
WAN card. Its primary application is WAN connectivity as a backup datalink for critical data applications and as a primary WAN connection. It supports the Cisco 1800 series, the Cisco 2800 series and the Cisco 3800 series integrated service routers (Cisco ISRs). The 3G wireless WAN HWIC houses - Cisco 16OC3/POS-SM | Hardware Installation Guide - Page 178
bands on the multiple services for use in different parts of the world: • 850/900/1800/1900 MHz for GPRS and EDGE services • 850/1900/2100 MHz for UMTS and HSDPA services HWIC-3G-GSM is the Cisco part number for which the interface card is configured. Figure 121 shows the front panel view of a 3G - Cisco 16OC3/POS-SM | Hardware Installation Guide - Page 179
WAN Interface Cards REVIEW DRAFT-CISCO CONFIDENTIAL Figure 122 shows the top view of the 3G wireless WAN HWIC. Figure 122 Top View of HWIC-3G-GSM HWIC-3G-GSM 230090 3HGW-IGCS- M WWAN RSSI Diag Port ANT 1UMTS HSDPA Figure 123 shows the bottom view of the 3G wireless WAN HWIC. Figure 123 - Cisco 16OC3/POS-SM | Hardware Installation Guide - Page 180
DRAFT-CISCO CONFIDENTIAL HWIC-3G-CDMA The CDMA version supports multiple bands and services: • 800/1900 MHz for 1xRTT • 800/1900 MHz for EVDO-Release 0 and Release A HWIC-3G-CDMA-x is the Cisco part number for which the interface card is configured. x is a variable for carrier-specific versions - Cisco 16OC3/POS-SM | Hardware Installation Guide - Page 181
3G Wireless WAN Interface Cards REVIEW DRAFT-CISCO CONFIDENTIAL Figure 125 shows the top view of a CDMA 3G wireless WAN HWIC. Figure 125 Top View of HWIC-3G-CDMA HWIC-3G-CDMA 230091 HEVWDICO- DIV WWAN RSSI Diag Port MAIN 1xRTT EVDO Figure 126 shows the bottom view of a CDMA 3G - Cisco 16OC3/POS-SM | Hardware Installation Guide - Page 182
Multiple 3G wireless HWICs on a single chassis is not a supported configuration at this time. • The 3G wireless HWIC must be installed in an HWIC slot. To determine which slots on your platform support HWICs, see the "Platform Slot Numbering and Limitations for Cisco Interface Cards" section on page - Cisco 16OC3/POS-SM | Hardware Installation Guide - Page 183
3G Wireless WAN Interface Cards Installing a SIM Card in the HWIC-3G-GSM REVIEW DRAFT-CISCO CONFIDENTIAL Installing a SIM Card in the HWIC-3G-GSM To install a SIM card onto the GSM HWIC, follow these steps: Step 1 On the bottom side of the 3G wireless HWIC, remove the bracket by unscrewing the - Cisco 16OC3/POS-SM | Hardware Installation Guide - Page 184
Installing a SIM Card in the HWIC-3G-GSM 3G Wireless WAN Interface Cards REVIEW DRAFT-CISCO CONFIDENTIAL Step 2 To open the SIM cover, slide it in the direction of the "Open" arrows. Then lift the hinged cover. See Figure 128 for details. Figure 128 SIM Cards Installation Step 2 OPEN LOCK - Cisco 16OC3/POS-SM | Hardware Installation Guide - Page 185
3G Wireless WAN Interface Cards Installing a SIM Card in the HWIC-3G-GSM REVIEW DRAFT-CISCO CONFIDENTIAL Figure 129 SIM Card Installation Step 3 1 OPEN LOCK 2 170615 1 Chamfer 2 SIM Card Step 4 Close the cover by pushing it down and then sliding into the direction of the "Lock" arrows - Cisco 16OC3/POS-SM | Hardware Installation Guide - Page 186
WWAN LED (Per PCI Express Mini-card Wireless WAN Standard) Service Type LEDs (CDMA HWIC) Description Off: Low RSSI ( service or no RSSI detected. Off: HWIC in reset mode or not powered. Slow blink: Searching for service. Solid Green: Active service; no traffic detected. Fast Blink: Active service - Cisco 16OC3/POS-SM | Hardware Installation Guide - Page 187
on a chassis or working near power supplies, unplug the power cord on AC units; disconnect the power at the circuit breaker on DC units. Statement 12 Warning When handling the HWICs and antennas, wear grounding wrist straps to avoid ESD damage to the card. Do not directly touch the backplane - Cisco 16OC3/POS-SM | Hardware Installation Guide - Page 188
, install the 3G wireless HWIC in the router. See Chapter , "Installing Cisco Interface Cards in Cisco Access Routers," for more information. In major power cabling runs. If necessary, use an extension cable to relocate the antenna away from these obstructions. Caution Install the 3G wireless HWIC - Cisco 16OC3/POS-SM | Hardware Installation Guide - Page 189
for better radio performance and coverage. Supported Cisco Antennas and Cables . Table 37 Table 37 lists the Cisco antennas that are supported for use on the 3G wireless WAN HWIC Cisco Antennas Supported on the 3G Wireless HWIC Cisco Part Number 3G-ANTM1919D Antenna Type Dipole Omnidirectional - Cisco 16OC3/POS-SM | Hardware Installation Guide - Page 190
Antennas If you are using Cisco swivel-mounted dipole antennas, follow these steps: Step 1 Step 2 Attach an antenna to each TNC antenna connectors on the front of the 3G wireless HWIC and tighten it hand-tight. Orient the antennas, depending on how you intend to mount the router in which the 3G - Cisco 16OC3/POS-SM | Hardware Installation Guide - Page 191
information about the 3G wireless WAN interface cards. • Cisco Wireless ISR and HWIC Access Point Configuration Guide • Cisco Multiband Swivel Mount Dipole Antenna (3G-ANTM1919D) • Cisco Multiband Omnidirectional Ceiling Mount Antenna (3G-ANTM1916-CM) • Cisco Extended Antenna Base (3G-AE015-R) OL - Cisco 16OC3/POS-SM | Hardware Installation Guide - Page 192
Learn is a service mark of Cisco Systems, Inc.; and Access Registrar, Aironet, Catalyst, CCDA, CCDP, CCIE, CCIP, CCNA, CCNP, CCSP, Cisco, the Cisco Certified Internetwork Expert logo, Cisco IOS, Cisco Press, Cisco Systems, Cisco Systems Capital, the Cisco Systems logo, Cisco Unity, Enterprise/Solver - Cisco 16OC3/POS-SM | Hardware Installation Guide - Page 193
access point HWICs: • Single-mode access point HWIC with 2.4-GHz radio for 802.11b/g operations. (See Figure 132.) The following are the Cisco part numbers and the geographic regions for which the interface cards are configured: - HWIC-AP-G-A-North America - HWIC-AP-G-E-Europe - HWIC-AP-G-J-Japan - Cisco 16OC3/POS-SM | Hardware Installation Guide - Page 194
) web-based application, or by using the Cisco IOS command-line interface (CLI). See the Cisco Router and Security Device Manager (SDM) Quick Start Guide or the Cisco Access Router Wireless Configuration Guide for more information. • Dual-mode access point HWIC with two radios: one 2.4-GHz 802.11b - Cisco 16OC3/POS-SM | Hardware Installation Guide - Page 195
HWICs, see the "Platform Slot Numbering and Limitations for Cisco Interface Cards" section on page 8. • The 4.9-GHz band is not supported. • Although the use of two antennas is not required, both antennas should be used to take advantage of diversity for the best RF performance. Access Point HWIC - Cisco 16OC3/POS-SM | Hardware Installation Guide - Page 196
the LEDs are described in Table 39. Table 39 LED OK DATA Access Point HWIC LEDs Description Off if the access point HWIC is administratively shut down or there is no service set identifier (SSID) configured. Blinks if an SSID is configured but there is no client associated. On (solid green) if one - Cisco 16OC3/POS-SM | Hardware Installation Guide - Page 197
Access Point High-Speed WAN Interface Cards Supported Cisco Radio Antennas Table 40 lists the Cisco antennas that are supported for use on the single-mode access point HWIC. Table 40 Cisco Antennas Supported on the Single-Mode Access Point HWIC Cisco Part Number AIR-ANT4941 AIR-ANT1728 AIR - Cisco 16OC3/POS-SM | Hardware Installation Guide - Page 198
Point High-Speed WAN Interface Cards Access Point High-Speed WAN Interface Cards Table 41 lists the Cisco antennas that are supported for use on the dual-mode access point HWIC. Table 41 Cisco Antennas Supported on the Dual-Mode Access Point HWIC Cisco Part Number AIR-ANTM2050D-R Antenna Type - Cisco 16OC3/POS-SM | Hardware Installation Guide - Page 199
If you are using Cisco swivel-mount dipole antennas, follow these steps: Step 1 Step 2 Attach an antenna to each of the RP-TNC antenna connectors on the front of the access point HWIC and tighten it hand-tight. Orient the antennas depending on how you intend to mount the router in which the - Cisco 16OC3/POS-SM | Hardware Installation Guide - Page 200
Cards Note Although it is not absolutely necessary, for best RF performance, orient the antennas as shown in Figure 134. Figure 134 Swivel-Mount Dipole Antenna Positions for Use with Desktop Router 1 121422 HWIC AIR-ANTM2050D-R to the HWIC-AP-AG, see the Cisco Multiband Swivel-Mount Dipole - Cisco 16OC3/POS-SM | Hardware Installation Guide - Page 201
instructions for your antenna: • For more information about connecting the AIR-ANT1728 to the HWIC-AP-G, see the Cisco Support, and Security Guidelines" section on page 10. • Cisco Access Router Wireless Configuration Guide • Declarations of Conformity and Regulatory Information for Cisco - Cisco 16OC3/POS-SM | Hardware Installation Guide - Page 202
Learn is a service mark of Cisco Systems, Inc.; and Access Registrar, Aironet, Catalyst, CCDA, CCDP, CCIE, CCIP, CCNA, CCNP, CCSP, Cisco, the Cisco Certified Internetwork Expert logo, Cisco IOS, Cisco Press, Cisco Systems, Cisco Systems Capital, the Cisco Systems logo, Cisco Unity, Enterprise/Solver - Cisco 16OC3/POS-SM | Hardware Installation Guide - Page 203
of platforms, the Cisco cable modem HWIC is suitable for deployments ranging from small office/home office (SOHO) to small and medium business (SMB) to enterprise branch offices. When the Cisco cable modem HWIC is combined with the powerful Cisco IOS software and Cisco access routers, OL-12855-01 - Cisco 16OC3/POS-SM | Hardware Installation Guide - Page 204
Cable Modem HWICs Cisco Cable Modem High-Speed WAN Interface Cards an unparalleled range of services becomes possible, all within a single, easily manageable platform. This combination allows a provider or business to minimize operational expenses while maximizing the potential return on invested - Cisco 16OC3/POS-SM | Hardware Installation Guide - Page 205
(HWIC-CABLE-E/J-2) Faceplate HWICCABLE-E/J-2 CABLE DS US ONLINE LINK POWER 146549 Port Numbering Table 43 shows the different interface port types on the Cisco routers. For information about port numbering on interface cards in specific routers, see the Cisco Interface Cards Installation Guide - Cisco 16OC3/POS-SM | Hardware Installation Guide - Page 206
.com Accessibility These HWICs can be configured using the Cisco command-line interface (CLI). The CLI conforms to Section 508 of the Rehabilitation Act because it is text based and because it relies on a keyboard for navigation. All functions of the router can be configured and monitored through - Cisco 16OC3/POS-SM | Hardware Installation Guide - Page 207
Cards Platform Support for Cisco Cable Modem HWICs Platform Support for Cisco Cable Modem HWICs The Cisco Data-Over-Cable Service Interface Specification (DOCSIS) cable modem HWICs are supported in the following Cisco routers: Cisco IAD2431 Integrated Access Devices; Cisco 3725, and Cisco - Cisco 16OC3/POS-SM | Hardware Installation Guide - Page 208
Cards Connecting the Cisco Cable Modem HWIC To connect the Cisco cable modem HWIC to the router, follow these steps: Step 1 Verify that the router is powered off. Step 2 Insert the Cisco cable modem HWIC in the HWIC slot of the Cisco router. Note For specific information regarding WIC/HWIC support - Cisco 16OC3/POS-SM | Hardware Installation Guide - Page 209
Learn is a service mark of Cisco Systems, Inc.; and Access Registrar, Aironet, Catalyst, CCDA, CCDP, CCIE, CCIP, CCNA, CCNP, CCSP, Cisco, the Cisco Certified Internetwork Expert logo, Cisco IOS, Cisco Press, Cisco Systems, Cisco Systems Capital, the Cisco Systems logo, Cisco Unity, Enterprise/Solver - Cisco 16OC3/POS-SM | Hardware Installation Guide - Page 210
Obtaining Documentation, Obtaining Support, and Security Guidelines Cisco Cable Modem High-Speed WAN Interface Cards OL-12855-01 8 - Cisco 16OC3/POS-SM | Hardware Installation Guide - Page 211
Safety Warnings for Cisco T1/E1 HWICs, page 10 • Cisco T1/E1 HWIC LEDs, page 10 • Connecting a T1/E1 HWIC to a Network, page 12 Cisco T1/E1 HWICs T1/E1 HWICs provide T1 and E1 support to Cisco 2800 series and Cisco 3800 series integrated services routers. T1 support has integrated CSU/DSU capability - Cisco 16OC3/POS-SM | Hardware Installation Guide - Page 212
0-140 show the front panels and LEDs on the 1-port, 2-port, and 4-port HWICs, respectively. The LEDs are described in Table 0-46. Figure 0-138 1-Port T1/E1 HWIC Front Panel 3 4 HWIC1CE1T1-PRI 1 CD/LP PO AL 2 170619 1 RJ-48C connector 3 CD/LP LED (bicolor LED) 2 Port number 4 AL LED OL - Cisco 16OC3/POS-SM | Hardware Installation Guide - Page 213
-Speed WAN Interface Cards Cisco T1/E1 HWIC LEDs Figure 0-139 2-Port T1/E1 HWIC Front Panel 3 4 HWIC- 2CE1T1- PRI CD/LP P1 AL 1 CD/LP PO AL 170620 2 1 RJ-48C connector 3 CD/LP LED (bicolor LED) 2 Port number 4 AL LED Figure 0-140 4-Port T1/E1 HWIC Front Panel 3 4 1 HWIC4T1/E1 CD - Cisco 16OC3/POS-SM | Hardware Installation Guide - Page 214
to a Network T1/E1 High-Speed WAN Interface Cards Connecting a T1/E1 HWIC to a Network Use straight-through RJ-48C-to-RJ-48C cables to connect T1/E1 ports to RJ-48C jacks. See the Cisco Modular Access Router Cable Specifications for pinouts. To connect a T1/E1 port to the network, complete the - Cisco 16OC3/POS-SM | Hardware Installation Guide - Page 215
Learn is a service mark of Cisco Systems, Inc.; and Access Registrar, Aironet, Catalyst, CCDA, CCDP, CCIE, CCIP, CCNA, CCNP, CCSP, Cisco, the Cisco Certified Internetwork Expert logo, Cisco IOS, Cisco Press, Cisco Systems, Cisco Systems Capital, the Cisco Systems logo, Cisco Unity, Enterprise/Solver - Cisco 16OC3/POS-SM | Hardware Installation Guide - Page 216
Obtaining Documentation, Obtaining Support, and Security Guidelines T1/E1 High-Speed WAN Interface Cards OL-12851-01 14
-
 1
1 -
 2
2 -
 3
3 -
 4
4 -
 5
5 -
 6
6 -
 7
7 -
8
-
9
-
10
-
11
-
12
-
13
-
14
-
15
-
16
-
17
-
18
-
19
-
20
-
21
-
22
-
23
-
24
-
25
-
26
-
27
-
28
-
29
-
30
-
31
-
32
-
33
-
34
-
35
-
36
-
37
-
38
-
39
-
40
-
41
-
42
-
43
-
44
-
45
-
46
-
47
-
48
-
49
-
50
-
51
-
52
-
53
-
54
-
55
-
56
-
57
-
58
-
59
-
60
-
61
-
62
-
63
-
64
-
65
-
66
-
67
-
68
-
69
-
70
-
71
-
72
-
73
-
74
-
75
-
76
-
77
-
78
-
79
-
80
-
81
-
82
-
83
-
84
-
85
-
86
-
87
-
88
-
89
-
90
-
91
-
92
-
93
-
94
-
95
-
96
-
97
-
98
-
99
-
100
-
101
-
102
-
103
-
104
-
105
-
106
-
107
-
108
-
109
-
110
-
111
-
112
-
113
-
114
-
115
-
116
-
117
-
118
-
119
-
120
-
121
-
122
-
123
-
124
-
125
-
126
-
127
-
128
-
129
-
130
-
131
-
132
-
133
-
134
-
135
-
136
-
137
-
138
-
139
-
140
-
141
-
142
-
143
-
144
-
145
-
146
-
147
-
148
-
149
-
150
-
151
-
152
-
153
-
154
-
155
-
156
-
157
-
158
-
159
-
160
-
161
-
162
-
163
-
164
-
165
-
166
-
167
-
168
-
169
-
170
-
171
-
172
-
173
-
174
-
175
-
176
-
177
-
178
-
179
-
180
-
181
-
182
-
183
-
184
-
185
-
186
-
187
-
188
-
189
-
190
-
191
-
192
-
193
-
194
-
195
-
196
-
197
-
198
-
199
-
200
-
201
-
202
-
203
-
204
-
205
-
206
-
207
-
208
-
209
-
210
-
211
-
212
-
213
-
214
-
215
-
216
 |
 |

Corporate Headquarters
Cisco Systems, Inc.
170 West Tasman Drive
San Jose, CA 95134-1706
USA
Tel: 408 526-4000
800 553-NETS (6387)
Fax: 408 526-4100
Cisco Interface Cards
Hardware Installation Guide
For the Cisco 1600 Series, Cisco 1700 Series, Cisco 1800 Series,
Cisco 2600 Series, Cisco 2800 Series, Cisco 3600 Series, Cisco 3700 Series,
and Cisco 3800 Series Routers, the Cisco ICS 7750, and the
Cisco MWR 1941-DC Mobile Wireless Edge Router
Text Part Number: OL-1919-18