Cisco RV016 User Guide - Page 18
WAN Setting, Subnet 1, Edit WAN Connection - setup
 |
UPC - 745883556717
View all Cisco RV016 manuals
Add to My Manuals
Save this manual to your list of manuals |
Page 18 highlights
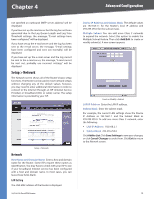
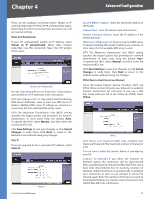
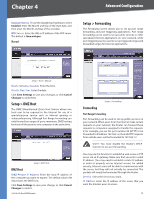
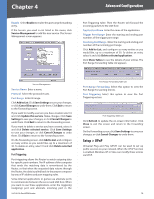
Chapter 4 Advanced Configuration Add One More Class C Network If you want to modify a subnet you have created, select it and make changes. Click Save Settings to save your changes, or click Cancel Changes to undo them. Click Exit to return to the Network screen. If you want to delete a subnet you have created, select it and click Delete selected subnet. Click Save Settings to save your changes, or click Cancel Changes to undo them. Click Exit to return to the Network screen. You can also divide a Class C network into four subnets. For example, the current LAN settings show the Device IP Address as 192.168.1.1 and the Subnet Mask as 255.255.255.192. LAN Settings Example To get the other three subnets, enter the following: Subnet 1 •• LAN IP Address 192.168.2.65 •• Subnet Mask 255.255.255.192 Subnet 2 •• LAN IP Address 192.168.2.129 •• Subnet Mask 255.255.255.192 Subnet 3 •• LAN IP Address 192.168.2.193 •• Subnet Mask 255.255.255.192 Click Add to List. Then click Save Settings. 10/100 16-Port VPN Router Create Three Additional Subnets WAN Setting By default, the Router allows you to simultaneously connect two broadband connections to the Router; however, you can set up as many as seven broadband connections. From the drop-down menu, select how many WAN ports you want to use. The default is 2. (You can also change the number of WAN ports using the Port Management > Port Setup screen.) Make sure the physical network configuration matches the number of WAN port settings on this screen. If you change the number of WAN ports, click Save Settings to save your change. A confirmation message will appear. Then click OK to save the new setting. The WAN Setting table displays the WAN port numbers in the Interface column and their respective connection types in the Connection Type column. Click Edit in the Config. column to change the WAN settings of the selected WAN port. You must save the new number of WAN ports before you can click Edit to change the settings of any new WAN ports. The Connection Type column will display the word "Undefined" if you changed the number of WAN ports but did not click Save Settings. After you save this setting, the Connection Type column will display, "Obtain an IP automatically." The default Connection Type of all WAN ports is Obtain an IP automatically. Edit WAN Connection After you clicked Edit, configure the WAN settings for the selected WAN port. Interface The selected WAN port will be displayed. 11
-
 1
1 -
2
-
3
-
4
-
5
-
6
-
7
-
8
-
9
-
10
-
11
-
12
-
 13
13 -
 14
14 -
 15
15 -
 16
16 -
 17
17 -
 18
18 -
 19
19 -
 20
20 -
 21
21 -
 22
22 -
 23
23 -
24
-
25
-
26
-
27
-
28
-
29
-
30
-
31
-
32
-
33
-
34
-
35
-
36
-
37
-
38
-
39
-
40
-
41
-
42
-
43
-
44
-
45
-
46
-
47
-
48
-
49
-
50
-
51
-
52
-
53
-
54
-
55
-
56
-
57
-
58
-
59
-
60
-
61
-
62
-
63
-
64
-
65
-
66
-
67
-
68
-
69
-
70
-
71
-
72
-
73
-
74
-
75
-
76
-
77
-
78
-
79
-
80
-
81
-
82
-
83
-
84
-
85
-
86
-
87
-
88
-
89
-
90
-
91
-
92
-
93
-
94
-
95
-
96
-
97
-
98
-
99
-
100
-
101
-
102
-
103
-
104
-
105
-
106
-
107
-
108
-
109
-
110
-
111
-
112
 |
 |
