Cisco X2000 User Manual - Page 13
Advanced Configuration - firmware
 |
View all Cisco X2000 manuals
Add to My Manuals
Save this manual to your list of manuals |
Page 13 highlights
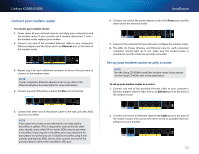
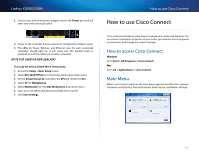
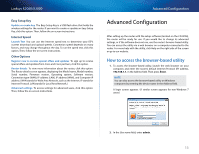
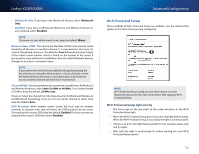
Linksys X2000/X3000 Easy Setup Key Update or create key The Easy Setup Key is a USB flash drive that holds the wireless settings for the router. If you want to create or update an Easy Setup Key, click this option. Then, follow the on-screen instructions. Internet Speed Launch Test You can use the Internet speed test to determine your ISP's current download and upload speeds. Connection speed depends on many factors, and may change throughout the day. To run the speed test, click this option. Then, follow the on-screen instructions. Other Options Register now to receive special offers and updates To sign up to receive special offers and updates from Cisco and Cisco partners, click this option. Router details To view more information about the router, click this option. The Router details screen appears, displaying the Model name, Model number, Serial number, Firmware version, Operating system, Software version, Connection type (WAN), IP address (LAN), IP address (WAN), and Computer IP address. (WAN stands for Wide Area Network, such as the Internet. IP stands for Internet Protocol. LAN stands for Local Area Network.) Advanced settings To access settings for advanced users, click this option. Then, follow the on-screen instructions. Advanced Configuration Advanced Configuration After setting up the router with the setup software (located on the CD-ROM), the router will be ready for use. If you would like to change its advanced settings, or if the software does not run, use the router's browser-based utility. You can access the utility via a web browser on a computer connected to the router. For more help with the utility, click Help on the right side of the screen or go to our website. How to access the browser-based utility 1. To access the browser-based utility, launch the web browser on your computer, and enter the router's default Internet Protocol (IP) address, 192.168.1.1, in the Address field. Then press Enter. Note You can also access the browser‑based utility on Windows computers by entering the device name in the Address field. A login screen appears. (A similar screen appears for non‑Windows 7 users.) 2. In the User name field, enter admin. 13
-
 1
1 -
2
-
3
-
4
-
5
-
6
-
7
-
 8
8 -
 9
9 -
 10
10 -
 11
11 -
 12
12 -
 13
13 -
 14
14 -
 15
15 -
 16
16 -
 17
17 -
 18
18 -
19
-
20
-
21
-
22
-
23
-
24
-
25
-
26
-
27
-
28
-
29
-
30
-
31
-
32
-
33
-
34
-
35
-
36
-
37
-
38
-
39
-
40
-
41
-
42
-
43
-
44
-
45
-
46
-
47
-
48
-
49
-
50
-
51
-
52
-
53
-
54
-
55
-
56
-
57
-
58
-
59
-
60
-
61
-
62
-
63
-
64
-
65
-
66
-
67
-
68
-
69
-
70
-
71
-
72
-
73
-
74
-
75
-
76
-
77
-
78
-
79
-
80
-
81
-
82
-
83
-
84
-
85
-
86
-
87
-
88
-
89
-
90
-
91
-
92
-
93
-
94
-
95
-
96
-
97
-
98
-
99
-
100
-
101
-
102
-
103
-
104
-
105
-
106
-
107
-
108
-
109
-
110
-
111
-
112
-
113
-
114
-
115
-
116
-
117
-
118
-
119
-
120
-
121
-
122
-
123
-
124
-
125
-
126
-
127
-
128
-
129
-
130
-
131
-
132
-
133
-
134
-
135
-
136
-
137
-
138
-
139
-
140
-
141
-
142
-
143
-
144
-
145
-
146
-
147
-
148
-
149
-
150
-
151
-
152
-
153
-
154
-
155
-
156
-
157
-
158
-
159
-
160
-
161
-
162
-
163
-
164
-
165
-
166
-
167
-
168
-
169
-
170
-
171
-
172
-
173
-
174
-
175
-
176
-
177
-
178
-
179
-
180
-
181
-
182
-
183
-
184
-
185
-
186
-
187
-
188
-
189
-
190
-
191
-
192
-
193
-
194
-
195
-
196
-
197
-
198
-
199
-
200
-
201
-
202
-
203
-
204
-
205
-
206
-
207
-
208
-
209
-
210
-
211
-
212
-
213
-
214
-
215
-
216
-
217
-
218
-
219
-
220
-
221
-
222
-
223
-
224
-
225
-
226
-
227
-
228
-
229
-
230
-
231
-
232
-
233
-
234
-
235
-
236
-
237
-
238
-
239
-
240
-
241
-
242
-
243
-
244
-
245
-
246
-
247
-
248
-
249
-
250
-
251
-
252
-
253
-
254
-
255
-
256
-
257
-
258
-
259
-
260
-
261
-
262
-
263
-
264
-
265
-
266
-
267
-
268
-
269
-
270
-
271
-
272
-
273
-
274
-
275
-
276
-
277
-
278
-
279
-
280
-
281
-
282
-
283
-
284
-
285
-
286
-
287
-
288
-
289
-
290
-
291
 |
 |