Compaq CQ2000 Upgrade and Service - Page 10
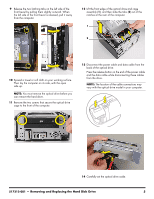
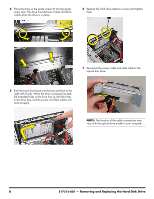
Replace the hard drive retention screws and tighten, route properly.
 |
View all Compaq CQ2000 manuals
Add to My Manuals
Save this manual to your list of manuals |
Page 10 highlights
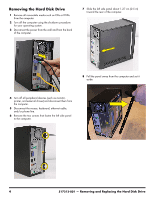
4 Place the drive so the guide screws fit into the guide screw slots. The drive manufacturer's label should be visible when the drive is in place. 6 Replace the hard drive retention screws and tighten them. 7 Reconnect the power cable and data cable to the optical disc drive. 5 Push the hard drive back into the bay and then to the right until it locks. When the drive is properly located, the threaded holes in the drive line up with the holes in the drive bay, and the power and data cables will route properly. NOTE: The location of the cable connections may vary with the optical drive model in your computer. 8 517212-001 - Removing and Replacing the Hard Disk Drive
-
 1
1 -
2
-
3
-
4
-
 5
5 -
 6
6 -
 7
7 -
 8
8 -
 9
9 -
 10
10 -
 11
11 -
 12
12 -
 13
13 -
 14
14 -
 15
15 -
16
-
17
-
18
-
19
-
20
-
21
-
22
-
23
-
24
-
25
-
26
 |
 |

8
517212-001
— Removing and Replacing the Hard Disk Drive
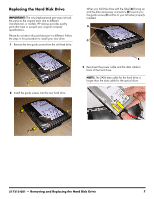
4
Place the drive so the guide screws fit into the guide
screw slots. The drive manufacturer’s label should be
visible when the drive is in place.
5
Push the hard drive back into the bay and then to the
right until it locks. When the drive is properly located,
the threaded holes in the drive line up with the holes
in the drive bay, and the power and data cables will
route properly.
6
Replace the hard drive retention screws and tighten
them.
7
Reconnect the power cable and data cable to the
optical disc drive.
NOTE:
The location of the cable connections may
vary with the optical drive model in your computer.