Compaq Evo n610c Compaq Evo Notebook N600c, N610c, N610v and N620c Notebook PC - Page 151
Proper Handling of the I/O Interface Board on, Evo Notebook N620c, N610c
 |
View all Compaq Evo n610c manuals
Add to My Manuals
Save this manual to your list of manuals |
Page 151 highlights
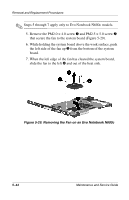
Removal and Replacement Procedures ✎ Figure 5-27 applies only to Evo Notebook N620c, N610c, and N610v models. When handling the system board, be careful not to put stress on the I/O interface board 1. The narrow profile of this board makes it susceptible to being damaged when mishandled. The system board should only be removed and handled using the Media Bay connector 2. After the system board is installed in the base enclosure, apply gentle downward pressure on the I/O interface board directly above the two connectors 3 and 4 that connect the I/O interface board to the system board. Figure 5-27. Proper Handling of the I/O Interface Board on Evo Notebook N620c, N610c, and N610v Models Reverse the preceding procedure to replace the system board. Maintenance and Service Guide 5-41
-
 1
1 -
2
-
3
-
4
-
5
-
6
-
7
-
8
-
9
-
10
-
11
-
12
-
13
-
14
-
15
-
16
-
17
-
18
-
19
-
20
-
21
-
22
-
23
-
24
-
25
-
26
-
27
-
28
-
29
-
30
-
31
-
32
-
33
-
34
-
35
-
36
-
37
-
38
-
39
-
40
-
41
-
42
-
43
-
44
-
45
-
46
-
47
-
48
-
49
-
50
-
51
-
52
-
53
-
54
-
55
-
56
-
57
-
58
-
59
-
60
-
61
-
62
-
63
-
64
-
65
-
66
-
67
-
68
-
69
-
70
-
71
-
72
-
73
-
74
-
75
-
76
-
77
-
78
-
79
-
80
-
81
-
82
-
83
-
84
-
85
-
86
-
87
-
88
-
89
-
90
-
91
-
92
-
93
-
94
-
95
-
96
-
97
-
98
-
99
-
100
-
101
-
102
-
103
-
104
-
105
-
106
-
107
-
108
-
109
-
110
-
111
-
112
-
113
-
114
-
115
-
116
-
117
-
118
-
119
-
120
-
121
-
122
-
123
-
124
-
125
-
126
-
127
-
128
-
129
-
130
-
131
-
132
-
133
-
134
-
135
-
136
-
137
-
138
-
139
-
140
-
141
-
142
-
143
-
144
-
145
-
 146
146 -
 147
147 -
 148
148 -
 149
149 -
 150
150 -
 151
151 -
 152
152 -
 153
153 -
 154
154 -
 155
155 -
 156
156 -
157
-
158
-
159
-
160
-
161
-
162
-
163
-
164
-
165
-
166
-
167
-
168
-
169
-
170
-
171
-
172
-
173
-
174
-
175
-
176
-
177
-
178
-
179
-
180
-
181
-
182
-
183
-
184
-
185
-
186
-
187
-
188
-
189
-
190
-
191
-
192
-
193
-
194
-
195
-
196
-
197
-
198
-
199
-
200
-
201
-
202
-
203
-
204
-
205
-
206
-
207
-
208
-
209
-
210
-
211
-
212
-
213
-
214
-
215
-
216
-
217
 |
 |
