Craftsman 11570 Operation Manual - Page 7
Operation
 |
View all Craftsman 11570 manuals
Add to My Manuals
Save this manual to your list of manuals |
Page 7 highlights
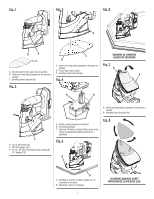
OPERATION WARNING: Do not allow familiarity with tools to make you careless. Remember that a careless fraction of a second is sufficient to inflict serious injury. WARNING: Always wear eye protection with side shields marked to comply with ANSI Z87.1. Failure to do so could result in objects being thrown into your eyes resulting in possible serious injury. WARNING: Do not use any attachments or accessories not recommended by the manufacturer of this tool. The use of attachments or accessories not recommended can result in serious personal injury. APPLICATIONS You may use this tool for the purposes listed below: Sanding on wood surfaces Removing rust from and sanding steel surfaces Polishing and scrubbing porcelain and metal This product will accept Craftsman® 19.2 V lithium-ion battery packs and Craftsman® 19.2 V nickel-cadmium battery packs. For complete charging instructions, see the Operator's Manuals for your battery pack and charger models. BATTERY PROTECTION FEATURES Craftsman® 19.2 V lithium-ion battery packs are designed with features that protect the lithium-ion cells and maximize battery life. If the tool stops during use, recharge the battery pack. WARNING: Battery tools are always in operating condition. Therefore, switch should always be locked when not in use or carrying at your side. TURNING THE SANDER ON/OFF See Figure 2, page i. n To turn the sander ON: push the ON ( I )/OFF ( O ) switch to the left. n To turn the sander OFF: push the ON ( I )/OFF ( O ) switch to the right. SANDING SHEET Selecting the correct size grit and type sandpaper is an extremely important step in achieving a high quality sanded finish. Aluminum oxide, silicon carbide, and other synthetic abrasives are best for power sanding. Natural abrasives, such as flint and garnet, are too soft for economical use in power sanding. In general, coarse grit will remove the most material and finer grit will produce the best finish in all sanding operations. The condition of the surface to be sanded will determine which grit will do the job. If the surface is rough, start with a coarse grit and sand until the surface is uniform. Medium grit may then be used to remove scratches left by the coarser grit and finer grit used for finishing of the surface. Always continue sanding with each grit until surface is uniform. Sheet Recommended Use 60-grit sanding sheet 120-grit sanding sheet 240-grit sanding sheet Coarse sanding Light sanding Finish sanding WARNING: Always remove the battery pack when attaching, changing, or rotating sanding sheets. Failure to do so could cause accidental starting, leading to serious personal injury. ATTACHING SANDING SHEETS See Figure 3, page i. n Align the pointed tip and rounded edges of the sanding sheet with the pointed tip and rounded edges of the hook-and-loop pad. Carefully press the fuzzy side of the sanding sheet against the pad as tightly as possible. NOTE: Sanding sheets can be reused for the life of the sanding abrasive. It is recommended that you keep the sanding sheet backing pad clean to provide for best adhesion. Clean occasionally by brushing lightly with a small brush. TO INSTALL BATTERY PACK See Figure 4, page i. WARNING: Always be sure the switch is in the OFF ( O ) position before installing the battery pack. Failure to do so could cause accidental starting, leading to serious personal injury. NOTE: The battery pack is shipped in a low charge condition. Therefore, it must be charged prior to use. Refer to CHARGING THE BATTERY PACK for charging instructions. n Slide the battery pack into the sander. n Make sure the latches on each side of the battery pack snap into place and the battery pack is secured in the sander before beginning operation. WARNING: Always remove battery pack from your tool when you are assembling parts, making adjustments, cleaning, or when not in use. Removing battery pack will prevent accidental starting that could cause serious personal injury. Page 7 - English
-
 1
1 -
 2
2 -
 3
3 -
 4
4 -
 5
5 -
 6
6 -
 7
7 -
 8
8 -
 9
9 -
 10
10 -
 11
11 -
 12
12 -
13
-
14
-
15
-
16
-
17
-
18
-
19
-
20
 |
 |
