Craftsman 11570 Operation Manual - Page 8
To Remove Battery Pack, Operating The Sander, Warning, Caution, Changing Sanding Sheets, Rotating
 |
View all Craftsman 11570 manuals
Add to My Manuals
Save this manual to your list of manuals |
Page 8 highlights
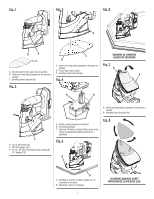
OPERATION TO REMOVE BATTERY PACK See Figure 4, page i. n Locate the latches on the side of the battery pack and depress them to release the battery pack from the sander. OPERATING THE SANDER See Figure 5 - 6, page i. n Secure the workpiece to prevent it from moving under the sander. WARNING: Unsecured workpieces could be thrown toward the operator, causing injury. WARNING: Keep your head away from the sander and the sanding area. Your hair could be drawn into the sander, causing serious injury. n Place the sander on the workpiece so that all of the sanding sheet surface is in contact with the workpiece. CAUTION: To avoid damaging the motor from overheating, be careful not to let your hand cover the air vents. n Turn on the sander and move it slowly over the workpiece. Hold the sander in front and away from you, keeping it clear of the workpiece. Start sander and let the motor build to its maximum speed, then gradually lower the sander onto the workpiece. Move the sander slowly across the workpiece using small circular motions. Do not force. The weight of the unit supplies adequate pressure, so let the sanding sheet and sander do the work. Applying additional pressure only slows the motor, rapidly wears sanding sheet and greatly reduces sander speed. Excessive pressure will overload the motor causing possible damage from motor overheating and can result in inferior work. Any finish or resin on wood may soften from the frictional heat. Do not allow sanding on one spot too long, as the sander's rapid action may remove too much material, making the surface uneven. Extended periods of sanding may tend to overheat the motor. If this occurs, turn sander off and wait until sanding sheet comes to a complete stop, then remove it from workpiece. Remove your hand from vent area, remove sanding sheet, then with your hand removed from vent area, turn sander on and run it free without a load to cool motor. For detail sanding such as corners and crevices, use the tip of the sanding pad with small back and forth motions. CHANGING SANDING SHEETS See Figure 7, page i. The sander is packed with sanding sheets designed for a variety of uses. To change sheets, simply pull the used sheet off the base and attach the desired sheet by pressing the sheet onto the base of the sander. ROTATING THE SANDING SHEETS See Figure 8, page i. The majority of wear in a precision sanding application occurs at the tip of the sanding sheet. The unique Tri-Flex design of the sanding sheets allows you to detach and rotate the top two-thirds of each and extend the life of the sheet. To rotate the top of the sheet, simply remove the top two-thirds along the perforation. Rotate the sheet so that a clean corner is located at the tip of the base. Press the sheet firmly onto the pad. Page 8 - English
-
 1
1 -
2
-
 3
3 -
 4
4 -
 5
5 -
 6
6 -
 7
7 -
 8
8 -
 9
9 -
 10
10 -
 11
11 -
 12
12 -
 13
13 -
14
-
15
-
16
-
17
-
18
-
19
-
20
 |
 |