Craftsman 21914 Operation Manual - Page 21
WiththetoolintheOFF O position
 |
View all Craftsman 21914 manuals
Add to My Manuals
Save this manual to your list of manuals |
Page 21 highlights
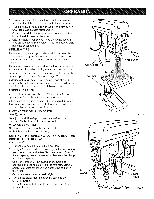
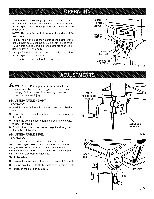
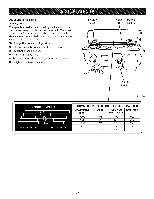
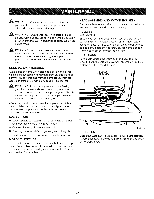
Withthetool inthe OFF( O) position,lowerthedrill bit byturningthefeedhandlesuntilthedrillbittouches the workpieceH. oldin thispositionandpressthe zero resetbutton. NOTET: hissetsthedepthto zeroatthesurfaceofthe workpiece. D Removetheworkpiecethenincreasethe depthof the drillbit (pastzero)untilthedesireddepthis displayed. Holdinthispositionandlockthedepthusingthelock knobto limitdrillingdepth. D Usinga C-clampor similarclampingdevice,reposition the workpieceto theworktable. D Turnonthetoolanddrilltothedesireddepth. DIGITAL DEPTH ON/OFF BUTTON in./mm BUTTON ZERORESET BUTTON Fig. 22 _ WARNING: Before performing any adjustment, make sure the tool is unplugged from the power supply. Failure to heed this warning could result in serious personal injury. ADJUSTING TABLE HEIGHT See Figure 23. [] Hold the table with one hand and loosen the table lock handle. [] Rotate the table adjustment handle clockwise to raise the table. [] Rotate the table adjustment handle counterclockwise to lower the table. [] Position the table to the desired height and retighten the table lock handle. ADJUSTING TABLE BEVEL See Figure 24. The drill press is equipped with a tilting table that allows you to drill angled holes. The table can be tilted left or right, from 0 ° to 45 ° after the pin has been removed. To remove the pin, turn the hex nut clockwise until the pin can be lifted away from the housing. To tilt the table: [] Loosen the large hex bolt located underneath the table. [] Use the bevel scale to tilt the table to the desired angle. [] Retighten the hex bolt securely. TABLE ADJUSTMENT HANDLE BEVEL SCALE 21 TABLELOCK HANDLE Fig. 23 HE× BOLT PiN Fig. 24
-
 1
1 -
2
-
3
-
4
-
5
-
6
-
7
-
8
-
9
-
10
-
11
-
12
-
13
-
14
-
15
-
 16
16 -
 17
17 -
 18
18 -
 19
19 -
 20
20 -
 21
21 -
 22
22 -
 23
23 -
 24
24 -
 25
25
 |
 |