Craftsman 975LM Owners Manual - Page 1
Craftsman 975LM - Sears Lift-Master Double Laser Garage Parking Assistant Manual
 |
UPC - 753182407562
View all Craftsman 975LM manuals
Add to My Manuals
Save this manual to your list of manuals |
Page 1 highlights
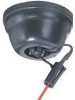
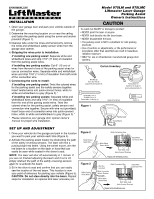
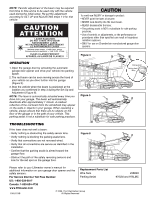
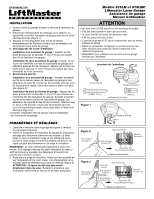
INSTALLATION 1. Open your garage door and park your vehicle outside of the garage. 2. Determine the mounting location on or near the ceiling and fasten the parking assist using the screw and anchor provided (Figure 1). 3. Depress tabs under the wires and temporarily remove the white and white/black safety sensor wires from the garage door opener. 4. Stripping the wires prior to installation: If installing one parking assist: Separate white and white/black wires and strip 7/16" (11 mm) of insulation from the parking assist wires. If installing two parking assists: Cut 6" (15 cm) of wires from the end of one of the parking assist wires for use as connection wires. Separate white and white/black wires and strip 7/16" (11 mm) of insulation from both ends of the connection wire. 5. Connecting the wires to install: If installing one parking assist: Twist like colored wires for the parking assist and the safety sensors together. Insert twisted wires into quick-connect holes: white to white and white/black to grey (Figure 2).* If installing two parking assists: Separate white and white/black wires and strip 7/16" (11 mm) of insulation from the end of the parking assist wires. Twist like colored wires for the parking assist, safety sensors and connection wire together. Secure with wire nut (provided). Insert loose end of connection wires into quick-connect holes: white to white and white/black to grey (Figure 3).* * Please reference your garage door opener owner's manual for proper wire installation. Model 975LM and 975LMC Liftmaster Laser Garage WARNINGParking Assist Owner's Instructions CAUTION To avoid eye INJURY or damage to product: • NEVER point the laser at anyone. • NEVER look directly into the laser beam. • NEVER disassemble the laser. • The parking assist is NOT a substitute for safe parking practices. • Use of controls or adjustments, or the performance or procedures other than specified can result in hazardous radiation exposure. • ONLY for use on Chamberlain manufactured garage door openers. Carton Inventory Wire Nuts (2) Écrou pour Fils (2) Capuchones de Emplame (2) Parking Assist (1) Assistance de Garage (1) Guía de Estacionamiento (1) Screw 6ABx1-1/4" (1) Vis 6ABx1-1/4 po (1) Tornillo 6ABx1-1/4 de pulg. (1) Figure 1 Labels (2) Not Shown Anchor (1) Parking Assist Swivel Mount SET UP AND ADJUSTMENT 1. Drive your vehicle into the garage and park in the location you want to park your vehicle each time (Figure 4). 2. Activate the parking assist locator by obstructing the path of the safety reversing sensors. The laser will emit a pulsing bright red beam. Using the swivel mount, aim the red beam to a location on the dash or hood that can easily be seen while seated in the driver's seat. NOTE: The laser will shut off automatically in 1 minute. If you are not finished adjusting the beam and it turns off, simply obstruct the path of the safety reversing sensors again to re-activate the beam. 3. Sit in the driver's seat and confirm that you can easily see the location of the red beam. This location is now your point of reference for parking your vehicle (Figure 5). CAUTION: Do not stare directly into the beam. Repeat steps for installation on optional 2nd laser accessory kit. Figure 2 White Parking Assist Wire Figure 3 White Parking Assist Wires White Connection Wires White Safety Sensor Wires Black/White Connection Wires Red White Grey Quick-Connect Terminals Repeat with white/black wires. Wire Nut (provided) White Connection Wire White Connection Wire to Terminal Black/White Connection Wire White Safety Sensor Wires Red White Grey Quick-Connect Terminals Repeat with white/black wires.
-
 1
1 -
 2
2 -
 3
3 -
 4
4
 |
 |