Craftsman 975LM Owners Manual - Page 2
Caution, Attention - liftmaster garage laser parking beam
 |
UPC - 753182407562
View all Craftsman 975LM manuals
Add to My Manuals
Save this manual to your list of manuals |
Page 2 highlights
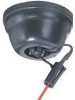
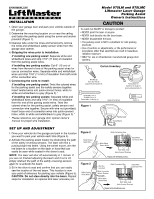
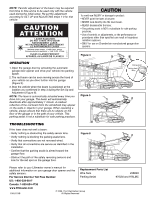
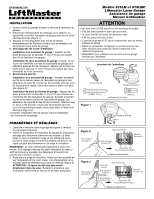
WARNING NOTE: Periodic adjustment of the beam may be required from time to time and is to be used only with the vehicle used during the initial setup. Re-set the adjustment according to SET UP and ADJUSTING steps 1-3 for that vehicle. CAUTION ATTENTION LASER RADIATION DO NOT STARE INTO BEAM RAYONNEMENT LASER NE PAS REGARDER DIRECTEMENT LE RAYONNEMENT LASER Maximum power output: < 1mW @ 635 - 670nm Puissance de sortie maximum: < 1mW @ 635 - 670nm CLASS II LASER PRODUCT APPAREIL AU LASER DE CLASSE II OPERATION 1. Open the garage door by activating the automatic garage door opener and drive your vehicle into parking space. 2. The red beam can be seen moving across the hood of your vehicle as you drive further into the garage (Figure 5). 3. Stop the vehicle when the beam is positioned at the location you confirmed in step 3 during the Set Up and Adjustment (Figure 6). NOTE: The laser is automatically actuated every time you drive into your garage. The beam will automatically deactivate after approximately 1 minute. A residual reflection of the red beam from the windshield may appear on the walls or objects in your garage. When operating a vehicle, always ensure that there are no objects on the floor of the garage or in the path of your vehicle. This parking assist is not a substitute for safe parking practices. 132C2469-1 CAUTION To avoid eye INJURY or damage to product: • NEVER point the laser at anyone. • NEVER look directly into the laser beam. • NEVER disassemble the laser. • The parking assist is NOT a substitute for safe parking practices. • Use of controls or adjustments, or the performance or procedures other than specified can result in hazardous radiation exposure. • ONLY for use on Chamberlain manufactured garage door openers. Figure 4 Parking Assist Parking Assist Wire Figure 5 TROUBLESHOOTING If the laser does not emit a beam: • Verify nothing is obstructing the safety sensor lens. • Verify nothing is blocking the parking assist lens. • Verify that connections are not reversed wired. • Verify that all connections are secure as identified in the installation. • Confirm that the parking assist is aimed toward the garage floor. • Obstruct the path of the safety reversing sensors and look for the red spot on the garage floor. Figure 6 Please refer to your Liftmaster owner's manual for additional information on your garage door opener and the safety sensors. Replacement Parts List Wire Nuts For Service Dial Our Toll Free Number: Parking Assist US: 1-800-528-2817 Canada: 1-800-654-4736 www.liftmaster.com 114A3174B © 2006, The Chamberlain Group All Rights Reserved 23B293 975LM and 975LMC
-
 1
1 -
 2
2 -
 3
3 -
 4
4
 |
 |
