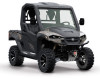
Cub Cadet Challenger MX 750 EPS Camo Operation Manual - Page 8
Controls & Operation
 |
View all Cub Cadet Challenger MX 750 EPS Camo manuals
Add to My Manuals
Save this manual to your list of manuals |
Page 8 highlights
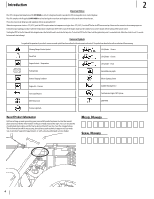
Controls & Operation (A) (L) (M) (C) (B) (D) (L) (E) 3 (K) (J) (H, I & D) (G) (F) (N) Features Refer to Figure 3-1 for the location of the features described below. Fuel Cap (A) The fuel cap is located on the right side of the vehicle to the rear of the passenger door. Bumper (B) The bumper is located on the front of the utility vehicle. Headlights (C) The headlights are located on the front of the utility vehicle and are illuminated when the headlight switch (See page 9) is in the "ON " position. Turn Signals (D) The turn signals are on the front and rear of the vehicle and are activated by the turn signal switch (See page 9). Door Handles (E) The door handles are used to open the doors and are located on the doors. Cargo Bed (F) The cargo bed is used to haul materials and is located on the back of the utility vehicle. See the Specifications chart on page 21 for information on cargo bed capacity and dimensions. Cargo Bed Release Levers (G) The cargo bed release levers are located on both the RH and LH side of the cargo bed and are used to dump/tilt the cargo bed. 8 Figure 3-1 Brake Lights (H) The brake lights are located on the rear of the cargo bed and are illuminated by depressing the brake pedal or when the hazard button is in the "ON" position. Tail Lights (I) The tail lights are illuminated when the headlight switch is turned to the "ON" position. Tailgate (J) The tailgate is located on the rear of the cargo bed and can be opened by using the tailgate lever. Tailgate Lever (K) The tailgate lever is located on the tailgate and is used to open the tailgate. Hand Grip (L) The hand grip is located on the passenger side of the utility vehicle on the OPS. Mirrors (M) The mirrors are located on the passenger and drivers side of the vehicle and are used to see behind the utility vehicle. Winch (N) The winch is located on the front of the utility vehicle inside the bumper. The winch is controlled by the winch control. Occupant Protection Structure (OPS) & Seat Belts (Not shown) This utility vehicle is equipped with an Occupant Protection Structure (OPS) and seat belts. When used together they are effective in reducing crushing injuries to the operator and passenger in the event of an accidental rollover or tip-over. The safety provided by the OPS is minimized if the seat belt is not properly adjusted AND buckled. Adjust the seat belts for proper fit and connect the buckle. This seat belt is an auto-locking, retractable type. To wear the 3-point seat belt properly: 1. Pull the seat belt latch down and across your chest toward the buckle. The belt should fit snugly across your hips and diagonally across your chest. Make sure the belt is not twisted. 2. Push the latch plate into the buckle until it clicks. Pull up on the strap to tighten. 3. Press the red release latch on the buckle to release the seat belt. WARNING Always wear the seat belt when operating the utility vehicle. Use the following guidelines when using a utility vehicle equipped with OPS: 1. Be aware of overhead clearances in the area of operation. Check for clearance of door (or gate) openings and other overhead objects such as utility lines and tree branches. Overhead objects could catch the OPS and upset the utility vehicle. 2. Do not modify the OPS by drilling holes for, or welding accessories to the structure. 3. Do not use the OPS to pull objects with the utility vehicle. Use ONLY the utility vehicle hitch for pulling. 4. Do not operate the utility vehicle without the OPS and do not remove the OPS. 5. In the event of an accident, have the OPS carefully inspected and, if necessary, replaced by your authorized dealer. Do not attempt to repair the OPS.
-
 1
1 -
2
-
 3
3 -
 4
4 -
 5
5 -
 6
6 -
 7
7 -
 8
8 -
 9
9 -
 10
10 -
 11
11 -
 12
12 -
 13
13 -
14
-
15
-
16
-
17
-
18
-
19
-
20
-
21
-
22
-
23
-
24
-
25
-
26
-
27
-
28
 |
 |
