Cub Cadet HT59L HT59L Operator's Manual - Page 2
Warning, Save These Instructions - accessories
 |
View all Cub Cadet HT59L manuals
Add to My Manuals
Save this manual to your list of manuals |
Page 2 highlights
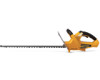
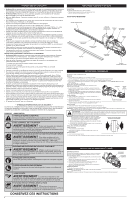
SAFETY INFORMATION • Always stop the motor when operation is delayed, before setting down the unit or when walking from one location to another. Make sure the blade comes to a complete stop. • To avoid accidental starting, never carry the unit with fingers on the switch trigger. • Always carry the unit by the front handle with the battery removed, finger off the switch trigger and the trimmer blade sheathed in the scabbard and positioned to the rear • Always make sure the switch lock is in the locked or OFF position before installing or removing the battery. • Use extreme caution when cutting small-sized brush, as slender material may catch the trimmer blade and be whipped toward the operator or pull the operator off balance. • This unit is intended for infrequent use by homeowners. It is not intended for prolonged use. MAINTENANCE AND STORAGE SAFETY • DO NOT perform maintenance procedures other than those described in this manual. Do not attempt to repair; there are no user serviceable parts inside. • Follow all maintenance instructions in this manual. • Before inspecting, servicing, cleaning, storing, transporting or replacing any parts on the unit: 1. Make sure all moving parts have stopped. 2. Allow the unit to cool. 3. Make sure the switch lock is in the locked or OFF position. 4. Remove the battery. • Never remove, modify or make inoperative any safety device furnished with the unit. • For safer, more effective performance, make sure the trimmer blade is sharp, properly cleaned and free from obstructions. • Frequently inspect the unit for damage. Before further use, any damaged part should be carefully checked to determine that it will operate properly and perform its intended function. Check for alignment of moving parts, binding of moving parts, breakage of parts and any other conditions that may affect its operation. Damaged parts should be properly repaired or replaced. • Use only original manufacturer replacement parts and accessories, which are designed specifically to enhance the performance and maximize the safe operation of the product. Failure to do so may cause poor performance and possible injury. • Remove the battery from the unit when not in use. • Be sure to secure the unit while transporting. • Always use the scabbard on the trimmer blade during transportation and storage. • When not in use, store the unit in a locked-up and dry, or high and dry, place to prevent unauthorized use or damage. Keep out of the reach of children. • Keep the handles dry, clean and free from debris, oil and grease. Clean the unit after each use. Never douse or squirt the unit with water or any other liquid. Do not use solvents or strong detergents. • If dropped in water, do not use the unit. KNOW YOUR UNIT APPLICATIONS This unit may be used for the purposes listed below: • Trimming and forming hedges, shrubs and bushes with a branch diameter of up to 1/2 of an inch (12.7 mm). NO TOOLS REQUIRED! Blade Support Rod Front Hand Guard Upper Cutting Blade Lower Blade Scabbard Switch Trigger Front Handle Switch Lock Rear Handle Battery (Sold Separately) • SAFETY AND INTERNATIONAL SYMBOLS • This operator's manual describes safety and international symbols and pictographs that may appear on this product. Read the operator's manual for complete safety, assembly, operating, maintenance and repair information. SYMBOL MEANING • SAFETY ALERT SYMBOL Indicates danger, warning or caution. May be used in conjunction with other symbols or pictographs. • READ OPERATOR'S MANUAL WARNING: Read the operator's manual(s) and follow all warnings and safety instructions. Failure to do so can result in serious injury to the operator and/or bystanders. • WEAR EYE AND HEARING PROTECTION WARNING: Thrown objects and loud noise can cause severe eye injury and hearing loss. Wear eye protection meeting ANSI Z87.1-1989 standards and ear protection when operating this unit. Use a full face shield when needed. • KEEP BYSTANDERS AWAY WARNING: Keep all bystanders, especially children and pets, at least 50 feet (15 m) from the operating area. If anyone enters the work area, stop the unit! • WEAR SAFETY GLOVES Wear non-slip, heavy-duty protective gloves when handling the unit. • WEAR SAFETY FOOTWEAR Wear non-slip safety footwear when using this equipment. • SHARP BLADE WARNING: The blade on this unit is sharp. To prevent serious injury, do not touch the blade. Keep both hands away from the blade while operating the unit. • DO NOT USE IN THE RAIN WARNING: Avoid dangerous environments. Never operate your unit in the rain or in damp or wet conditions. Moisture is a shock hazard. SAVE THESE INSTRUCTIONS ASSEMBLY INSTRUCTIONS This unit comes completely assembled. UNPACKING • Carefully remove the product and any accessories from the box. • Inspect the product carefully to make sure no breakage or damage occurred during shipping. • Do not discard the packing material until you have carefully inspected and satisfactorily operated the product. • If any parts are damaged or missing, please call 1-877-282-8684 (U.S.) or 1-800-668-1238 (Canada) for assistance. INSTALLING AND REMOVING THE BATTERY Follow these instructions in order to avoid injury and to reduce the risk of electric shock or fire: • Verify that the switch lock is in the locked or OFF position before installing or removing the battery. Refer to Starting and Stopping Instructions. Tongue Latch Button • Verify that the battery is removed and the switch lock is in the locked or OFF position before inspecting, adjusting or performing maintenance on any part of the unit. Installing the Battery 1. Align the tongue of the battery with the handle cavity (Fig. 1). 2. Grasp the rear handle firmly. 3. Push the battery into the handle cavity until the latch locks into place. 4. Do not use force when inserting the battery. It should slide into position and "click." Handle Cavity Removing the Battery Fig. 1 1. Press the latch button on the battery down and hold (Fig. 1). 2. Grasp the rear handle firmly and pull the battery out of the handle cavity. NOTE: The battery fits into the handle cavity snugly in order to prevent accidental dislodging. It may require a strong pull to remove it. CAUTION: When the battery is not installed in the unit, keep it away from paper clips, coins, keys, nails, screws or other metal objects that could make a connection from one terminal to another. Shorting the battery terminals together may cause sparks, burns or a fire. IMPORTANT! The battery is equipped with an internal circuit breaker that will automatically shut off power to the unit if the battery is overloaded during heavy use. Once cooled, the battery will reset itself. Follow these steps if an overload occurs: 1. Release the switch trigger and then restart the unit. Refer to Starting and Stopping Instructions. 2. The battery may need to be removed for approximately 1 minute, allowed to cool and then reinstalled. INSTALLING AND REMOVING THE SCABBARD Installing the Scabbard 1. Grasp the rear handle firmly. Squeeze Both Sides to Release the Scabbard 2. Slide the scabbard over the trimmer blade until it locks into place. Removing the Scabbard 1. Grasp the rear handle firmly. 2. Squeeze both sides of the scabbard near the tip (Fig. 2) and slide the scabbard off of the trimmer blade. Scabbard Fig. 2 STARTING AND STOPPING INSTRUCTIONS STARTING THE MOTOR To help prevent accidental start-ups, this unit has a switch lock and switch trigger that must be used together to start the unit. 1. Fit the battery into the handle cavity (Fig. 1). Refer to Installing the Battery. 2. Press and hold the switch lock (Fig. 3). This makes the switch trigger operational. 3. While holding the switch lock, press and hold the switch trigger. 4. Release the switch lock and continue to squeeze the switch trigger for continued operation. STOPPING THE MOTOR 1. Release the switch trigger. NOTE: It is normal for the trimmer blade to coast to a stop once the switch trigger is released. NOTE: Upon release of the switch trigger, the switch lock will automatically reset to the locked position. Switch Lock Switch Trigger Fig. 3 2
-
 1
1 -
 2
2 -
 3
3 -
 4
4 -
 5
5 -
 6
6 -
 7
7 -
 8
8 -
9
-
10
-
11
-
12
 |
 |
