Cub Cadet ZT1 46 Operation Manual - Page 10
Spark Plug Service
 |
View all Cub Cadet ZT1 46 manuals
Add to My Manuals
Save this manual to your list of manuals |
Page 10 highlights
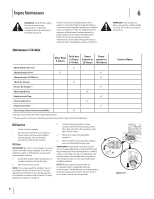
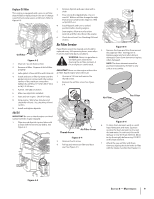
Spark Plug Service WARNING: DO NOT check for spark with spark plug removed. DO NOT crank engine with spark plug removed. Electrode WARNING: If the engine has been running, the muffler will be 0.024-0.031 in. very hot. Be careful not to touch the muffler. Figure 6-10 To ensure proper engine operation, the spark plug must be properly gapped and free of deposits. 4. Check that the spark plug washer is in good condition and thread the spark plug in by hand to prevent cross-threading. Intake Manifold 1. Remove the spark plug boot and use a spark plug wrench to remove the plug. See Figure 6-9. 5. After the spark plug is seated, tighten with a spark plug wrench to compress the washer. NOTE: When installing a new spark plug, tighten 1/2 turn after the spark plug seats to compress the washer. When Figure 6-7 reinstalling a used spark plug, tighten 8. Attach the air filter cover. See Figure 6-8. Turn thumb screws clockwise a 1/4 turn until snug. Check for any misalignment. Spark Plug Boot 1/8-1/4 turn after the spark plug seats to compress the washer. IMPORTANT: The spark plug must be securely tightened. An improperly tightened spark plug can become very hot and may damage the engine. 6. Repeat STEPS 1-5 to service the remaining spark plug. 2 Air Filter Cover 1 Figure 6-8 Figure 6-9 2. Visually inspect the spark plug. Discard the spark plug if there is apparent wear, or if the insulator is cracked or chipped. Clean the spark plug with a wire brush if it is to be reused. 3. Measure the plug gap with a feeler gauge. Correct as necessary by bending electrode. See Figure 6-10. The gap should be set to 0.024-0.031 in. 10 Section 6 - Maintenance
-
 1
1 -
2
-
3
-
4
-
 5
5 -
 6
6 -
 7
7 -
 8
8 -
 9
9 -
 10
10 -
 11
11 -
 12
12 -
 13
13 -
 14
14 -
 15
15 -
16
-
17
-
18
-
19
-
20
-
21
-
22
-
23
-
24
-
25
-
26
-
27
-
28
 |
 |
