D-Link DP-101P User Manual - Page 10
Installing the DP-101P - problems
 |
UPC - 790069237782
View all D-Link DP-101P manuals
Add to My Manuals
Save this manual to your list of manuals |
Page 10 highlights
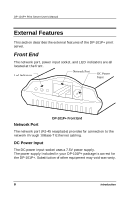
DP-101P+ Print Server User's Manual Installing the DP-101P+ Follow these steps for a trouble-free start of print-server operations with your DP-101P+. Please take particular notice of the warning in step 4: the network connection should be made before supplying power to the DP-101P+. 1. Confirm proper operation of the printer to be connected to the DP-101P+. 2. When you have confirmed proper operation of the printer, switch its power off. 3. Confirm that your network is operating normally. 4. Connect the DP-101P+ to the network (through the RJ-45 receptacle on the print server's rear end). WARNING: Configuration problems may result if the DP-101P+ is powered up without first establishing its network connection. Follow this procedure to avoid complications at the configuration stage. 5. While the printer is power off, connect the DP-101P+ print server directly to the printer parallel port. 6. Switch printer power on. 7. Plug the AC Power adapter's output plug into the DC power input socket on the rear end of the DP-101P+. 8. Plug the AC Power adapter into an electric service outlet. This will supply power to the DP-101P+. (The DP-101P+ has no power switch.) The DP-101P+'s self-test routines will proceed automatically. 10 Unpacking and Installation
-
 1
1 -
2
-
3
-
4
-
 5
5 -
 6
6 -
 7
7 -
 8
8 -
 9
9 -
 10
10 -
 11
11 -
 12
12 -
 13
13 -
 14
14 -
 15
15 -
16
-
17
-
18
-
19
-
20
-
21
-
22
-
23
-
24
-
25
-
26
 |
 |
