D-Link DSM-120 Product Manual - Page 12
Getting Started - software
 |
UPC - 790069284892
View all D-Link DSM-120 manuals
Add to My Manuals
Save this manual to your list of manuals |
Page 12 highlights
DSM-120 User's Manual Getting Started Getting Started To begin using the DSM-120 Wireless Music Player, you will need: An existing home network (including a wireless 802.11b or 802.11g router or a router/ hub with an available Ethernet port). The DSM-120 Media Server software installed on the PC you will be sharing files from. This computer will collect music content from local sources and from the Internet (downloaded MP3 music). The DSM-120 Wireless Music Player connected to your standard PC speakers or audio system. Optional: The 2.5" HDD can be used to play local music, but it must be partitioned in order to work with the DSM-120 (see page 62). D-Link Systems, Inc. 12
-
 1
1 -
2
-
3
-
4
-
5
-
6
-
 7
7 -
 8
8 -
 9
9 -
 10
10 -
 11
11 -
 12
12 -
 13
13 -
 14
14 -
 15
15 -
 16
16 -
 17
17 -
18
-
19
-
20
-
21
-
22
-
23
-
24
-
25
-
26
-
27
-
28
-
29
-
30
-
31
-
32
-
33
-
34
-
35
-
36
-
37
-
38
-
39
-
40
-
41
-
42
-
43
-
44
-
45
-
46
-
47
-
48
-
49
-
50
-
51
-
52
-
53
-
54
-
55
-
56
-
57
-
58
-
59
-
60
-
61
-
62
-
63
-
64
-
65
-
66
-
67
-
68
-
69
-
70
-
71
-
72
-
73
-
74
-
75
-
76
-
77
-
78
-
79
-
80
-
81
-
82
-
83
-
84
-
85
-
86
-
87
-
88
 |
 |
12
DSM-120 User’s Manual
D-Link Systems, Inc.
Getting Started
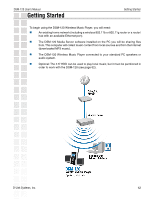
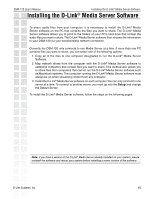
To begin using the DSM-120 Wireless Music Player, you will need:
An existing home network (including a wireless 802.11b or 802.11g router or a router/
hub with an available Ethernet port).
The DSM-120 Media Server software installed on the PC you will be sharing files
from. This computer will collect music content from local sources and from the Internet
(downloaded MP3 music).
The DSM-120 Wireless Music Player connected to your standard PC speakers or
audio system.
Optional: The 2.5” HDD can be used to play local music, but it must be partitioned in
order to work with the DSM-120 (see page 62).
Getting Started