D-Link DSN-3400-10 Hardware Reference Guide for DSN-3200-10 Valid for fir - Page 29
Appendix A Replacing and Upgrading FRUs
 |
UPC - 790069299766
View all D-Link DSN-3400-10 manuals
Add to My Manuals
Save this manual to your list of manuals |
Page 29 highlights
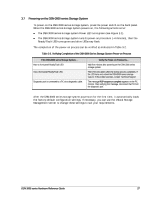
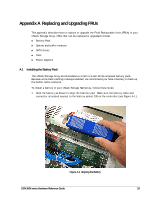
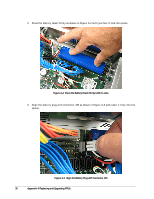
Appendix A Replacing and Upgrading FRUs This appendix describes how to replace or upgrade the Field Replaceable Units (FRUs) in your xStack Storage Array. FRUs that can be replaced or upgraded include: Battery Pack System and buffer memory SATA drives Fans Power supplies A.1 Installing the Battery Pack The xStack Storage Array accommodates a 4-cell or 6-cell shrink-wrapped battery pack. Because write-back caching is always enabled, we recommend you have a battery to back up the buffer cache contents. To install a battery in your xStack Storage SAN Array, follow these steps: 1. Hold the battery as shown to align the fastener pad. Make sure the battery cable and connector is located nearest to the battery socket J35 on the controller (see Figure A-1 ). Figure A-1 Aligning the Battery DSN-3000 series Hardware Reference Guide 29
-
 1
1 -
2
-
3
-
4
-
5
-
6
-
7
-
8
-
9
-
10
-
11
-
12
-
13
-
14
-
15
-
16
-
17
-
18
-
19
-
20
-
21
-
22
-
23
-
 24
24 -
 25
25 -
 26
26 -
 27
27 -
 28
28 -
 29
29 -
 30
30 -
 31
31 -
 32
32 -
 33
33 -
 34
34 -
35
-
36
-
37
-
38
-
39
-
40
-
41
-
42
 |
 |
