D-Link DSN-626 Quick Installation Guide - Page 3
Drive Installation, Drive Slot Numbering, Install Battery Backup Module, Controller Installation
 |
View all D-Link DSN-626 manuals
Add to My Manuals
Save this manual to your list of manuals |
Page 3 highlights
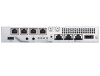
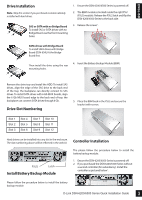
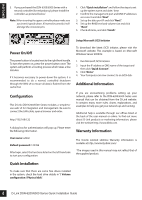
ENGLISH Drive Installation Note : Skip this section if you purchased a solution already installed with hard drives. SAS or SATA with no Bridge Board To install SAS or SATA drives with no Bridge Board use the front mounting holes. 1. Ensure the DSN-6200/6500 Series is powered off. 2. The BBM module is located inside the right PSU (PSU2 module). Release the PSU2 latch and flip the DSN-6200/6500 Series to the back side. 3. Release the screws1. SATA drives with Bridge Board To install SATA drives with Bridge Board (DSN-654), fit the Bridge Board first. Then install the drive using the rear mounting holes. 4. Insert the Battery Backup Module (BBM). Remove the drive tray and install the HDD. To install SAS drives, align the edge of the SAS drive to the back end of the tray; the backplane can directly connect to SAS drives. To install SATA drives with 6 Gb MUX boards, align the 6 Gb MUX board edge to the back end of tray; the backplane can connect SATA drives through 6 Gb. Drive Slot Numbering 5. Place the BBM back in the PSU, and secure the bracket with screws. Slot 1 Slot 2 Slot 3 Slot 4 Slot 5 Slot 6 Slot 7 Slot 8 Slot 9 Slot 10 Slot 11 Slot 12 Hard drives can be installed into any slot in the enclosure. The slot numbering above will be reflected in the web UI. Controller Installation The please follow the procedure below to install the battery backup module. PSU2 Latch Install Battery Backup Module 1. Ensure the DSN-6200/6500 Series is powered off. 2. If you purchased the DSN-6200/6500 Series without a second controller (for redundancy). Install the controller as pictured below1. Please follow the procedure below to install the battery backup module. D-Link DSN-6200/6500 Series Quick Installation Guide 3
-
 1
1 -
 2
2 -
 3
3 -
 4
4 -
 5
5
 |
 |
