D-Link DSN-626 Quick Installation Guide - Page 4
Power On/Off, Configuration, Quick Installation, Additional Information, Warranty Information
 |
View all D-Link DSN-626 manuals
Add to My Manuals
Save this manual to your list of manuals |
Page 4 highlights
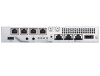
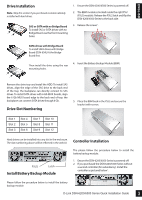
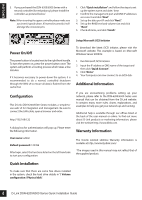
ENGLISH 3. If you purchased the DSN-6200/6500 Series with a second controller (for redundancy) please install the controllers as pictured below1. Note: When inserting the upper controller please make sure you insert it upside down. If inserted incorrectly it will damage the connector pins. 1. Click "Quick installation" and follow the steps to set up the system name and date / time. 2. Confirm the management port and DNS IP addresses are correct and click "Next". 3. Set up the data port IP and click "Next". 4. Set up the RAID level and volume size and click "Next". 5. Check all items, and click "Finish". Setup Microsoft iSCSI initiator Power On/Off The power button is located next to the right front handle. To turn the system on, press the power button once. The system will perform a booting process which takes a few minutes. If it becomes necessary to power down the system, it is recommended to do a normal, controlled shutdown through the Web UI to ensure all data is flushed from the cache first. Configuration The D-Link DSN-6200/6500 Series includes a simple-touse web UI for integration and management. Be sure to connect the LAN cable, open a browser and enter: http://192.168.0.32 A dialog box for authentication will pop up. Please enter the following information. To download the latest iSCSI initiator, please visit the Microsoft website. This example is based on Microsoft Windows Server 2008 R2. 1. Run Microsoft iSCSI Initiator. 2. Input the IP address or DNS name of the target and then click "Quick Connect". 3. Click "Done". 4. Your Computer can now connect to an iSCSI disk. Additional Information If you are encountering problems setting up your network, please refer to the DSN-6200/6500 Series user manual that can be obtained from the D-Link website. It contains many more rules, charts, explanations, and examples to help you get your network up and running. Additional help is available through our offices listed at the back of the user manual or online. To find out more about D-Link products or marketing information, please visit the website http://www.dlink.com. Warranty Information User name: admin Default password: 123456 After login, select the functions listed on the left hand side to start your configuration. The D-Link Limited Lifetime Warranty information is available at http://warranty.dlink.com/ 1 The images used in this manual may not reflect that of the supplied product. Quick Installation To make sure that there are some free drives installed in the system, check the hard drive details in "/ Volume configuration / Physical disk". 4 D-Link DSN-6200/6500 Series Quick Installation Guide
-
 1
1 -
 2
2 -
 3
3 -
 4
4 -
 5
5
 |
 |
