Dacor RV46 Installation Instructions
Dacor RV46 Manual
 |
View all Dacor RV46 manuals
Add to My Manuals
Save this manual to your list of manuals |
Dacor RV46 manual content summary:
- Dacor RV46 | Installation Instructions - Page 1
Instructions Downdraft Raised Vent Models: RV30, RV36, RV46 Includes installation instructions for optional cabinet blower (Dacor model CABP3) Part No. 85515 Rev. H Use these downdraft raised vents only with approved Dacor ® cooktops. See the installation instructions for the particular cooktop - Dacor RV46 | Installation Instructions - Page 2
Web site: www.Dacor.com Dacor Distinctive Service (repairs under warranty only) Phone: (877) 337-3226 (U.S.A. and Canada) Monday - Friday 6:00 a.m. to 4:00 p.m. Pacific Time RV30 = 30-inch wide raised vent RV36 = 36-inch wide raised vent RV46 = 46-inch wide raised vent Tested in accordance with - Dacor RV46 | Installation Instructions - Page 3
and warnings in these instructions are not meant to cover all possible problems and conditions that can occur. Use common sense and caution when installing, maintaining or operating this or any other appliance. • Always contact the Dacor Customer Service Team about problems and conditions that you - Dacor RV46 | Installation Instructions - Page 4
Contact the Dacor Customer Service Team for examination, repair or adjustment. • Do not leave children or pets alone or unattended in the area around the cooktop when it is in use. Never allow children to sit or stand on an appliance. Do not let children play with the cooktop or the raised vent. Do - Dacor RV46 | Installation Instructions - Page 5
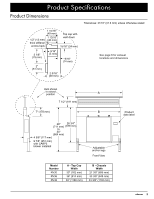
Vent shown in raised position A 7 1/2" (191 mm) 7" (178 mm) B 28" (711 mm) 26 3/4" (679 mm) to 34" (864 mm) 4 5/8" (117 mm) 9 7/8" (251 mm) with CABP3 blower installed Adjustable anchor legs Front View Model Number RV30 RV36 RV46 A - Top Cap Width 30" (762 mm) 36" (914 mm) 46 - Dacor RV46 | Installation Instructions - Page 6
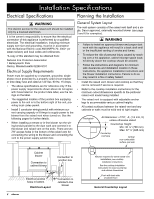
fire or safety hazard. • Install the raised vent, blower and cooktop so that they can be removed if service is required. • Refer to the cooktop installation instructions for the minimum cutout dimensions specific to the particular raised vent model being installed. • The raised vent is equipped with - Dacor RV46 | Installation Instructions - Page 7
cooktop, the vent system and the electrical and gas supplies for the cooktop and vent must be provided for inspection and service. Any drawers or shelves placed below the cooktop and in front of the vent must be easy to remove for access to the cooktop, vent and utilities. • For installation with - Dacor RV46 | Installation Instructions - Page 8
Installation Specifications General System Layout (Continued) Cooktop Cabinet back Raised vent Raised vent configured for bottom exhaust 3 1/4" X 10" to round transition Outside wall Floor Wall cap on outside wall Wiring/conduit from raised vent to in-line blower Duct work Duct work ILHSF - Dacor RV46 | Installation Instructions - Page 9
raised vent. You must install one of the Dacor blower models listed below for proper operation. For ILHSF or REMP series blowers, see the blower installation instructions. For model CABP3, see the instructions later in this manual sheet metal screws as required to support the duct weight. • To - Dacor RV46 | Installation Instructions - Page 10
Installation Specifications 14 3/8" (365 mm) CL 1 7/8" * (48 mm) CL Raised vent Raised vent Countertop center line B 11 5/8" (295 mm) 3 1/4 X 10 Duct connection Duct connection center line Cooktop CABP3 Blower - Right Exhaust Countertop Raised vent center line C 11 3/4" ( - Dacor RV46 | Installation Instructions - Page 11
Installation Specifications Calculating the Maximum Duct Run Length • Do not use stated at the right. • The maximum straight duct length for the raised vent system depends on the model of blower used with the vent system and the number of elbows and transitions used. The Equivalent Number of Feet - Dacor RV46 | Installation Instructions - Page 12
moving parts, make sure the cover is properly centered over the opening. 8. Reinstall the top retainer bracket over the top of the vent cover flange. Secure it in place with the three (3) wing nuts removed in step 4. Adjustable anchor legs Installation Preparation for Raised Vent with ILHSF - Dacor RV46 | Installation Instructions - Page 13
Installation Instructions Installing the Vent in the Cutout NOTE: The raised vent installs in the back of the cutout, separate from the cooktop. It is installed prior to final installation of the cooktop. Installing the Raised Vent 1. Cut a hole in the cabinet to allow the duct work to pass through - Dacor RV46 | Installation Instructions - Page 14
Installation Instructions Duct Work Installation • Install the duct work from the raised vent to the point where it exits the building according to the Installation Specifications. Use sheet metal screws and duct tape to connect and seal all of the pieces. Support the duct weight as necessary to - Dacor RV46 | Installation Instructions - Page 15
blower installation instructions REMP series blower shown Blower electrical connections - see Wiring Diagram A Power supply wiring from junction to raised vent Power supply wiring from raised vent to CABP3 blower Electrical Wiring - Cabinet Blower Installations (CABP3) Raised vent electrical - Dacor RV46 | Installation Instructions - Page 16
cooktop overlaps the leading edge of the vent. Verifying Proper Operation warning • Read the raised vent use and care manual completely before operation. • Make sure the filters are installed prior to operating the raised vent. Refer to the use and care manual for filter installation instructions - Dacor RV46 | Installation Instructions - Page 17
Raised Vent Wiring Diagram LOWER LIMIT SWITCH COM NO UPPER LIMIT SWITCH COM NO TO PUSH BUTTON CIRCUIT BOARD POWER CONTROL CIRCUIT BOARD FUSE 12A BLOWR OUTPUT N2 L2 BLU GRN/YEL BLK WHT CHASSIS GROUND STUD INCOMING 120V N1 L1 MOTOR , see the blower installation instructions. Static pressure - - Dacor RV46 | Installation Instructions - Page 18
Notes 16 - Dacor RV46 | Installation Instructions - Page 19
- Dacor RV46 | Installation Instructions - Page 20
Dacor ● 600 Anton Blvd. Suite 1000 Costa Mesa, CA 92626 ● Phone: (800) 793-0093 ● Fax: (626) 403-3130 ● www.Dacor.com
-
 1
1 -
 2
2 -
 3
3 -
 4
4 -
 5
5 -
 6
6 -
 7
7 -
8
-
9
-
10
-
11
-
12
-
13
-
14
-
15
-
16
-
17
-
18
-
19
-
20
 |
 |
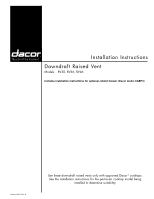
Installation Instructions
Downdraft Raised Vent
Models: RV30, RV36, RV46
Includes installation instructions for optional cabinet blower (Dacor model CABP3)
Part No. 85515
Rev. H
Use these downdraft raised vents only with approved Dacor
®
cooktops.
See the installation instructions for the particular cooktop model being
installed to determine suitability.