Dacor RV46 Installation Instructions - Page 12
Installation Instructions - parts list
 |
View all Dacor RV46 manuals
Add to My Manuals
Save this manual to your list of manuals |
Page 12 highlights
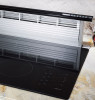
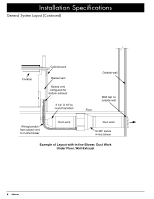
Installation Instructions Parts List • Product literature • Vent cover • Anchoring legs • 2 wood screws, #14 x 2 1/2 (PN 83047) • 3 wire nuts • 2 sheet metal screws, #10 x 1/2 (PN 83022) • 3 ¼" X 10 duct mounting flange • 2 keps nuts, 1/4-20 (PN 83049) • 2 flat washers, 1/4-20 (PN 83203) • Insulation foam Installation Preparation warning • If the electrical service does not meet the Electrical Specifications on page 4, do not proceed with the installation. Call a licensed electrician to install an electrical circuit that meets the specifications. • Install the vent only in a vertical orientation. Do not mount the vent on a slant or angle. • Do not enlarge or modify the exhaust knock outs or cut an exhaust hole in a location on the chassis other than those shown. Doing so may cause an increase in noise and decrease performance. • Loosely attach the anchoring legs to the studs on the left and right sides of the raised vent using the provided keps nuts and washers. Front of raised vent 2. Locate the 3 ¼" X 10 duct mounting flange included with the unit. Attach it to the open exhaust hole using the two (2) screws removed in step 1, with the flange facing outward. Exhaust flange Exhaust Flange Installation (bottom shown) 3. Locate the vent cover included with the unit. Also locate the supplied foam tape. Peel the backing off the tape and attach it to the right and left flanges on the inside of the vent cover. 4. Remove and retain the three (3) wing nuts from the top retainer bracket on the front of the unit. Remove the bracket. 5. Slide the bottom flange of the vent cover into the bottom retainer bracket with the wiring diagram facing out. 6. Cover the opening on the front of the unit by pushing the vent cover against it. 7. Make sure that the foam tape on the cover creates a good seal on the right and left sides of the opening. IMPORTANT: To prevent interference with the internal moving parts, make sure the cover is properly centered over the opening. 8. Reinstall the top retainer bracket over the top of the vent cover flange. Secure it in place with the three (3) wing nuts removed in step 4. Adjustable anchor legs Installation Preparation for Raised Vent with ILHSF or REMP Series Blower: NOTE: For units using the CABP3 cabinet blower, skip to Installing the Vent in the Cutout on the next page. 1. Remove and retain the two (2) screws on the cover plate over the exhaust that will be used (bottom or side). Discard the cover plate that was removed, but leave the two other cover plates in place. Top retainer bracket Flange Vent cover Attach foam to right/left flanges Bottom cover Exhaust Cover Removal (bottom shown) 10 Bottom retainer bracket Vent Cover Installation
-
 1
1 -
2
-
3
-
4
-
5
-
6
-
 7
7 -
 8
8 -
 9
9 -
 10
10 -
 11
11 -
 12
12 -
 13
13 -
 14
14 -
 15
15 -
 16
16 -
 17
17 -
18
-
19
-
20
 |
 |
