Danby DPAC120068 Owners Manual - Page 6
External, Water, Feature
 |
View all Danby DPAC120068 manuals
Add to My Manuals
Save this manual to your list of manuals |
Page 6 highlights
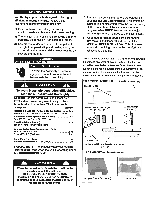
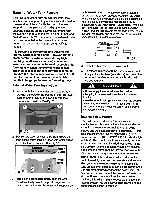
External Water Tank Feature: This unit is equipped with an external water tank which sits on a support tray and is easily attached to the rear side of the unit with the use of the two support hangers (see pg. 12). Align the two supports brackets on the external water tank with the support hangers on the rear side of the unit and push down firmly. We recommend the external water tank be connected to the main unit at all times during both air conditioning and dehumidifying modes. It is possible to operate the unit utilizing the internal water reservoir only. However, running time/operation maybe reduced during high humidity conditions as (excess) condensed water accumulates in the internal reservoir only. Alternatively, when the external water tank is attached, (excess) condensed water is directed first into the internal reservoir and once full, will then be pumped into the external tank, this results in longer (uninterrupted) running times. External Water Tank Instructions: 1. Align the holes in the water tank support tray (A) with the screws (B) located at the rear lower section of the unit, push down firmly to lock the tray into position. See Fig. 35 B IMPORTANT: Once external water tank is installed, ensure that the support brackets located on the water tank are flush with the back of the unit, then secure the tank in place with the locking mechanism (Fig. 37) located above the water outlet. Please note: When the tank is installed, the lock and unlock symbols will be hidden - Pull the lock lever to the far right in order to lock the tank into postion, and push the lever to the far left to unlock the tank (in order to remove it). Locked I 7 cJ Fig.37 4. Install both covers on the water tank. 5. To release (disconnect) the external water tank, firstly unlock the tank (see above) and grasp the recessed handles located on each side, pull up and remove. A CAUTION A • Always empty the external water tank before attempting to move or re-locate the unit to another location. • In order to avoid spillage when emptying the external water tank, remove cover "A" (as identified in fig. 36) and carefully tilt the uncovered portion of the external tank towards the sink. Fig.35 2. Position the external water tank, making sure the inlet on the water tank is aligned with water outlet at the back of the cabinet. See Fig 36. -External Water Tank LociNibro alb-Outlet • A Fig.36 Water Inlet • 3. To make the connection, simply push the water tank down firmly onto the support hangers on the back of the cabinet and the water tank support tray. Internal Safety Feature This unit is equipped with a fail-safe switch mechanism which prevents the unit from condensing water in the event the external tank is not being utilized and the internal reservoir becomes full. If this situation occurs, the unit will signal (BEEP) for 20 seconds, and the (RED) WATER FULL indicator light will flash. This condition will remain steady until the external water tank is re-installed (connected) to the unit, at which time the secondary pump will activate and pump the water from the internal reservoir to the external tank allowing normal operation to resume. IMPORTANT: If the red water full indicator on the control panel lights up and remains steady does not flash, ensure the external water tank is connected (and empty), then proceed to turn off the power to the unit and temporarily disconnect the power cord. After several seconds reconnect the power cord, switch to air conditioning mode and turn the power to the unit back on, this will pump any excess water out of the internal system into the external tank allowing normal operating conditions to continue. 5
-
 1
1 -
 2
2 -
 3
3 -
 4
4 -
 5
5 -
 6
6 -
 7
7 -
 8
8 -
 9
9 -
 10
10 -
 11
11 -
 12
12 -
13
-
14
-
15
-
16
-
17
-
18
-
19
-
20
-
21
-
22
 |
 |
