Dell 1250c Color User's Guide
Dell 1250c Color Manual
 |
View all Dell 1250c Color manuals
Add to My Manuals
Save this manual to your list of manuals |
Dell 1250c Color manual content summary:
- Dell 1250c Color | User's Guide - Page 1
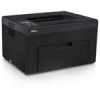
Dell™ 1250c Color Printer User's Guide www.dell.com | support.dell.com - Dell 1250c Color | User's Guide - Page 2
- Dell 1250c Color | User's Guide - Page 3
Cautions 13 1 Dell™ 1250c Color Printer User's Guide . 15 2 Finding Information 17 3 Product Features 21 4 About the Printer 23 Front View 23 Rear View 24 Space Requirements 25 Operator Panel 26 Securing the Printer 26 Ordering Supplies 27 Setting Up Printer (Printer Setup 29 Contents - Dell 1250c Color | User's Guide - Page 4
Specification (XPS) printer driver 41 8 Installing Printer Drivers on Computers Running Macintosh 45 Installing the Drivers and Software 45 Adding a Printer on Mac OS X 10.5 or Later Version(s) 45 Adding a Printer on Mac OS X 10.4.11 46 Adding a Printer on Mac OS X 10.3.9 46 Using Your Printer - Dell 1250c Color | User's Guide - Page 5
Pre-Punched Paper 53 Envelopes 54 Labels 55 Storing Print Media 56 Identifying Print Media and Specifications 56 Supported Paper Sizes 56 Supported Paper Types 57 Paper Type Specifications 58 10 Loading Print Media 59 Capacity 59 Print Media Dimensions 59 Loading Print Media 59 Loading - Dell 1250c Color | User's Guide - Page 6
71 Warnings 72 Operator Call Errors 73 Secondary light sequences 75 Fatal Errors 76 Firmware Errors 76 Printing a Device Job From the Computer Running Windows 80 Manual Duplex Printing (Windows Printer Driver Only) 81 Printing a Report Page 82 Printing a Printer Settings Page 82 The Operator - Dell 1250c Color | User's Guide - Page 7
Defaults 96 Non-Dell Toner 96 BTR Refresh Mode 97 Diagnosis 97 Chart Print 98 Machine Check 98 Environment Sensor Info 99 Developer Stir Mode 99 Refresh Mode 100 Resetting Defaults 100 14 Understanding Your Printer Software . . 103 Windows 103 Printer Status Window 103 Status Monitor - Dell 1250c Color | User's Guide - Page 8
Status Monitor Widget 106 15 Specifications 111 Operating System Compatibility Printer 115 16 Maintaining Your Printer 117 Conserving Supplies 117 Storing Print Media 117 Storing Consumables 118 Replacing Toner Cartridges 118 Removing the Toner Cartridges 119 Installing a Toner Cartridge - Dell 1250c Color | User's Guide - Page 9
. . . 134 Clearing Paper Jams From the Output Tray 136 Troubleshooting 139 18 Troubleshooting 141 Basic Printer Problems 141 Display Problems 141 Printing Problems 142 Print Quality Problems 143 The output is too light 143 Toner smears or print comes off/Stain on back side 144 Contents 7 - Dell 1250c Color | User's Guide - Page 10
margins is incorrect 153 Color registration is out of alignment 154 Protrudent / Bumpy paper 155 Noise 156 Jam 157 Misfeed jam 158 Multi-feed jam 159 Other Problems 160 Contacting Service 160 Appendix 161 B Appendix 163 Dell Technical Support Policy 163 Online Services 163 Warranty and - Dell 1250c Color | User's Guide - Page 11
Contacting Dell 164 Contents 9 - Dell 1250c Color | User's Guide - Page 12
10 Contents - Dell 1250c Color | User's Guide - Page 13
Before Beginning 11 - Dell 1250c Color | User's Guide - Page 14
12 - Dell 1250c Color | User's Guide - Page 15
used in this text: Dell, the DELL logo are trademarks of Dell Inc.; Microsoft, Windows, Windows Server, and Windows Vista are either trademarks or registered trademarks of Microsoft Corporation in the United States and/or other countries. XML Paper Specification (XPS): This product may incorporate - Dell 1250c Color | User's Guide - Page 16
is subject to restrictions as set forth in subparagraph (c)(1)(ii) of the Rights in Technical Data and Computer Software clause at DFARS 252.227-7013 and in applicable FAR provisions: Dell Inc., One Dell Way, Round Rock, Texas, 78682, USA. September 2010 Rev. A00 14 Notes, Notices, and Cautions - Dell 1250c Color | User's Guide - Page 17
the Dell Printer Supplies website at www.dell.com/supplies, or order Dell printer supplies by phone. For best service, have your Dell printer Service Tag ready. To locate the Service Tag of your printer, see "Express Service Code and Service Tag" on page 19. Dell™ 1250c Color Printer User's Guide - Dell 1250c Color | User's Guide - Page 18
16 Dell™ 1250c Color Printer User's Guide - Dell 1250c Color | User's Guide - Page 19
NOTE: The USB cable is not shipped with your printer. What are you looking for? • Drivers for my printer • My User's Guide Find it here Drivers and Utilities CD 2 • How to use my printer The Drivers and Utilities CD contains setup video, documentation, and drivers for your printer. You can - Dell 1250c Color | User's Guide - Page 20
information Find it here Product Information Guide How to set up my printer CAUTION: Read and follow all safety instructions in your Product Information Guide prior to setting up and operating your printer. Setup diagram Troubleshooting "Troubleshooting" on page 141 18 Finding Information - Dell 1250c Color | User's Guide - Page 21
the side door of your printer. • Latest drivers for my printer Go to support.dell.com • Answers to technical service and support questions support.dell.com provides several online tools, • Documentation for my printer including: • Solutions - Troubleshooting hints and tips, articles from - Dell 1250c Color | User's Guide - Page 22
20 Finding Information - Dell 1250c Color | User's Guide - Page 23
two or more pages on the front and back side of a single sheet of paper manually. This feature allows you to reduce the paper consumption. For more information, see "Manual Duplex Printing (Windows Printer Driver Only)" on page 81. N-up Print enables you to print multiple pages on a single sheet - Dell 1250c Color | User's Guide - Page 24
22 Product Features - Dell 1250c Color | User's Guide - Page 25
This chapter provides an overview of your Dell™ 1250c Color Printer. Front View 1 2 3 4 12 11 10 9 8 7 6 5 1 Operator Panel 3 Output Tray Extension 5 Toner Access Cover 7 Paper Width Guides 9 Front Cover 11 MPF Extension 2 Output Tray 4 Print Head Cleaning Rod 6 Power Switch 8 Multipurpose - Dell 1250c Color | User's Guide - Page 26
Rear View 12 10 9 8 7 3 6 4 5 1 Wall Jack Connector 3 USB Port 5 Rear Cover 7 Paper Chute 9 Transfer Belt 2 Rear Cover Release Handle 4 Security Slot 6 Transfer Roller 8 Paper Feed Roller 10 Fuser Release Lever 24 About the Printer - Dell 1250c Color | User's Guide - Page 27
at a location such that there is adequate space for using the printer feeder and covers. 69 mm/2.7 inches 225 mm/ 8.9 inches 100 mm/ 3.9 13 inches To avoid irregular screen image or malfunctioning of your printer, avoid placing the printer in direct sunlight with the front cover opened. About the - Dell 1250c Color | User's Guide - Page 28
"Operator Panel" on page 69. Securing the Printer To protect your printer from theft, you can use the optional Kensington lock. Attach the Kensington lock to the security slot on your printer. Security slot For details, see the operating instructions supplied with the Kensington lock. 26 About - Dell 1250c Color | User's Guide - Page 29
toner for your printer. You can also order toner cartridges by the following method: 1 Click Start All Programs Dell Printers Additional Color Laser Software Dell Supplies Management System. The Dell Supplies Management System window appears. 2 Select your printer from the Select Printer - Dell 1250c Color | User's Guide - Page 30
If you order by phone, call the number that appears in the Order by Phone section. 28 About the Printer - Dell 1250c Color | User's Guide - Page 31
Setting Up Printer (Printer Setup) 29 - Dell 1250c Color | User's Guide - Page 32
30 - Dell 1250c Color | User's Guide - Page 33
Your Printer Your Dell™ 1250c Color Printer interconnection cable must meet the following requirements: Connection type USB Connection specifications USB 2.0 compatible 1 1 USB Port Connecting Printer to Computer A local printer is a printer attached to your computer using the USB cable. USB - Dell 1250c Color | User's Guide - Page 34
64-bit Edition • Windows 7 • Windows 7 64-bit Edition • Mac OS® X 10.3.9/10.4.11/10.5/10.6 To attach the printer to a computer: 1 Ensure that the printer, computer, and any other attached devices are turned off and unplugged from the power source/outlet. 2 Connect the smaller USB connector into the - Dell 1250c Color | User's Guide - Page 35
CAUTION: The printer should not be connected to a UPS system. 1 Connect the power cable to the wall jack connector on the back of your printer (see "Rear View" on page 24). 2 Connect the other end of the cable to the power source. 3 Turn on the printer. Connecting Your Printer 33 - Dell 1250c Color | User's Guide - Page 36
34 Connecting Your Printer - Dell 1250c Color | User's Guide - Page 37
Loading Paper NOTE: Use only laser print media. Do not use ink jet paper in your printer. NOTE: For printing envelopes, see "Loading Print Media" on page 59. 1 Open the front cover by pulling out the instruction sheet. 2 Pull the paper cover out. 3 Remove the instruction sheet attached to the paper - Dell 1250c Color | User's Guide - Page 38
4 Pull the length guide forward until it stops. 5 Pull the MPF extension forward until it stops. 6 Adjust the paper width guides to their maximum width. 36 Loading Paper - Dell 1250c Color | User's Guide - Page 39
on a level surface. 8 Load print media on the MPF with the top edge first and with the recommended print side facing up. 9 Adjust the width guides until they rest lightly against the edges of the stack of print media. Loading Paper 37 - Dell 1250c Color | User's Guide - Page 40
10 Slide the length guide towards the printer until it touches the print media. NOTE: Depending on the size of print media, first slide the length guide backward until it stops, and then slide the MPF extension until it touches print media. 38 Loading Paper - Dell 1250c Color | User's Guide - Page 41
11 Insert the paper cover into the printer and then align the paper cover to the marking on the paper tray. 12 Select the paper type from the printer driver if the loaded print media is not standard plain paper. If a user-specified print media is loaded in the MPF, you must specify the - Dell 1250c Color | User's Guide - Page 42
40 Loading Paper - Dell 1250c Color | User's Guide - Page 43
XML Paper Specification (XPS) printer driver NOTE: Download and install the XPS printer driver at support.dell.com/support NOTE: XPS driver is supported on the following operating systems: Windows 7, Windows 7 64-bit Edition, Windows Vista, Windows Vista 64-bit Edition, Windows Server 2008 - Dell 1250c Color | User's Guide - Page 44
8 Click OK. 9 Select your printer name and click Next. 10 To change the printer name, enter the printer name in the Printer name box. To use this printer as the default printer, select the Set as the default printer check box. Click Next. 42 Installing Printer Drivers on Computers Running Windows - Dell 1250c Color | User's Guide - Page 45
12 As the driver installation is completed, click Print a test page to print a test page. 13 Click Finish. Windows 7, Windows 7 64-bit Edition, or Windows Server 2008 R2 1 Extract the zip file you downloaded to your desired location. 2 Click Start Devices and Printers. 3 Click Add a printer. 4 When - Dell 1250c Color | User's Guide - Page 46
14 Click Finish. 44 Installing Printer Drivers on Computers Running Windows - Dell 1250c Color | User's Guide - Page 47
Computers Running Macintosh Download and install the printer drivers and software for Macintosh operating system at support.dell.com/support Installing the Drivers and Software 1 After downloading the drivers and software, double-click the Dell 1250c Installer icon, and then click Continue. 2 Click - Dell 1250c Color | User's Guide - Page 48
Print Using are automatically entered. 7 Click Add. Adding a Printer on Mac OS X 10.4.11 1 Turn on the printer. 2 Connect the USB cable between the printer and Macintosh computer. 3 Start Printer Setup Utility. NOTE: You can find Printer Setup Utility in the Utilities folder in Applications. 4 Click - Dell 1250c Color | User's Guide - Page 49
Using Your Printer 47 - Dell 1250c Color | User's Guide - Page 50
48 - Dell 1250c Color | User's Guide - Page 51
printer helps avoid printing troubles. color, use 75 g/m2 (20 lb) xerographic, grain long paper. For the best print quality in black and white, use 90 g/m2 (24 lb) xerographic, grain long paper. Before buying problems. Curl usually occurs after the paper passes through the printer, where it - Dell 1250c Color | User's Guide - Page 52
is too rough, the toner does not fuse to the paper it can cause paper feeding problems. Smoothness between 150 and 250 laser printing process heats paper to high temperatures. Check with the manufacturer or vendor to determine whether the paper you have chosen is acceptable for laser printers - Dell 1250c Color | User's Guide - Page 53
buying large quantities of any type of print media. When choosing any print media, you should consider the weight, fiber content, and color. Unacceptable Paper The following paper types are not recommended for use with the printer your software program to jams and ensures trouble-free printing. To - Dell 1250c Color | User's Guide - Page 54
-based should meet these requirements; latex inks might not. If you are in doubt, contact your paper supplier. Printing on Letterhead Check with the manufacturer or vendor to determine whether the pre-printed letterhead you have selected is acceptable for laser printers. 52 Print Media Guidelines - Dell 1250c Color | User's Guide - Page 55
paper can cause jams when multiple sheets feed through the printer. This may result in a paper jam. • Pre-punched paper can include more paper dust than standard paper. Your printer may require more frequent cleaning and feed reliability may not be as good - Dell 1250c Color | User's Guide - Page 56
instructions on loading an envelope. When printing on envelopes: • Use only high-quality envelopes that are designed for use in laser printers. • Set the print media source to MPF. Set the paper type to Envelope, and select the correct size of envelope from the printer driver the guide to windows, - Dell 1250c Color | User's Guide - Page 57
Labels Your printer can print on many labels designed only for use with laser printers. When selecting with a slick backing material. NOTICE: Before buying large quantities of any print media, it is • Set the paper type to Label from the printer driver. • Do not load labels together with paper in - Dell 1250c Color | User's Guide - Page 58
This section provides information on supported paper sizes, types, and specification. Supported Paper Sizes A4 (210x297 mm) B5 (182x257 mm) A5 (148x210 mm) C5 (162x229 mm) Monarch (3.875x7.5 in) Monarch LEF (7.5x3.875 in)*1 Envelope #10 (4.125x9.5 in) DL (110x220 mm) Multipurpose Feeder - Dell 1250c Color | User's Guide - Page 59
x 10.5 in) Y Custom*2*3 Y *1 You can place the originals in a long-edge feed direction or in a short-edge feed direction. The following illustration shows SEF and LEF. The arrow mark in the illustration shows the orientation of the paper loading. NOTE: Not available when the XPS Printer Driver - Dell 1250c Color | User's Guide - Page 60
Covers Y Covers Side 2 Y Envelope Y Coated Y Coated Side 2 Y * Values marked by an asterisk (*) are the factory default menu settings. Paper Type Specifications Paper type Plain Paper Plain Thick Paper Covers Coated Label Envelopes Recycled Weight (gsm) 60-90 91-105 106-163 106-163 - 60 - Dell 1250c Color | User's Guide - Page 61
10 Loading Print Media Loading print media properly helps prevent jams and ensures trouble-free printing. Before loading print media 355.6 mm (14.00 inches) Loading Print Media NOTE: Use only laser print media. Do not use ink jet paper in this printer. 1 Open the front cover. Loading Print Media 59 - Dell 1250c Color | User's Guide - Page 62
2 Pull the paper cover out. 3 Pull the length guide forward until it stops. 4 Pull the MPF extension forward until it stops. 60 Loading Print Media - Dell 1250c Color | User's Guide - Page 63
5 Adjust the paper width guides to their maximum width. 6 Before loading the print media, flex the sheets back and forth, and then fan them. Straighten the edges of the stack - Dell 1250c Color | User's Guide - Page 64
rest lightly against the edges of the stack of print media. 9 Slide the length guide towards the printer until it touches the print media. NOTE: Depending on the size of print media, first slide the length guide backward until it stops, and then slide the MPF extension until it touches print media - Dell 1250c Color | User's Guide - Page 65
10 Insert the paper cover into the printer and then align the paper cover to the marking on the paper tray. Loading Print Media 63 - Dell 1250c Color | User's Guide - Page 66
Loading Envelopes NOTE: When you print on envelopes, be sure to specify the envelope setting on the printer driver. If not specified, the print image will be rotated 180 degrees. When Loading Envelope#10, DL, or Monarch Load envelopes with the side to be printed on facing up, the flap side facing - Dell 1250c Color | User's Guide - Page 67
NOTICE: Never use envelopes with windows, or coated linings. These lead to paper jams and can cause damage to the printer. NOTE: If you do not load envelopes in the MPF right after they have been removed from the packaging, they may bulge. To avoid jams, - Dell 1250c Color | User's Guide - Page 68
NOTE: To confirm the correct orientation of each print media such as envelopes, see the instruction on the Envelope/Paper Setup Navigator on the printer driver. Loading Letterhead The letterhead must be toward the top edge of MPF with the print side facing up. However, the letterhead must be - Dell 1250c Color | User's Guide - Page 69
Using the Output Tray Extension The output tray extension is designed to prevent print media from falling from the printer after the print job is complete. Before printing a document, ensure that the output tray extension is fully extended. Loading Print Media 67 - Dell 1250c Color | User's Guide - Page 70
68 Loading Print Media - Dell 1250c Color | User's Guide - Page 71
is low or empty, or toner error occurred. 3 (Error) indicator • Indicates that an error occurred. 4 (Ready/Data) indicator • Indicates the printer status, such as receiving and printing data. 5 (Start) button/indicator • Press this button to start duplex printing after loading paper. • Press - Dell 1250c Color | User's Guide - Page 72
when Dell toner cartridges are used (Non-Dell Toner is set to Off). The specified toner is low when Dell toner cartridges are used (Non-Dell Toner is set to Off). All toner indicators blink when the printer is in the non-Dell toner mode (Non-Dell Toner is set to On). A fatal error occurred. An error - Dell 1250c Color | User's Guide - Page 73
Load Paper Status Green blinks Orange on Orange blinks Condition The printer is waiting for manual duplex printing. No paper on, and/or blinking indicate printer conditions such as printer status, intervention (for example, out of paper), or service. Off On Fast Blink Slow Blink - None - - Dell 1250c Color | User's Guide - Page 74
1 2 3 4 5 7 8 Printer Status Jam Toner Error Ready Start Manual Load /Data Duplex Paper - - - - - - Ready - - - - - - Processing - - - - - - Printing - ) pages, and press the (Start) button . See "Manual Duplex Printing (Windows Printer Driver Only)" on page 81. Warnings - Dell 1250c Color | User's Guide - Page 75
*1 The Ready/Data indicator blinks or lights up green depending on the printer status. *2 This warning appears only when Dell toner cartridges are used (Non-Dell Toner is set to Off). *3 In this case, you can continue printing in black and white. Operator Call Errors The following table shows the - Dell 1250c Color | User's Guide - Page 76
occurred. Press and hold the (Start) button to display the secondary error light sequences. - - - - - The specified toner cartridge is low, not installed or not - - - - - supported. - - - - - See "Replacing Toner Cartridges" on page 118. - - - - - - - - - The density of - Dell 1250c Color | User's Guide - Page 77
Secondary light sequences When the Error indicator blinks, a secondary error has occurred. Press and hold the (Start) button to display the secondary error light sequences. 1 Jam Y -- -- -- 2 Toner MC -- - - 3 4 5 7 8 Cause/Remedy Error Ready/ Start Manual Load K Data Duplex Paper - - - Dell 1250c Color | User's Guide - Page 78
Contact Dell if this error occurs repeatedly. See "Contacting Dell" on page 164. 1 2 3 4 5 7 8 Cause/Remedy Jam Toner Error Ready/ Start Manual Load Data Duplex Paper - - - - - - A fatal error occurred. Turn off the printer, and then on. Firmware Errors Contact Dell if this error - Dell 1250c Color | User's Guide - Page 79
12 Jam Y - Toner MC 3 4 5 7 8 Cause/Remedy Error Ready/ Start Manual Load K Data Duplex Paper - - An error occurred while downloading the firmware. Turn off the printer, and then on. Printing a Device Settings Page Press and hold the (Start) button when the Ready/Data indicator - Dell 1250c Color | User's Guide - Page 80
78 Operator Panel - Dell 1250c Color | User's Guide - Page 81
see "Jam" on page 157 for instructions. Sending a Job to Print To support all of the printer features, use the printer driver. When you choose Print from a software program, a window representing the printer driver opens. Select the appropriate settings for the specific job you are sending to print - Dell 1250c Color | User's Guide - Page 82
in the printer window. 2 Select the job you want to cancel. 3 Press Delete on the keyboard. Canceling a Job From the Desktop 1 Minimize all programs to reveal the desktop. Click StartPrinters and Faxes (for Windows XP). Click Start Devices and Printers (for Windows 7 and Windows Server® 2008 - Dell 1250c Color | User's Guide - Page 83
then insert it into the feeder. NOTE: The XPS printer driver does not support manual duplex printing. When you start manual duplex printing, the instruction window appears. Note that the window cannot be reopen once closed. Do not close the window until duplex printing is complete. 1 First print the - Dell 1250c Color | User's Guide - Page 84
printed in the order of page 1, page 3, then page 5. 4 Press the (Start) button. NOTE: Printing on both sides of the paper is not possible if the of printing a report page. Printing a Printer Settings Page To verify detailed printer settings, print a printer settings page. See "Operator Panel" on - Dell 1250c Color | User's Guide - Page 85
blinking, and then press and hold the (Start) button for over three seconds. The printer settings page is printed. The Tool Box NOTE: 1 Click Start All Programs Dell Printers Dell 1250c Color Printer Tool Box. NOTE: The Select Printer window appears in this step, when multiple printer drivers - Dell 1250c Color | User's Guide - Page 86
NOTE: The Select Printer window appears in this step, when multiple printer drivers are installed on your computer. In this case, click the name of Dell 1250c Color Printer listed in Printer Name, and then click OK. The Tool Box opens. 2 Click the Printer Maintenance tab. 3 Select the desired menu - Dell 1250c Color | User's Guide - Page 87
Know Your Printer 85 - Dell 1250c Color | User's Guide - Page 88
86 - Dell 1250c Color | User's Guide - Page 89
Capacity Processor Speed Firmware Version MCU Firmware Version Displays Dell's service tag number. Displays the express service code of the printer. Displays the serial number of the printer. Displays the type of the printer. Color Laser is displayed normally. Displays the asset tag number of - Dell 1250c Color | User's Guide - Page 90
Adjust BTR Default Print Paper Size Low Toner Alert Message Plain Label Plain Displays the time taken by the printer before it enters Sleep mode after it that the printer waits for data to arrive from the computer. Displays whether to automatically print a job history report after every 10 jobs. - Dell 1250c Color | User's Guide - Page 91
. Auto Registration Displays whether to automatically adjust color registration. Adjustment Adjust Altitude Displays the altitude of the location where the printer is installed. Non-Dell Toner Displays whether to use toner cartridge of another manufacturer. BTR Refresh Mode Displays whether - Dell 1250c Color | User's Guide - Page 92
history. Click to print the error history. Click to print a color test page. Printer Maintenance The Printer Maintenance tab contains the System Settings, Paper Density, Adjust BTR, Adjust Fuser, Color Registration Adjustment, Adjust Altitude, Reset Defaults, Non-Dell Toner, and BTR Refresh Mode - Dell 1250c Color | User's Guide - Page 93
seconds Disables the job time-out. Specifies the amount of time that the printer waits for data to arrive from the computer. The print job is cancelled prints a job history report after every 10 jobs. Default Print Paper A4 Size*2 Letter Low Toner Alert On* Message Specifies the default paper - Dell 1250c Color | User's Guide - Page 94
Light Apply New Settings After you complete the settings, press the Apply New Settings button to apply the changes. Restart printer to apply new Press the Restart printer to apply new settings button settings to apply the changes. Adjust BTR Purpose: To specify the optimum voltage settings for - Dell 1250c Color | User's Guide - Page 95
press the Apply New Settings button to apply the changes. Press the Restart printer to apply new settings button to apply the changes. Adjust Fuser Purpose: To printed paper has curled, try to lower the temperature. When the toner does not fuse on the paper properly, try to increase the temperature - Dell 1250c Color | User's Guide - Page 96
On* Adjustment Off Auto Correct*1 Print Color Regi Chart*1*2 Automatically adjusts color registration. Does not automatically adjust color registration. Click Start to automatically correct color registration. Click Start to open the Print Color Regi Chart window, and then select the paper size - Dell 1250c Color | User's Guide - Page 97
to apply new settings Press the Restart printer to apply new settings button to apply the changes. *1 This item is available only when Auto Registration Adjustment is set to Off. *2 The color registration chart prints a lattice pattern of yellow, magenta, and cyan lines. On the chart, find the - Dell 1250c Color | User's Guide - Page 98
executing this function and rebooting the printer, all the menu parameters are reset to their default values. For details, see "Resetting Defaults" on page 100. Values: Start Click to initialize the system parameters. Non-Dell Toner Purpose: To use toner cartridge of another manufacturer. 96 - Dell 1250c Color | User's Guide - Page 99
NOTE: Using non-Dell-brand toner cartridges may make some printer features unusable, reduce print quality and decrease the reliability of your printer. Dell recommends only new Dell-brand toner cartridges for your printer. Dell does not provide warranty coverage for problems caused by using - Dell 1250c Color | User's Guide - Page 100
be used for diagnosing your printer. Values: Paper Size A4 Letter Ghost Configuration Chart 4 Colors Configuration Chart Alignment Chart Drum of the drum cartridge. Machine Check Purpose: To check the operation of the different components of the printer. Values: 98 Understanding the Tool - Dell 1250c Color | User's Guide - Page 101
printer. Confirm the motor sound. Feed Roll Operation Click Start to operate the feed roll. Confirm Check*1 the motor sound. REGI CLUTCH Operation Check Click Start Dispense Motor Check (Magenta) Click Start to operate the dispense motor for each toner cartridge. Confirm the motor sound. - Dell 1250c Color | User's Guide - Page 102
the black toner cartridge. Resetting Defaults After executing this function and rebooting the printer, all the menu parameters are reset to their default values. NOTE: 1 Click Start All Programs Dell Printers Dell 1250c Color Printer Tool Box. NOTE: When multiple printer drivers are installed - Dell 1250c Color | User's Guide - Page 103
The printer restarts automatically to apply the settings. Understanding the Tool Box Menus 101 - Dell 1250c Color | User's Guide - Page 104
102 Understanding the Tool Box Menus - Dell 1250c Color | User's Guide - Page 105
consumables by phone or from the web. 1 Click Start All Programs Dell Printers Additional Color Laser Software Dell Supplies Management System. The Dell Supplies Management System window appears. 2 Select your printer from the Select Printer Model list. Understanding Your Printer Software 103 - Dell 1250c Color | User's Guide - Page 106
site. Dell 1250c Color Printer - Dell Supplies Management System window appears. c Enter the Service Tag, and then click OK. If you order by phone, call the number that appears in the Order by Phone section. Software Update The firmware and/or driver updates can be downloaded from the Dell Support - Dell 1250c Color | User's Guide - Page 107
window. See "Printer Status Window" on page 103. Click to open the Tool Box. See "Understanding the Tool Box Menus" on page 87. Click to update the Dell software and printer firmware. Click to open the Troubleshooting Guide the printer driver. • Install the Dell™ 1250c Color Printer driver in - Dell 1250c Color | User's Guide - Page 108
on Preference, see "Preferences" on page 107. Status Monitor window appears. 1 2 3 4 1 Printer Status Message Area Displays a message of the current printer status. NOTE: The Status Monitor Widget automatically obtains the printer information at the updated interval that can be specified in - Dell 1250c Color | User's Guide - Page 109
from the printer, the Unknown toner image is displayed. • Printer error image Displays an indication image when an error occurs. An error has occurred and the printer requires your attention to correct a problem. An error has occurred and the printer cannot be used. An unknown error has occurred - Dell 1250c Color | User's Guide - Page 110
. 4 Order Supplies button Click this button to display the Order window. This window provides you with the information for ordering printer supplies by telephone or from the web site. NOTE: The Order window automatically appears when low toner is detected. 108 Understanding Your Printer Software - Dell 1250c Color | User's Guide - Page 111
a web address from the drop-down list and click Visit Dell printer supplies ordering web site. hyperlink to access the web site for ordering Dell printer supplies. Displays a list of available phone numbers that you can call to order Dell printer supplies. Understanding Your Printer Software 109 - Dell 1250c Color | User's Guide - Page 112
110 Understanding Your Printer Software - Dell 1250c Color | User's Guide - Page 113
15 Specifications Operating System Compatibility Your Dell™ 1250c Color Printer is compatible with Microsoft® Windows® XP, Windows XP 64-bit Edition, Windows Server® 2003, Windows Server 2003 x64 Edition, Windows Server 2008, Windows Server 2008 64-bit Edition, Windows Server 2008 R2, Windows - Dell 1250c Color | User's Guide - Page 114
, Windows Server 2003, Windows Server 2003 x64 Edition, Mac OS X Version 10.3.9, 10.4.11, 10.5.8, and 10.6 Interface Standard local: USB 2.0 Environment Operation Temperature Relative humidity Print Quality Guarantee 10-32°C 10-85% RH (no condensation) Temperature 112 Specifications 15 - Dell 1250c Color | User's Guide - Page 115
Storage humidity range Altitude -20-40°C 5-85% RH (no condensation) Operating Storage Up to 3,100 m (10,000 feet) 70.9275 Kpa Cables Your interconnection cable must meet the following requirements: Connection type Connection specifications and symbols 1 USB USB 2.0 1 Specifications 113 - Dell 1250c Color | User's Guide - Page 116
114 Specifications - Dell 1250c Color | User's Guide - Page 117
Maintaining Your Printer 115 - Dell 1250c Color | User's Guide - Page 118
116 - Dell 1250c Color | User's Guide - Page 119
operator to maintain your printer. Refer printing problems and maintenance tasks to this key operator. Conserving Supplies You can change several settings in your printer driver to conserve toner cartridge and paper. Supply Toner cartridge Print media Setting Function Toner Saving Mode in the - Dell 1250c Color | User's Guide - Page 120
: Before performing any of the following procedures, read and follow the safety instructions in your Product Information Guide. Dell toner cartridges are available only through Dell. You can order more cartridges online at http://www.dell.com/supplies or by phone. To order by phone, see "Contacting - Dell 1250c Color | User's Guide - Page 121
CAUTION: Do not shake the used toner cartridge to avoid spilling of toner. Removing the Toner Cartridges 1 Turn off the printer. 2 Open the toner access cover. 3 Pinch the cartridge firmly as shown in the illustration. 4 Pull the toner cartridge out. Maintaining Your Printer 119 - Dell 1250c Color | User's Guide - Page 122
to six times to distribute the toner evenly. NOTE: Ensure that the color of the new toner cartridge matches that on the handle before replacing it. NOTE: Handle the toner cartridge carefully to avoid spillage of the toner. 2 Remove the tape from the toner cartridge. 120 Maintaining Your Printer - Dell 1250c Color | User's Guide - Page 123
3 Adjust the toner cartridge to the associated cartridge holder, and then insert it firmly by pressing near the center of the label until the cartridge clicks. 4 Close the toner access cover. Maintaining Your Printer 121 - Dell 1250c Color | User's Guide - Page 124
To prevent electric shock, always turn off the printer and disconnect the power cable from the grounded outlet before performing maintenance. 1 Confirm that the printer is not in operation, and open the toner access cover. 2 Pinch the cartridge firmly as shown in the illustration. 122 Maintaining - Dell 1250c Color | User's Guide - Page 125
3 Pull the toner cartridge out. 4 Pull the other three cartridges out as well. 5 Pull the cleaning rod out. Maintaining Your Printer 123 - Dell 1250c Color | User's Guide - Page 126
tip reaches the interior of the printer as illustrated below, and then pull it out. 7 Repeat the same procedure for the other three holes. 8 Return the cleaning rod to its original location. 9 Replace the black cartridge by adjusting it to the associated cartridge holder, and then insert it firmly - Dell 1250c Color | User's Guide - Page 127
10 Replace the other three cartridges as well. 11 Close the toner access cover. Y Cleaning the Color Toner Density (CTD) Sensor CAUTION: To prevent electric shock, always turn off the printer and disconnect the power cable from the grounded outlet before performing maintenance. 1 Ensure that the - Dell 1250c Color | User's Guide - Page 128
3 Clean the CTD sensor inside the printer with a clean dry cotton swab. 4 Close the rear cover. Adjusting Color Registration This section describes how to adjust the color registration when you first install the printer or after moving it to a new location. 126 Maintaining Your Printer - Dell 1250c Color | User's Guide - Page 129
Chart NOTE: 1 Click Start All Programs Dell Printers Dell 1250c Color Printer Tool Box. NOTE: The Select Printer window appears in this step, when multiple printer drivers are installed on your computer. In this case, click the name of Dell 1250c Color Printer listed in Printer Name, and then - Dell 1250c Color | User's Guide - Page 130
colored line are most closely aligned for each color (Y, M, and C). If you find the straightest line, make a note of the value (-5 - +5) indicated by the straightest line for each color. When the value is 0 for each color , you do not need to adjust the color - Dell 1250c Color | User's Guide - Page 131
Entering Values Using the Tool Box, enter the values that you found in the color registration chart to make adjustments. NOTE: 1 Click Start All Programs Dell Printers Dell 1250c Color Printer Tool Box. Maintaining Your Printer 129 - Dell 1250c Color | User's Guide - Page 132
NOTE: The Select Printer window appears in this step, when multiple printer drivers are installed on your computer. In this case, click the name of Dell 1250c Color Printer listed in Printer Name, and then click OK. The Tool Box opens. 2 Click the Printer Maintenance tab. 3 Select Color Registration - Dell 1250c Color | User's Guide - Page 133
jams. See "Print Media Guidelines" on page 49 for more information. NOTE: Before buying large quantities of any print media, it is recommended that you try a sample first all cables that connect to the printer are correctly attached. • Over tightening the guides may cause jams. Clearing Jams 131 - Dell 1250c Color | User's Guide - Page 134
the Location of Paper Jams CAUTION: Do not attempt to clear any jams using tools or instruments. This may permanently damage the printer. The following illustration shows where paper jams may occur along the print media path. 1 3 2 4 6 5 1 Output Tray 2 Transfer Belt 3 Fuser Release Lever 4 Rear - Dell 1250c Color | User's Guide - Page 135
Clearing Paper Jams From the Front of the Printer CAUTION: Before performing any of the following procedures, read and follow the safety instructions in your Product Information Guide. NOTE: To resolve the error displayed on the operator panel, you must clear all print media from the print media - Dell 1250c Color | User's Guide - Page 136
CAUTION: Before performing any of the following procedures, read and follow the safety instructions in your Product Information Guide. CAUTION: To prevent electric shock, always turn off the printer and disconnect the power cable from the grounded outlet before performing maintenance. CAUTION - Dell 1250c Color | User's Guide - Page 137
3 Remove any paper jammed from the back of the printer. 4 Lower the fuser release levers to their original position. 5 Close the rear cover. Clearing Jams 135 - Dell 1250c Color | User's Guide - Page 138
CAUTION: Before performing any of the following procedures, read and follow the safety instructions in your Product Information Guide. CAUTION: To prevent electric shock, always turn off the printer and disconnect the power cable from the grounded outlet before performing maintenance. CAUTION: To - Dell 1250c Color | User's Guide - Page 139
3 Remove any paper jammed from the back of the printer. If no paper is found in the paper path, then remove any paper jammed out of the output tray. 4 Lower the fuser release levers to their original position. 5 Close the rear cover. Clearing Jams 137 - Dell 1250c Color | User's Guide - Page 140
138 Clearing Jams - Dell 1250c Color | User's Guide - Page 141
Troubleshooting 139 - Dell 1250c Color | User's Guide - Page 142
140 - Dell 1250c Color | User's Guide - Page 143
a problem, turn off the printer, wait for 10 seconds, and then turn on the printer. This often fixes the problem. Display Problems Problem After the printer is turned on, (Ready/Data) indicator is not lit. Action Turn off the printer, wait for 10 seconds, and turn on the printer. Troubleshooting - Dell 1250c Color | User's Guide - Page 144
Printing Problems Problem Action Job did not print or incorrect Ensure that (Ready/Data) indicator is lit. characters printed. Ensure that print media is loaded in the printer. Verify that you are using the correct printer driver. Ensure that you are using the correct USB cable and that it is - Dell 1250c Color | User's Guide - Page 145
toner cartridges may be low or need to be The task is replaced. Confirm the amount of toner in each complete. toner cartridge. 1 Check the toner level in the Status tab in the Status Monitor. 2 Replace the toner cartridges as necessary. Is the problem recovered? No Go to action 2. Troubleshooting - Dell 1250c Color | User's Guide - Page 146
driver. complete. 1 On the Advanced tab in Printing Preferences of the printer driver, ensure that the Toner Saving Mode check box is not selected. Is the problem recovered? Toner smears or print comes off/Stain on back side No Go to action 3. Go to action 4. Contact Dell. 144 Troubleshooting - Dell 1250c Color | User's Guide - Page 147
the plain paper to thick. 1 On the Paper/Output tab in Printing Preferences of the printer driver, change the Paper Type setting. Is the problem recovered? 2 Verify that the correct print media is being used. See "Supported Paper Sizes" on page 56. If not, use the print media recommended for the - Dell 1250c Color | User's Guide - Page 148
1 Ensure that the toner cartridges are installed correctly. See "Installing a Toner Cartridge" on page 120. The task is complete. Is the problem recovered? 2 If you use non-Dell brand toner cartridges, install Dell brand toner cartridges. The task is complete. Is the problem recovered? 3 Clean - Dell 1250c Color | User's Guide - Page 149
Streaks appear on the output If this trouble comes out, contact Dell. Pitched color dots If this trouble comes out, contact Dell. Vertical blanks Troubleshooting 147 - Dell 1250c Color | User's Guide - Page 150
print. The task is complete. 1 Clean inside the printer by using the cleaning rod. See "Cleaning Inside the Printer" on page 122. 2 Click Print Test Page in Properties of the printer driver. Is the problem recovered? Mottle No Contact Dell. Action Yes 1 Adjust the transfer bias. The task - Dell 1250c Color | User's Guide - Page 151
. 4 Click close box to exit Tool Box. Is the problem recovered? 4 If you use non-recommended print media, use The task is the print media recommended for the printer. complete. Is the problem recovered? No Go to action 2. Go to action 3. Go to action 4. Contact Dell. Troubleshooting 149 - Dell 1250c Color | User's Guide - Page 152
the whole page printed light? 2 Start Developer Stir Mode. 1 Launch the Tool Box, click Developer Stir Mode on the Diagnosis tab. 2 Click the Start button. Is the problem recovered? Bead-Carry-Out (BCO) Yes Contact Dell. The task is complete. No Go to action 2. Contact Dell. 150 Troubleshooting - Dell 1250c Color | User's Guide - Page 153
altitude of the location where the printer is installed. Is them problem recovered? Auger mark Yes The task is complete. No Contact Dell. Action 1 The toner cartridges may be low or need to be replaced. Confirm the amount of toner in each toner cartridge. 1 Check the toner level in the Status tab - Dell 1250c Color | User's Guide - Page 154
Print Media Guidelines" on page 49. If not, use the print media recommended for the printer. Is the problem recovered? If printing on an envelope, go to action 2. If printing on print media other than envelopes, contact Dell. 2 Check the crease. Is the crease within 30 mm of This type of If the - Dell 1250c Color | User's Guide - Page 155
see "When Loading Envelope#10, DL, or Monarch" on page 64. Is the problem recovered? 4a Load the envelope Dell. Contact Dell. Action Yes 1 Ensure that the margins are set correctly on the The task is application being used. complete. Is the problem recovered? No Contact Dell. Troubleshooting - Dell 1250c Color | User's Guide - Page 156
sensor. 1 Clean the CTD sensor. See "Cleaning the Color Toner Density (CTD) Sensor" on page 125. 2 Launch the Tool Box, and click Color Registration Adjustment on the Printer Maintenance tab. 3 Click the Start button next to Auto Correct. Is the problem recovered? Yes The task is complete. The task - Dell 1250c Color | User's Guide - Page 157
Color Registration Chart and manually correct the color registration. 1 Click Color Registration Adjustment on the Printer Maintenance tab. 2 Click the Start button next to Color Regi Chart. The color print a blank sheet of paper. Is the problem recovered? No Contact Dell. Troubleshooting 155 - Dell 1250c Color | User's Guide - Page 158
Box Menus" on page 87. For more information about Status Monitor, see "Printer Status Window" on page 103. Action 1 Locate the cause of the problem by removing the toner cartridges. 1 Remove the toner cartridges. See "Replacing Toner Cartridges" on page 118. 2 Launch the Tool Box, and click Machine - Dell 1250c Color | User's Guide - Page 159
the printer match with the noise from the Play of Sound button? 3 1 Reinstall the toner cartridges. 2 Perform action 2 again. Contact Dell. Does the noise generated from the printer match 87. For more information about Status Monitor, see "Printer Status Window" on page 103. Troubleshooting 157 - Dell 1250c Color | User's Guide - Page 160
recovered? 2c Ensure that the envelope is properly loaded in the MPF as instructed in "Loading Envelopes" on page 64. Is the problem recovered? 2d Ensure that the print media is not curled. Is the problem recovered? The task is complete. The task is complete. The task is complete. The task is - Dell 1250c Color | User's Guide - Page 161
? 3a Use print media that is not damp. Is the problem recovered? 3b Fan the print media. Is the problem recovered? Yes The task is complete. Go to action 3a. The task is complete. The task is complete. No Go to action 2. Go to action 3b. Go to action 3b. Contact Dell. Troubleshooting 159 - Dell 1250c Color | User's Guide - Page 162
. Contacting Service When you call for printer service, be prepared to describe the problem you are experiencing or the error message on the display. You need to know the model of your printer type and serial number. See the label located inside the side door of your printer. 160 Troubleshooting - Dell 1250c Color | User's Guide - Page 163
Appendix 161 - Dell 1250c Color | User's Guide - Page 164
162 - Dell 1250c Color | User's Guide - Page 165
customer in the troubleshooting process and provides for restoration of the operating system, software program and hardware drivers to the original default configuration as shipped from Dell, as well as the verification of appropriate functionality of the printer and all Dell-installed hardware. In - Dell 1250c Color | User's Guide - Page 166
practices. For information about the Dell warranty for your printer, see support.dell.com. Recycling Information It is recommended specific information on Dell's worldwide recycling programs, see www.dell.com/ recyclingworldwide. Contacting Dell For customers in the United States, call 800-WWW-Dell - Dell 1250c Color | User's Guide - Page 167
several online and telephone-based support and service options. Availability varies by country and product, and some services may not be available in your area. To contact Dell for sales, technical support, or customer service issues: 1 Visit support.dell.com. 2 Verify your country or region - Dell 1250c Color | User's Guide - Page 168
166 Appendix - Dell 1250c Color | User's Guide - Page 169
memory, 112 Basic printer problem, 141 BTR Refresh Mode, 97 C C5, 56 Cable, 113 Cancel button, 70 Canceling a job, 80 Canceling ajob from the computer running windows, 80 Carbonless copy paper, 51 CCP, 51 Chart Print, 98 Cleaning Inside the Printer, 122 Cleaning the Color Toner Density (CTD) Sensor - Dell 1250c Color | User's Guide - Page 170
Sensor Info, 99 Error indicator, 69 Executive, 57 168 Index F Finding Information, 17 Folio, 57 Front Cover, 23, 132 Fuser Release Lever, 24, 132 H How to set up, 18 How to use, 17 I Identifying print media, 56 Installing Printer drivers, 41, 45 Installing a Toner Cartridge, 120 Interfaces, 112 - Dell 1250c Color | User's Guide - Page 171
51 No carbon required, 51 Noise, 156 Non-Dell Toner, 96 O OCR, 51 Online Services, 163 Operating System compatibility, 111 Operation, 112 Operator panel, 23, 69 Button, 69 Operator Panel Lights, 71 Optical character recognition, 51 Ordering printer supplies, 15 Ordering supplies, 27 Output Tray, 23 - Dell 1250c Color | User's Guide - Page 172
Quality Problems, 143 Printer, 15 Printer drivers Installing, 41, 45 Printer Information, 87 Printer paper, 49 Printer software, 103 Printer specification, 111 Printer Status Window, 103 Printing, 79 Printing on letterhead, 52 Printing problem, 142 Product Features, 21 Product Information Guide, 18 - Dell 1250c Color | User's Guide - Page 173
79 Service Code, 19 Service Tag, 19 Setup diagram, 18 Software Update, 104 Start button/indicator, 69 Status Monitor Console, 103 Status Monitor Widget, 106 Storage, 113 Storage humidity range, 113 Storing consumables, 118 Storing print media, 56, 79, 117 Support Contacting Dell, 164 Supported paper - Dell 1250c Color | User's Guide - Page 174
172 Index
-
 1
1 -
 2
2 -
 3
3 -
 4
4 -
 5
5 -
 6
6 -
 7
7 -
8
-
9
-
10
-
11
-
12
-
13
-
14
-
15
-
16
-
17
-
18
-
19
-
20
-
21
-
22
-
23
-
24
-
25
-
26
-
27
-
28
-
29
-
30
-
31
-
32
-
33
-
34
-
35
-
36
-
37
-
38
-
39
-
40
-
41
-
42
-
43
-
44
-
45
-
46
-
47
-
48
-
49
-
50
-
51
-
52
-
53
-
54
-
55
-
56
-
57
-
58
-
59
-
60
-
61
-
62
-
63
-
64
-
65
-
66
-
67
-
68
-
69
-
70
-
71
-
72
-
73
-
74
-
75
-
76
-
77
-
78
-
79
-
80
-
81
-
82
-
83
-
84
-
85
-
86
-
87
-
88
-
89
-
90
-
91
-
92
-
93
-
94
-
95
-
96
-
97
-
98
-
99
-
100
-
101
-
102
-
103
-
104
-
105
-
106
-
107
-
108
-
109
-
110
-
111
-
112
-
113
-
114
-
115
-
116
-
117
-
118
-
119
-
120
-
121
-
122
-
123
-
124
-
125
-
126
-
127
-
128
-
129
-
130
-
131
-
132
-
133
-
134
-
135
-
136
-
137
-
138
-
139
-
140
-
141
-
142
-
143
-
144
-
145
-
146
-
147
-
148
-
149
-
150
-
151
-
152
-
153
-
154
-
155
-
156
-
157
-
158
-
159
-
160
-
161
-
162
-
163
-
164
-
165
-
166
-
167
-
168
-
169
-
170
-
171
-
172
-
173
-
174
 |
 |

www.dell.com | support.dell.com
Dell™ 1250c Color Printer
User's Guide