Dell 2130cn User Guide - Page 163
Edit SNMP v3 Properties
 |
UPC - 335521301238
View all Dell 2130cn manuals
Add to My Manuals
Save this manual to your list of manuals |
Page 163 highlights
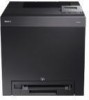
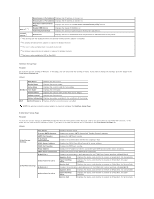
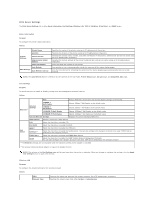
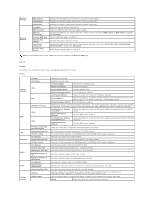
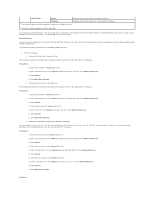
*1 Available when POP before SMTP for E-Mail Send Authentication is selected. SNMP Purpose: To configure the detailed settings of SNMP. Values: Enable SNMP v1/v2c Protocol Select the check box to enable the SNMP v1/v2c protocol. Edit SNMP v1/v2c Properties Click to display SNMP v1/v2c page and to edit the setting of SNMP v1/v2c protocol from the page. Enable SNMP v3 Protocol Select the check box to enable the SNMP v3 protocol. Edit SNMP v3 Properties Click to display SNMP v3 page and to edit the setting of SNMP v3 protocol from the page. Without SSL communication is enabled, you cannot click this item. NOTE: An optional network protocol adapter is required to display the SNMP page. SNMP v1/v2c Purpose: To edit the detailed settings of SNMP v1/v2c protocol. To enter this page, click Edit SNMP v1/v2c Properties in the SNMP page. Values: Community Name (Read Specifies the community name to access (read only) data using up to 31 alphanumeric characters. only)*1 The original setting will remain valid if no input is made. Characters entered for community name in the previous settings will not be displayed on the screen. The default Read Community is public. Re-enter Community Name (Read only)*1 Enter the community name to access (read only) data again to confirm it. Community Name (Read/Write)*1 Specifies the community name to access (read and write) data using up to 31 alphanumeric characters. The original setting will remain valid if no input is made. Characters entered for community name in the previous settings will not be displayed on the screen. The default Read/Write Community is private. Re-enter Community Name (Read/Write)*1 Enter the community name to access (read and write) data again to confirm it. Community Name (Trap)*1 Specifies the community name used for trap up to 31 alphanumeric characters. The original settings will remain valid if no input is made. Characters entered for Community Name (Trap) in the previous settings will not be displayed on the screen. The default Trap Community is " " (NULL). Re-enter Community Name (Trap)*1 Enter the community name used for trap again to confirm it. Select the check boxes to notify trap occurrence. In this case, specify the IP address and IP socket in the following format: l IPv4 Trap Notification 1-4 Specify the IP address and IP socket in the nnn.nnn.nnn.nnn:mmmmm format. Each section of "nnn" is a variable value between 0 and 255. Note that values 127 and 224-254 are not valid for the first three-digits only. IP socket mmmmm is a variable value between 0 and 65535. l IPv6 Specify the IP address and IP socket in the xxxx:xxxx:xxxx:xxxx:xxxx:xxxx:xxxx:xxxx:mmmmm format. Each section of "xxxx" is a hexadecimal variable value between 0 and ffff. IP socket mmmmm is a variable value between 0 and 65535. Authenticate Error Trap Select the check box to notify Authenticate Error Trap. *1 The default value of each items can be changed by using Dell Printer Configuration Web Tool. SNMP v3 Purpose: To edit the detailed settings of SNMP v3 protocol. To enter this page, click Edit SNMP v3 Properties in the SNMP page. Values: Account Enabled User Name Select the check box to enable the administrator account. Enter the user name of the administrator account.
-
 1
1 -
2
-
3
-
4
-
5
-
6
-
7
-
8
-
9
-
10
-
11
-
12
-
13
-
14
-
15
-
16
-
17
-
18
-
19
-
20
-
21
-
22
-
23
-
24
-
25
-
26
-
27
-
28
-
29
-
30
-
31
-
32
-
33
-
34
-
35
-
36
-
37
-
38
-
39
-
40
-
41
-
42
-
43
-
44
-
45
-
46
-
47
-
48
-
49
-
50
-
51
-
52
-
53
-
54
-
55
-
56
-
57
-
58
-
59
-
60
-
61
-
62
-
63
-
64
-
65
-
66
-
67
-
68
-
69
-
70
-
71
-
72
-
73
-
74
-
75
-
76
-
77
-
78
-
79
-
80
-
81
-
82
-
83
-
84
-
85
-
86
-
87
-
88
-
89
-
90
-
91
-
92
-
93
-
94
-
95
-
96
-
97
-
98
-
99
-
100
-
101
-
102
-
103
-
104
-
105
-
106
-
107
-
108
-
109
-
110
-
111
-
112
-
113
-
114
-
115
-
116
-
117
-
118
-
119
-
120
-
121
-
122
-
123
-
124
-
125
-
126
-
127
-
128
-
129
-
130
-
131
-
132
-
133
-
134
-
135
-
136
-
137
-
138
-
139
-
140
-
141
-
142
-
143
-
144
-
145
-
146
-
147
-
148
-
149
-
150
-
151
-
152
-
153
-
154
-
155
-
156
-
157
-
 158
158 -
 159
159 -
 160
160 -
 161
161 -
 162
162 -
 163
163 -
 164
164 -
 165
165 -
 166
166 -
 167
167 -
 168
168 -
169
-
170
-
171
-
172
-
173
-
174
-
175
-
176
-
177
-
178
-
179
-
180
-
181
-
182
-
183
-
184
-
185
-
186
-
187
-
188
-
189
-
190
-
191
-
192
-
193
-
194
-
195
-
196
-
197
-
198
-
199
-
200
-
201
-
202
-
203
-
204
 |
 |