Dell 948 All In One Printer User Guide - Page 144
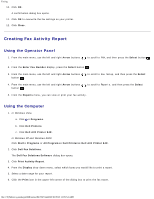
Creating Fax Activity Report
 |
View all Dell 948 All In One Printer manuals
Add to My Manuals
Save this manual to your list of manuals |
Page 144 highlights
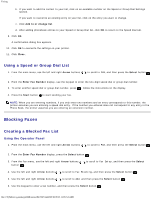
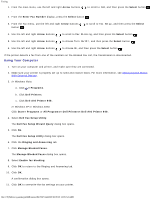
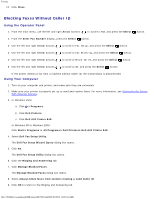
Faxing 10. Click OK. A confirmation dialog box opens. 11. Click OK to overwrite the fax settings on your printer. 12. Click Close. Creating Fax Activity Report Using the Operator Panel 1. From the main menu, use the left and right Arrow buttons . to scroll to FAX, and then press the Select button 2. From the Enter Fax Number display, press the Select button . 3. From the main menu, use the left and right Arrow buttons button . to scroll to Fax Setup, and then press the Select 4. From the main menu, use the left and right Arrow buttons button . to scroll to Reports, and then press the Select 5. From the Reports menu, you can view or print your fax activity. Using the Computer 1. In Windows Vista: a. Click ® Programs. b. Click Dell Printers. c. Click Dell AIO Printer 948. In Windows XP and Windows 2000: Click Start® Programs or All Programs® Dell Printers® Dell AIO Printer 948. 2. Click Dell Fax Solutions. The Dell Fax Solutions Software dialog box opens. 3. Click Print Activity Report. 4. From the Display drop-down menu, select which faxes you would like to print a report. 5. Select a date range for your report. 6. Click the Print icon in the upper-left corner of the dialog box to print the fax report. file:///T|/htdocs/systems/prn948/en/en/d0e7047.html[10/10/2012 11:05:54 AM]
-
 1
1 -
2
-
3
-
4
-
5
-
6
-
7
-
8
-
9
-
10
-
11
-
12
-
13
-
14
-
15
-
16
-
17
-
18
-
19
-
20
-
21
-
22
-
23
-
24
-
25
-
26
-
27
-
28
-
29
-
30
-
31
-
32
-
33
-
34
-
35
-
36
-
37
-
38
-
39
-
40
-
41
-
42
-
43
-
44
-
45
-
46
-
47
-
48
-
49
-
50
-
51
-
52
-
53
-
54
-
55
-
56
-
57
-
58
-
59
-
60
-
61
-
62
-
63
-
64
-
65
-
66
-
67
-
68
-
69
-
70
-
71
-
72
-
73
-
74
-
75
-
76
-
77
-
78
-
79
-
80
-
81
-
82
-
83
-
84
-
85
-
86
-
87
-
88
-
89
-
90
-
91
-
92
-
93
-
94
-
95
-
96
-
97
-
98
-
99
-
100
-
101
-
102
-
103
-
104
-
105
-
106
-
107
-
108
-
109
-
110
-
111
-
112
-
113
-
114
-
115
-
116
-
117
-
118
-
119
-
120
-
121
-
122
-
123
-
124
-
125
-
126
-
127
-
128
-
129
-
130
-
131
-
132
-
133
-
134
-
135
-
136
-
137
-
138
-
 139
139 -
 140
140 -
 141
141 -
 142
142 -
 143
143 -
 144
144
 |
 |