Dell Alienware Aurora - R2 Service Manual (English only) - Page 52
Removing the Processor, Removing
 |
View all Dell Alienware Aurora - R2 manuals
Add to My Manuals
Save this manual to your list of manuals |
Page 52 highlights
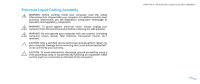
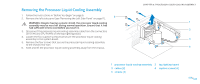
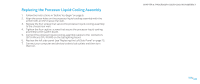
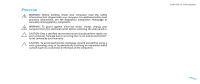
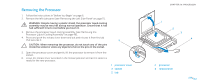
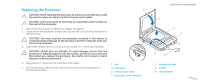
Removing the Processor 1. Follow the instructions in "Before You Begin" on page 6. 2. Remove the left side-panel (see "Removing the Left Side-Panel" on page 11). WARNING: Despite having a plastic shield, the processor liquid-cooling assembly may be very hot during normal operation. Ensure that it has had sufficient time to cool before you touch it. 3. Remove the processor liquid-cooling assembly (see "Removing the Processor Liquid-Cooling Assembly" on page 48). 4. Press and push the release lever down and out and release it from the tab that secures it. 5 CAUTION: When removing the processor, do not touch any of the pins inside the socket or allow any objects to fall on the pins in the socket. 5. Open the processor cover and gently lift the processor to remove it from the socket. 6. Leave the release lever extended in the release position so that the socket is ready for the new processor. 1 processor cover 3 socket 5 tab CHAPTER 10: PROCESSOR 1 2 3 4 2 processor 4 release lever 052 /052
-
 1
1 -
2
-
3
-
4
-
5
-
6
-
7
-
8
-
9
-
10
-
11
-
12
-
13
-
14
-
15
-
16
-
17
-
18
-
19
-
20
-
21
-
22
-
23
-
24
-
25
-
26
-
27
-
28
-
29
-
30
-
31
-
32
-
33
-
34
-
35
-
36
-
37
-
38
-
39
-
40
-
41
-
42
-
43
-
44
-
45
-
46
-
 47
47 -
 48
48 -
 49
49 -
 50
50 -
 51
51 -
 52
52 -
 53
53 -
 54
54 -
 55
55 -
 56
56 -
 57
57 -
58
-
59
-
60
-
61
-
62
-
63
-
64
-
65
-
66
-
67
-
68
-
69
-
70
-
71
-
72
-
73
-
74
-
75
-
76
-
77
-
78
-
79
-
80
-
81
-
82
-
83
-
84
-
85
-
86
-
87
-
88
-
89
-
90
-
91
-
92
-
93
-
94
-
95
-
96
-
97
-
98
-
99
-
100
-
101
-
102
-
103
-
104
-
105
-
106
-
107
-
108
-
109
-
110
-
111
-
112
-
113
-
114
-
115
-
116
-
117
 |
 |
