Dell Force10 Z9000 Dell Force10 Z9000 System Quick Start Guide - Page 14
Install a New DC Power Supply
 |
View all Dell Force10 Z9000 manuals
Add to My Manuals
Save this manual to your list of manuals |
Page 14 highlights
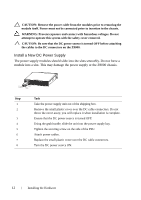
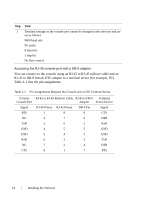
CAUTION: Remove the power cable from the modules prior to removing the module itself. Power must not be connected prior to insertion in the chassis. WARNING: Prevent exposure and contact with hazardous voltages. Do not attempt to operate this system with the safety cover removed. CAUTION: Be sure that the DC power source is turned OFF before attaching the cables to the DC connectors on the Z9000. Install a New DC Power Supply The power supply modules should slide into the slots smoothly. Do not force a module into a slot. This may damage the power supply or the Z9000 chassis. PSU0 Fan Modules PSU1 DC cable connectors Securing Screw Grab Handle Step Task 1 Take the power supply unit out of the shipping box. 2 Remove the small plastic cover over the DC cable connectors. Do not throw the cover away; you will replace it when installation is complete. 3 Ensure that the DC power source is turned OFF. 4 Using the grab handle, slide the unit into the power supply bay. 5 Tighten the securing screw on the side of the PSU. 6 Attach power cables. 7 Replace the small plastic cover over the DC cable connectors. 8 Turn the DC power source ON. 12 Installing the Hardware
-
 1
1 -
2
-
3
-
4
-
5
-
6
-
7
-
8
-
 9
9 -
 10
10 -
 11
11 -
 12
12 -
 13
13 -
 14
14 -
 15
15 -
 16
16 -
 17
17 -
 18
18 -
 19
19 -
20
-
21
-
22
-
23
-
24
 |
 |
