Dell Inspiron 15R 5537 Owner's Manual - Page 34
Removing the System Board, Prerequisites - hard drive
 |
View all Dell Inspiron 15R 5537 manuals
Add to My Manuals
Save this manual to your list of manuals |
Page 34 highlights
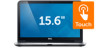
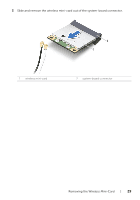
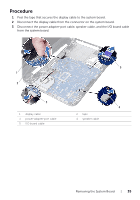
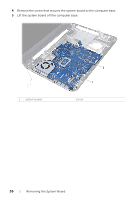
Removing the System Board WARNING: Before working inside your computer, read the safety information that shipped with your computer and follow the steps in "Before You Begin" on page 7. After working inside your computer, follow the instructions in "After Working Inside Your Computer" on page 9. For additional safety best practices information, see the Regulatory Compliance Homepage at dell.com/regulatory_compliance. NOTE: Your computer's Service Tag is stored in the system board. You must enter the Service Tag in system setup after you replace the system board. For more information, see "Entering the Service Tag in system setup" on page 37. NOTE: Before disconnecting the cables from the system board, note the location of the connectors so that you can reconnect them correctly after you replace the system board. Prerequisites 1 Remove the battery. See "Removing the Battery" on page 10. 2 Follow the instructions from step 1 to step 2 in "Removing the Memory Module(s)" on page 12. 3 Remove the hard-drive assembly. See "Removing the Hard-Drive Assembly" on page 18. 4 Remove the optical-drive assembly. See "Removing the Optical-Drive Assembly" on page 15. 5 Remove the keyboard. See "Removing the Keyboard" on page 21. 6 Remove the palm-rest. See "Removing the Palm-Rest" on page 24. 7 Remove the wireless mini-card. See "Removing the Wireless Mini-Card" on page 28. 34 | Removing the System Board
-
 1
1 -
2
-
3
-
4
-
5
-
6
-
7
-
8
-
9
-
10
-
11
-
12
-
13
-
14
-
15
-
16
-
17
-
18
-
19
-
20
-
21
-
22
-
23
-
24
-
25
-
26
-
27
-
28
-
 29
29 -
 30
30 -
 31
31 -
 32
32 -
 33
33 -
 34
34 -
 35
35 -
 36
36 -
 37
37 -
 38
38 -
 39
39 -
40
-
41
-
42
-
43
-
44
-
45
-
46
-
47
-
48
-
49
-
50
-
51
-
52
-
53
-
54
-
55
-
56
-
57
-
58
-
59
-
60
-
61
-
62
-
63
-
64
-
65
-
66
-
67
-
68
 |
 |