Dell M2300 User's Guide
Dell M2300 Manual
 |
View all Dell M2300 manuals
Add to My Manuals
Save this manual to your list of manuals |
Dell M2300 manual content summary:
- Dell M2300 | User's Guide - Page 1
Dell Precision™ M2300 User's Guide Model PP18L www.dell.com | support.dell.com - Dell M2300 | User's Guide - Page 2
in this document to Microsoft® Windows® operating systems are not applicable. Information in this document is subject to change without notice. © 2007-2008 Dell Inc. All rights reserved. Trademarks used in this text: Dell, the DELL logo, Dell Precision, ExpressCharge, TravelLite, Strike Zone, Wi - Dell M2300 | User's Guide - Page 3
to a New Computer Microsoft® Windows® XP 27 Running the Files and Settings Windows Vista 29 4 Using a Battery Battery Performance 31 Checking the Battery Charge 32 Dell™ QuickSet Battery Meter 32 Microsoft® Windows® Power Meter 32 Charge Gauge 32 Low-Battery Warning 33 Conserving Battery - Dell M2300 | User's Guide - Page 4
Power Options Properties 35 Charging the Battery 35 Replacing the Battery 36 Storing a Battery 36 Battery Errors 37 5 Using the Keyboard Numeric Keypad 39 Key Combinations 39 System Functions 39 Battery 40 Display Functions 40 Power Management 40 Microsoft® Windows® Logo Key Functions 40 - Dell M2300 | User's Guide - Page 5
Playing Media 57 Copying Media 58 How to Copy Media 59 Using Blank Media 59 Helpful Tips 60 Adjusting the Volume 61 Adjusting the Picture 61 Microsoft® Windows® XP Operating System 61 Microsoft Windows Vista® Operating System 62 9 Using Cards Card Types 63 PC Cards 63 Contents 5 - Dell M2300 | User's Guide - Page 6
72 Using the Security Management Software 73 Computer Tracking Software 73 If Your Computer Is Lost or Stolen 73 11 Troubleshooting Dell™ Technical Update Service 75 Dell Diagnostics 75 When to Use the Dell Diagnostics 75 Starting the Dell Diagnostics From Your Hard Drive 75 6 Contents - Dell M2300 | User's Guide - Page 7
an unfamiliar scraping or grinding sound 80 Hard drive problems 80 E-Mail, Modem, and Internet Problems 80 Error Messages 82 IEEE 1394 Device Problems 85 Keyboard Problems 86 External Keyboard problems 86 Unexpected characters 87 Lockups and Software Problems 87 The computer does not start - Dell M2300 | User's Guide - Page 8
sound from integrated speakers 93 No sound from external speakers 94 No sound from headphones 94 Touch Pad or Mouse Problems 94 Video and Display Problems 95 If the display is blank 95 If the display is difficult to read 95 If only part of the display is readable 96 12 System Setup Program - Dell M2300 | User's Guide - Page 9
Your Computer 110 Hinge Cover 111 Keyboard 111 Internal Card With Bluetooth® Wireless Technology 113 Coin-Cell Battery 114 Memory 115 Wireless Local Area Network (WLAN) Card 120 Mobile Broadband Card 122 Subscriber Identity Module (SIM) Card 125 Hard Drive 126 Media Bay 128 Removing Media - Dell M2300 | User's Guide - Page 10
Order-Status Service 145 Problems With Your Order 145 Product Information 145 Returning Items for Warranty Repair or Credit 145 Before You Call 146 Contacting Dell 147 19 Appendix Cleaning Your Computer 149 Computer, Keyboard, and Display 149 Touch Pad 149 Mouse 150 Floppy Drive 150 CDs - Dell M2300 | User's Guide - Page 11
75). Readme files may be included on your media to provide last-minute updates about technical changes to your computer or advanced technicalreference material for technicians or experienced users. NOTE: Drivers and documentation updates can be found at support.dell.com. Finding Information 11 - Dell M2300 | User's Guide - Page 12
instructions • Regulatory information • Ergonomics information • End User License Agreement • Service Tag and Express Service Code • Microsoft Windows License Label NOTE: This document is available as a PDF at support.dell.com. Dell™ Product Information Guide Service Tag and Microsoft® Windows - Dell M2300 | User's Guide - Page 13
Software: 1 Go to support.dell.com, select your region or business segment, and enter your Service Tag. 2 Select Drivers & Downloads and click Go. for your operating system and support for processors, 3 Click your operating system and search for the keyword optical drives, USB devices, and so on - Dell M2300 | User's Guide - Page 14
Microsoft Windows XP: 1 Click the Start button and click Help and Support. 2 Either select one of the topics listed, or type a word or phrase that describes your problem into the Search box, click the arrow icon, and then click the topic that describes your problem. 3 Follow the instructions on - Dell M2300 | User's Guide - Page 15
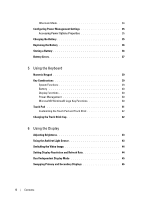
About Your Computer NOTE: The appearance of your computer may vary slightly from the model shown in this document. Front View 1 2 3 13 12 11 4 10 5 9 8 7 6 About Your Computer 15 - Dell M2300 | User's Guide - Page 16
1 display latch 2 display 3 power button 4 device status lights 5 keyboard 6 touch pad 7 fingerprint reader (optional) 8 touch pad buttons/track stick 9 track stick buttons 10 keyboard status lights 11 volume control buttons 12 ambient light sensor 13 mute button DEVICE STATUS LIGHTS 16 - Dell M2300 | User's Guide - Page 17
that came with your Bluetooth wireless technology. If the computer is connected to an electrical outlet, the light operates as follows: - Solid green: The battery is charging. - Flashing green: The battery is almost fully charged. - Off: The battery is adequately charged (or external power is not - Dell M2300 | User's Guide - Page 18
keyboard - Helps to keep your Dell™ computer secure. When you slide your finger over the reader, it uses your unique reader, see "Security Management Software" on page 72. A M B I E N T L I G H T S E N S O R - Detects available environmental light and automatically increases or decreases the display - Dell M2300 | User's Guide - Page 19
4 smart card slot (with blank) 5 1394 connector 7 Wi-Fi Catcher™ Network 8 PC Card slot Locater light 3 audio connectors (2) 6 wireless switch 9 hard drive A I R V E N T S - The computer uses an internal fan to create airflow through the vents, which prevents the computer from overheating - Dell M2300 | User's Guide - Page 20
smart card slot. For more information and instructions on removing the blank, see "Smart Cards" on page 63. I E E E 1 3 9 4 C O N N E C T O R - Connects devices supporting IEEE 1394 high-speed transfer rates, such as some digital video cameras. W I R E L E S S S W I T C H - When enabled through Dell - Dell M2300 | User's Guide - Page 21
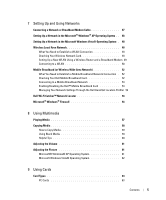
(see "Card Types" on page 63). H A R D D R I V E - Stores software and data. Right Side View 1 2 3 1 optical drive in media bay 2 media-bay device latch release 3 USB connectors (2) M E D I A B A Y - Supports a floppy or an optical drive, second battery, second hard drive, or a Dell TravelLite - Dell M2300 | User's Guide - Page 22
(RJ-45) 4 serial connector 7 air vents 2 modem connector (RJ-11) 5 video connector 3 USB connectors (2) 6 AC adapter connector CAUTION: Do not block, push objects into, or allow on using the network adapter, see the device user's guide supplied with your computer. 22 About Your Computer - Dell M2300 | User's Guide - Page 23
(see "Finding Information" on page 11). USB CONNECTORS Connects USB devices, such as a mouse, keyboard, or printer. SERIAL CONNECTOR Connects serial devices, such as a mouse or handheld device. VIDEO CONNECTOR Connects video devices, such as a monitor. AC ADAPTER CONNECTOR Connects an AC - Dell M2300 | User's Guide - Page 24
AC adapter to avoid damaging the cable. A I R V E N T S - The computer uses an internal fan to create airflow through the vents, which prevents the computer from overheating. CAUTION: Do not block, push objects into, or allow dust to accumulate in the air vents. Do not store your computer in a low - Dell M2300 | User's Guide - Page 25
(if present) 5 memory module cover 7 air vents 8 hard drive 3 battery-bay latch releases (2) 6 docking-device connector 9 hard drive screws (2) B A T T E R Y C H A R G E G A U G E / H E A L T H G A U G E - Provides information on the battery charge (see "Checking the Battery Charge" on page 32 - Dell M2300 | User's Guide - Page 26
A I R V E N T S - The computer uses an internal fan to create airflow through the fan air vents, which prevents the computer from overheating. H A R D D R I V E S C R E W S - Secure the hard drive in place. 26 About Your Computer - Dell M2300 | User's Guide - Page 27
you transfer files and other data from one computer another. For instructions, see the following section that corresponds to the operating system your computer is running. Microsoft® Windows® XP The Microsoft Windows XP operating system provides the Files and Settings Transfer wizard to move data - Dell M2300 | User's Guide - Page 28
, click Next. 3 On the Which computer is this? screen, click New Computer→Next. 4 On the Do you have a Windows XP CD? screen, click I want to create a Wizard Disk in the following drive→Next. 5 Insert the removable media, such as a writable CD, and click OK. 6 When the disk creation completes and - Dell M2300 | User's Guide - Page 29
your settings and files and click Next. Follow the instructions on the screen. The wizard reads the collected support.dell.com for document #PA1089586 (How Do I Transfer Files From My Old Computer to My New Dell Computer Using the Microsoft® Windows® XP Operating System?). NOTE: Access to the Dell - Dell M2300 | User's Guide - Page 30
The screen indicates that a connection has been made. 5 At the computer you are transferring data from, follow the on-screen instructions to select the settings and files you want to transfer. 6 You will come to a screen that indicates you are ready to transfer files. 7 From the - Dell M2300 | User's Guide - Page 31
to, the following: • Using optical drives. • Using wireless communications devices, PC Cards, media memory cards, or USB devices. • Using high-brightness display settings, 3D screen savers, or other power-intensive programs such as complex 3D graphics applications. • Running the computer in maximum - Dell M2300 | User's Guide - Page 32
Dell QuickSet Battery Meter, the Microsoft Windows Power Meter window and battery meter icon ( or ), the battery charge gauge and health gauge, and the low-battery warning provide information on the battery charge. Dell™ QuickSet Battery Meter If Dell QuickSet is installed, press to display - Dell M2300 | User's Guide - Page 33
of power, hibernate mode begins automatically. A pop-up window warns you when the battery charge is approximately 90 percent depleted. If two batteries are installed, the low-battery warning means that the combined charge of both batteries is approximately 90 percent depleted. The computer enters - Dell M2300 | User's Guide - Page 34
mode (sleep mode in Microsoft Windows Vista®) conserves power by turning off the display and the hard drive after a predetermined period of inactivity enters hibernate mode if the battery charge level becomes critically low. To manually enter hibernate mode in Windows XP, click Start→Turn off - Dell M2300 | User's Guide - Page 35
exits hibernate mode. Remove and reinsert the card (see "Removing a Card or Blank" on page 65), or simply restart ( Windows XP Click Start→Control Panel→Performance and Maintenance→Power Options. Windows Vista Click Start→Control Panel→System and Maintenance→Power Options. Charging the Battery - Dell M2300 | User's Guide - Page 36
. NOTICE: You must remove all external cables from the computer to avoid possible connector damage. To remove the battery: 1 If the computer is connected to a docking device (docked), undock it. See the documentation that came with your docking device for instructions. 2 Ensure that the computer is - Dell M2300 | User's Guide - Page 37
Battery Errors To address error codes generated by the battery, refer to "Error Messages" on page 82. Using a Battery 37 - Dell M2300 | User's Guide - Page 38
38 Using a Battery - Dell M2300 | User's Guide - Page 39
Keypad numeric keypad The numeric keypad functions like the numeric keypad on an external keyboard. Each key on the keypad has multiple functions. The keypad numbers and Lk> again. Key Combinations System Functions Opens the Task Manager window. Using the Keyboard 39 - Dell M2300 | User's Guide - Page 40
Meter (see "Dell™ QuickSet Battery Meter" on page 32). Display Functions and left-arrow key and up-arrow key and down-arrow key Switches the video image to the next display option. The options include the integrated display, an external monitor, and both displays - Dell M2300 | User's Guide - Page 41
click Keyboard. For information about the Control Panel, access the Help and Support Center (click Start→Help and Support). Touch Pad The touch pad detects the pressure and movement of your finger to allow you to move the cursor on the display - Dell M2300 | User's Guide - Page 42
the Control Panel, access the Help and Support Center (click Start→Help and Support). 2 In the Mouse Properties window: • Click the Device Select tab to disable display if it is not properly seated on the post. 3 Test the track stick to ensure that the cap is seated properly. 42 Using the Keyboard - Dell M2300 | User's Guide - Page 43
- or down-arrow key on the keyboard. NOTE: Brightness key combinations only affect the display on your portable computer, not monitors or projectors that you attach to your portable computer or docking device. If your computer is connected to an external monitor and you try to change the brightness - Dell M2300 | User's Guide - Page 44
between the display only, the external device only, or the display and the external device simultaneously. Setting Display Resolution and Refresh Rate To display a program at a specific resolution, both the graphics card and the display must support the program, and the necessary video drivers must - Dell M2300 | User's Guide - Page 45
and right. NOTICE: You can damage an external monitor by using an unsupported refresh rate. Before adjusting the refresh rate on an external monitor, see the user's guide for the monitor. Dual Independent Display Mode You can attach an external monitor or projector to your computer and use it as an - Dell M2300 | User's Guide - Page 46
display. Swapping Primary and Secondary Displays To swap your primary and secondary display designations (for example, to use your external monitor as your primary display after docking Display. 4 Click the Settings tab→Advanced→Displays tab. See the documentation that came with your video card - Dell M2300 | User's Guide - Page 47
cable, or set up a wireless LAN (WLAN). The Windows XP and Windows Vista operating systems provide wizards to help guide you through the process of networking computers. For more information about Networking, access the Help and Support Center (click Start→Help and Support). Connecting a Network or - Dell M2300 | User's Guide - Page 48
Windows XP Service Pack 2 (SP2). 2 Complete the checklist. 3 Return to the Network Setup Wizard and follow the instructions in the wizard. Setting Up a Network in the Microsoft Windows Vista® Operating System 1 Click the Windows has a wireless network card and to determine the type of card, use one - Dell M2300 | User's Guide - Page 49
Using a Wireless Router and a Broadband Modem 1 Contact your Internet service provider (ISP) to obtain specific information troubleshooting information. Install the required software according to the instructions provided by the router manufacturer. 4 Shut down your computer and any other wireless - Dell M2300 | User's Guide - Page 50
the software is removed or corrupted, follow the instructions in the user documentation for your wireless network card. Verify the type of wireless network card installed in your computer and then search for that name on the Dell™ Support website at support.dell.com. For information on the type of - Dell M2300 | User's Guide - Page 51
up to 1 minute to connect to the network. Monitoring the Status of the Wireless Network Card Through Dell QuickSet The wireless activity indicator provides you with an easy way to monitor the status of your computer's wireless devices. To turn the wireless activity indicator on or off, click the - Dell M2300 | User's Guide - Page 52
zone. Contact your service provider for coverage in a specific geographical location, Dell Mobile Broadband Card Utility user's guide for instructions. The user's guide is available through the Windows Help and Support Center (click Start→Help and Support) or on the media that accompanied your card - Dell M2300 | User's Guide - Page 53
service provider. For instructions and for additional information about using the Dell Mobile Broadband Card Utility, see the user's guide available through the Windows Help and Support Center (click Start→Help and Support). The user's guide is also available on the Dell Support website at support - Dell M2300 | User's Guide - Page 54
wireless device, see "Monitoring the Status of the Wireless Network Card Through Dell QuickSet" on page 51. Managing Your Network Settings Through the Dell QuickSet Location Profiler The Dell , home, or other public places with Internet services. General Mobility Settings allows you to change the - Dell M2300 | User's Guide - Page 55
NOTE: Enabling Windows Firewall does not reduce the need for virus-checking software. For more information, click Start→Control Panel→Security→Windows Firewall, or access the Help and Support Center (click Start→Help and Support). Setting Up and Using Networks 55 - Dell M2300 | User's Guide - Page 56
56 Setting Up and Using Networks - Dell M2300 | User's Guide - Page 57
button on the front of the drive. 2 Pull out the tray. 3 Place the disc, label side up, in the center of the tray and snap the disc onto the spindle. NOTE: If you use a module that shipped with another computer, you need to install the drivers and software necessary to play DVDs - Dell M2300 | User's Guide - Page 58
4 Push the tray back into the drive. To format media for storing data, to create music media, or to copy media, see the media software that came with your computer. NOTE: Ensure - Dell M2300 | User's Guide - Page 59
of the window. How to Copy Media NOTE: CD-RW/DVD combo drives cannot write to DVD media. If you have a CD-RW/DVD combo drive and you experience recording problems, check for available software patches on the Sonic support website at sonic.com. The DVD-writable drives installed in Dell™ computers can - Dell M2300 | User's Guide - Page 60
of formats supported by your DVD player, see the documentation provided with your DVD player or contact the manufacturer. • Do not burn a blank CD-R or CD-RW to its maximum capacity; for example, do not copy a 650-MB file to a blank 650-MB CD. The CD-RW drive needs 1-2 MB of blank space to finalize - Dell M2300 | User's Guide - Page 61
an error message notifies you that the current resolution and color depth are using too much memory and preventing DVD playback, adjust the display properties. Microsoft® Windows® XP Operating System 1 Click Start→Control Panel→Appearance and Themes. 2 Under Pick a task..., click Change the screen - Dell M2300 | User's Guide - Page 62
Vista® Operating System 1 Click the Windows Vista Start button, Personalization. , and click Control Panel→Appearance and 2 Under Personalization, click Adjust Screen Resolution. 3 Under Resolution: click and drag the bar to reduce - Dell M2300 | User's Guide - Page 63
/ExpressCard" on page 135 for information on supported ExpressCards. NOTE: An ExpressCard is not a bootable device. ExpressCards leverage PC Card technology to provide a fast and convenient way to add memory, wired and wireless network communications (including Mobile Broadband network [also known - Dell M2300 | User's Guide - Page 64
. CAUTION: Before you begin any of the procedures in this section, follow the safety instructions in the Product Information Guide. PC Card 1 Hold the card with its orientation symbol pointing into the slot and the top side of the card facing up. The latch may need to be in the "in" position before - Dell M2300 | User's Guide - Page 65
Install the ExpressCard with the adapter the same way as a PC Card. (See "PC Cards" on page 63) Removing a Card or Blank CAUTION: Before you begin any of the procedures in this section, follow the safety instructions in the Product Information Guide. NOTICE: Click the icon in the taskbar to select - Dell M2300 | User's Guide - Page 66
66 Using Cards - Dell M2300 | User's Guide - Page 67
to the security cable slot on your Dell™ computer. For more information, see the instructions included with the device. NOTICE: Before you buy an antitheft device, ensure that it will work with the security cable slot on your computer. Smart Card - Dell M2300 | User's Guide - Page 68
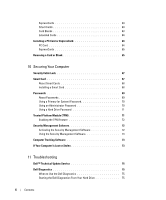
the gold contact pad is facing upward and pointing toward the smart card slot. 1 2 1 gold contact pad 2 smart card (top) 2 Slide the smart card into the smart card slot until the card is completely seated in its connector. The smart card will protrude approximately 1/2 inch from the slot. The - Dell M2300 | User's Guide - Page 69
or hard drive. However, they are not foolproof. If you require more security, obtain and use additional forms of protection, such as smart cards, data encryption programs, or PC Cards with encryption features. Use the User Accounts option in the Control Panel in the Microsoft® Windows® operating - Dell M2300 | User's Guide - Page 70
your hard drive from unauthorized access NOTE: Some hard drives do not support hard drive passwords. NOTE: Passwords provide a high level of security for data in your computer or hard drive. However, they are not foolproof. For security, the Dell Precision™ M2300 ships with a smart card reader. If - Dell M2300 | User's Guide - Page 71
start-up from another device. If the Boot First Device option is not set to allow the computer to start from another device, the computer returns to the operating state it was in when you turned it on. If the hard drive password, the external hard-drive password, and the primary password are the - Dell M2300 | User's Guide - Page 72
Started Guide. In the event of these backups being incomplete, lost, or damaged, Dell will the computer and press during the Power On Self Test to enter the system setup program. b Select Security→TPM Activation • Pre-boot authentication (using a fingerprint reader, smart card, or password - Dell M2300 | User's Guide - Page 73
When the DELL™ logo appears, press immediately. If you wait too long and the Windows logo appears, continue to wait until you see the Windows desktop. office of the company. • Contact Dell customer service to report the missing computer. Provide the computer Service Tag, the case number, and the - Dell M2300 | User's Guide - Page 74
representative will log your report under the computer Service Tag and record the computer as missing or stolen. If someone calls Dell for technical assistance and gives your Service Tag, the computer is identified automatically as missing or stolen. The representative will attempt to get the - Dell M2300 | User's Guide - Page 75
97), review your computer's configuration information, and ensure that the device you want to test displays in system setup and is active. Start the Dell Diagnostics from your hard drive or from the Drivers and Utilities media. Starting the Dell Diagnostics From Your Hard Drive The Dell Diagnostics - Dell M2300 | User's Guide - Page 76
no diagnostics utility partition has been found, run the Dell Diagnostics from the Drivers and Utilities media. The computer runs the Pre-boot System Assessment, a series of initial tests of your system board, keyboard, display, memory, hard drive, etc. • During the assessment, answer any questions - Dell M2300 | User's Guide - Page 77
code and problem description and follow the instructions on the screen. If you cannot resolve the error condition, contact Dell (see "Obtaining Assistance" on page 143). NOTE: The Service Tag for your computer is located at the top of each test screen. If you contact Dell, technical support will ask - Dell M2300 | User's Guide - Page 78
the Dell Diagnostics from the Drivers and Utilities media, remove the media. 5 When the tests are complete, close the test screen to return to the Main Menu screen. To exit the Dell Diagnostics and restart the computer, close the Main Menu screen. Dell Support Utility The Dell Support Utility - Dell M2300 | User's Guide - Page 79
mark (?) at the top of the Dell Support screen. Drive Problems Fill out the Diagnostics Checklist (see "Diagnostics Checklist" on page 147) as you complete these checks. CAUTION: Before you begin any of the procedures in this section, follow the safety instructions in the Product Information Guide - Dell M2300 | User's Guide - Page 80
. E-Mail, Modem, and Internet Problems Fill out the Diagnostics Checklist (see "Diagnostics Checklist" on page 147) as you complete these checks. CAUTION: Before you begin any of the procedures in this section, follow the safety instructions in the Product Information Guide. 80 Troubleshooting - Dell M2300 | User's Guide - Page 81
and then click Modem Diagnostic Tool. Follow the instructions on the screen to identify and resolve modem problems. VERIFY THAT THE MODEM IS COMMUNICATING WITH WINDOWS - 1 Click the Start button and click connect to the Internet. For help, contact your Internet service provider. Troubleshooting 81 - Dell M2300 | User's Guide - Page 82
78). DATA ERROR - The hard drive cannot read the data (see "Dell Support Utility" on page 78). DECREASING AVAILABLE MEMORY - One or more memory modules may be faulty or improperly seated. Reinstall the memory modules and, if necessary, replace them (see "Memory Problems" on page 88). DISK C: FAILED - Dell M2300 | User's Guide - Page 83
persists, try another drive. Run the Hard-Disk Drive tests in the Dell Diagnostics (see "Dell Diagnostics" on page 75). HARD-DISK DRIVE READ FAILURE - The hard drive may be defective. Shut down the computer, remove the hard drive (see "Hard drive problems" on page 80), and boot the computer from - Dell M2300 | User's Guide - Page 84
(see "Memory Problems" on page 88) and, if necessary, replace them. NO BOOT DEVICE AVAILABLE - The computer cannot find the hard drive. If the hard drive is your boot device, ensure that the drive is installed, properly seated, and partitioned as a boot device. NO BOOT SECTOR ON HARD DRIVE - The - Dell M2300 | User's Guide - Page 85
loose. Run the System Memory tests and the Keyboard Controller test in the Dell Diagnostics (see "Dell Diagnostics" on page 75). X : \ I S N O T A C C E S S I B L E . T H E D E V I C E I S N O T R E A D Y - Insert a disk into the drive and try again. WA R N I N G : BATTERY I S CRITICALLY LOW - The - Dell M2300 | User's Guide - Page 86
section, follow the safety instructions in the Product Information Guide. NOTE: Use the integrated keyboard when running the Dell Diagnostics or the system setup program. When you attach an external keyboard, the integrated keyboard remains fully functional. External Keyboard problems NOTE: When you - Dell M2300 | User's Guide - Page 87
tests in the Dell Diagnostics (see "Dell Diagnostics" on page 75). If the tests indicate a defective external keyboard, contact Dell (see "Obtaining Assistance" on page 143). Unexpected characters DISABLE THE NUMERIC KEYPAD - Press to disable the numeric keypad if numbers are displayed - Dell M2300 | User's Guide - Page 88
you begin any of the procedures in this section, follow the safety instructions in the Product Information Guide. IF YOU RECEIVE AN INSUFFICIENT MEMORY MESSAGE - • Save and close any open files and exit any open programs you are not using to see if that resolves the problem. 88 Troubleshooting - Dell M2300 | User's Guide - Page 89
→Help and Support. You can also download the Dell Mobile Broadband Card Utility user's guide from support.dell.com. NOTE: Remove any network cables from the computer and disable the WLAN card. To disable the WLAN card, click Start→Connect To→Wireless Network Connection→Disable. Troubleshooting 89 - Dell M2300 | User's Guide - Page 90
service provider. For instructions and for additional information about using the Dell Mobile Broadband Card Utility, see the user's guide available through the Windows Help and Support Center (click Start→Help and Support). The user's guide is also available on the Dell Support website at support - Dell M2300 | User's Guide - Page 91
- Contact the card manufacturer. Power Problems Fill out the Diagnostics Checklist (see "Diagnostics Checklist" on page 147) as you complete these checks. CAUTION: Before you begin any of the procedures in this section, follow the safety instructions in the Product Information Guide. CHECK THE POWER - Dell M2300 | User's Guide - Page 92
on but the display remains blank, reinstall the memory modules (see "Memory Problems" on page docked to the Dell D/Dock, normal computer operation is not possible on battery power alone. Ensure that the AC adapter is connected to your computer when the computer is docked to the Dell D/Dock. Docking - Dell M2300 | User's Guide - Page 93
Other Hardware. 2 Click Scanners and Cameras. If your scanner is listed, Windows recognizes the scanner. R EINSTALL T H E S C A N N E R DRIVER - See the scanner documentation for instructions. Sound and Speaker Problems Fill out the Diagnostics Checklist (see "Diagnostics Checklist" on page 147) as - Dell M2300 | User's Guide - Page 94
lamps to check for interference. R EINSTALL T H E AUDIO DRIVER - See "Reinstalling Drivers and Utilities" on page 102. R U N T H E D ELL D IAGNOSTICS - See "Dell Diagnostics" on page 75. NOTE: The volume control in some MP3 players overrides the Windows volume setting. If you have been listening to - Dell M2300 | User's Guide - Page 95
section, follow the safety instructions in the Product Information Guide. If the display is blank NOTE: If you are using a program that requires a higher resolution than your computer supports, it is recommended that you attach an external monitor to your computer. CHECK THE BATTERY - If you are - Dell M2300 | User's Guide - Page 96
blank, run the Video device group in the Dell Diagnostics. If the problem persists, contact Dell (see "Obtaining Assistance" on page 143). SEE "ERROR MESSAGES" - If an error message appears, see "Error Messages" on page 82 If only part of the display is readable CONNECT AN EXTERNAL MONITOR - Dell M2300 | User's Guide - Page 97
System configuration • Boot order • Boot (start-up) configuration and docking-device configuration settings • Basic device-configuration settings • System security and hard-drive password settings NOTE: Unless you are an expert computer user or are directed to do so by Dell technical support, do not - Dell M2300 | User's Guide - Page 98
For information about a specific item on a system Boot" on page 99. The Boot Order page displays a general list of the bootable devices that may be installed in your computer, including but not limited to the following: • Diskette Drive • Modular bay HDD • Internal HDD • Optical Drive During the boot - Dell M2300 | User's Guide - Page 99
to boot the Dell Diagnostics on the diagnostics utility partition on your hard drive.) 1 Shut down the computer through the Start menu. 2 If the computer is connected to a docking device (docked), undock it. See the documentation that came with your docking device for instructions. 3 Connect - Dell M2300 | User's Guide - Page 100
100 System Setup Program - Dell M2300 | User's Guide - Page 101
operating system. • Connect or install a new device. Identifying Drivers If you experience a problem with any device, identify whether the driver is the source of your problem and, if necessary, update the driver. Microsoft® Windows® XP 1 Click Start→Control Panel. 2 Under Pick a Category, click - Dell M2300 | User's Guide - Page 102
The Dell Support website at support.dell.com and your Drivers and Utilities media provide approved drivers for Dell™ computers. If you install drivers obtained from other sources, your computer might not work correctly. Installing Drivers in the Correct Order Microsoft Windows XP (with service pack - Dell M2300 | User's Guide - Page 103
close any open files, and exit any open programs. 2 Insert the Drivers and Utilities media. In most cases, the media starts running automatically. If it does not, start Windows Explorer, click your media drive directory to display the media contents, and then double-click the autorcd.exe file. The - Dell M2300 | User's Guide - Page 104
If instructed to navigate to the driver files, click the media directory on the driver information window to display the files associated with that driver. Manually Reinstalling Drivers After extracting the driver files to your hard drive as described in the previous section, reinstall the drivers: - Dell M2300 | User's Guide - Page 105
. However, using the Operating System media also deletes all data on the hard drive. Use the media only if System Restore did not resolve your operating system problem. Using Microsoft® Windows® System Restore The Windows operating systems provide a System Restore option which allows you to return - Dell M2300 | User's Guide - Page 106
Vista does not disable System Restore regardless of low disk space. Therefore, the steps below apply only to Windows XP. If you reinstall Windows XP with less than 200 MB of free hard-disk space available, System Restore is automatically disabled. To see if System Restore is enabled: 1 Click Start - Dell M2300 | User's Guide - Page 107
. The options can overwrite files and possibly affect programs that are installed on your hard drive. Therefore, do not reinstall Windows XP or Windows Vista unless a Dell technical support representative instructs you to do so. 1 Save and close any open files and exit any open programs. 2 Insert - Dell M2300 | User's Guide - Page 108
108 Reinstalling Software - Dell M2300 | User's Guide - Page 109
Replacing Parts Before . • You have read the safety information in your Dell™ Product Information Guide. • A component can be replaced or-if purchased screwdriver • Small Phillips screwdriver • Small plastic scribe • Flash BIOS update program CD Turning Off Your Computer NOTICE: To avoid losing data - Dell M2300 | User's Guide - Page 110
Before you begin any of the procedures in this section, follow the safety instructions in the Product Information Guide. CAUTION: Handle components and cards with care. Do not touch the components or contacts on a card. Hold a card by its edges or by its metal mounting bracket. Hold a component such - Dell M2300 | User's Guide - Page 111
Turn the computer top-side up, and then open the display all the way (180 degrees) so that the display rests on your work surface. NOTICE: To avoid damaging place. Keyboard CAUTION: Before performing the following procedures, follow the safety instructions in your Product Information Guide. NOTICE: - Dell M2300 | User's Guide - Page 112
1 Follow the instructions in "Before You Begin" on page 109. 2 Remove the hinge cover (see "Hinge Cover" on page 111). 1 2 3 4 5 6 1 screws (3) 4 pull-tab 2 keyboard tabs (5) 3 palm rest 5 keyboard-cable locking arm 6 keyboard cable connector NOTICE: The keycaps on the keyboard are fragile, - Dell M2300 | User's Guide - Page 113
Card With Bluetooth® Wireless Technology CAUTION: Before performing the following procedures, follow the safety instructions in your Product Information Guide remove the main battery before you begin working inside the computer. If you ordered an internal card with Bluetooth wireless technology with - Dell M2300 | User's Guide - Page 114
from the cable and remove the card from the computer. Coin-Cell Battery CAUTION: Before performing the following procedures, follow the safety instructions in your Product Information Guide. NOTICE: To avoid electrostatic discharge, ground yourself by using a wrist grounding strap or by periodically - Dell M2300 | User's Guide - Page 115
. See "Specifications" on page 135 for information on the memory supported by your computer. Install only memory modules that are intended for your computer. CAUTION: Before you begin any of the procedures in this section, follow the safety instructions in the Product Information Guide. NOTICE: If - Dell M2300 | User's Guide - Page 116
Remove the hinge cover (see "Hinge Cover" on page 111). 3 Remove the keyboard (see "Keyboard" on page 111). 1 2 1 memory module (DIMM A) 2 securing clips (2) NOTICE: To prevent damage to the memory module connector, do not use tools to spread the memory-module securing clips. 4 If you are replacing - Dell M2300 | User's Guide - Page 117
module 5 Ground yourself and install the new memory module: NOTE: If the memory module is not installed properly, the computer may not boot properly. No error message indicates this failure. a Align the notch in the module connector with the tab in the connector slot. b Slide the module firmly - Dell M2300 | User's Guide - Page 118
. 3 If you are replacing a memory module, ground yourself and remove the existing module: a Use your fingertips to carefully spread apart the securing clips on each end of the memory module connector until the module pops up. b Remove the module from the connector. 118 Adding and Replacing Parts - Dell M2300 | User's Guide - Page 119
damaging the connector. 4 Ground yourself and install the new memory module: NOTE: If the memory module is not installed properly, the computer may not boot properly. No error message indicates this failure. a Align the the cover to close may damage your computer. Adding and Replacing Parts 119 - Dell M2300 | User's Guide - Page 120
and Support, and then click Computer Information. 8 Replace the memory module cover. Wireless Local Area Network (WLAN) Card If you ordered a WLAN card with your computer, the card is already installed. CAUTION: Before you begin any of the procedures in this section, follow the safety instructions - Dell M2300 | User's Guide - Page 121
2 1 WLAN card 2 metal securing tabs (2) 5 To install a WLAN card: a Move any antenna cables out of the way to make space for the WLAN card. b Align the WLAN card with the connector at a 45-degree angle, and press the card into the connector until you feel a click. Adding and Replacing Parts 121 - Dell M2300 | User's Guide - Page 122
the card is already installed. CAUTION: Before you begin any of the procedures in this section, follow the safety instructions in the Product Information Guide. 1 Follow the procedures in "Before You Begin" on page 109. 2 Remove the hinge cover (see "Hinge Cover" on page 111). 3 Remove the keyboard - Dell M2300 | User's Guide - Page 123
the connector, do not use tools to spread the securing clips. 4 If a Mobile Broadband card is not already installed, go to step 5. If you are replacing a Mobile Broadband card, remove the existing card: a Disconnect the Mobile Broadband card from any attached cables. Adding and Replacing Parts 123 - Dell M2300 | User's Guide - Page 124
of card you ordered. 5 To install a Mobile Broadband card: a Move any antenna cables out of the way to make space for the Mobile Broadband card. b Align the card with the connector at a 45-degree angle, and press the card into the connector until you feel a click. 124 Adding and Replacing Parts - Dell M2300 | User's Guide - Page 125
Card CAUTION: Before you begin any of the procedures in this section, follow the safety instructions in the Product Information Guide. NOTE: Only GSM (HSDPA) type cards need a SIM. EVDO cards do not use a SIM. 1 Remove the battery (see "Replacing the Battery" on page 36). Adding and Replacing Parts - Dell M2300 | User's Guide - Page 126
fragile; even a slight bump can damage the drive. NOTE: Dell does not guarantee compatibility or provide support for hard drives from sources other than Dell. To replace the hard drive in the hard drive bay: 1 Follow the procedures in "Before You Begin" on page 109. 126 Adding and Replacing Parts - Dell M2300 | User's Guide - Page 127
Guide. 3 Slide the hard drive out of the computer. 4 Remove the new drive from its packaging. Save the original packaging for storing or shipping the hard drive ). 8 Use the Drivers and Utilities media to install the drivers and utilities for your computer (see "Reinstalling Drivers and Utilities" on - Dell M2300 | User's Guide - Page 128
computer is running and connected to a docking device (docked). Removing Media Bay Devices NOTICE: To 3 Press the device latch release. 1 2 1 optical drive 2 device latch release 4 Pull the device out of the drive that helps improve the performance of your computer. 128 Adding and Replacing - Dell M2300 | User's Guide - Page 129
with the Microsoft Windows Vista® operating system. NOTE: If you ordered an FCM card with your computer, the card is already installed. 1 Follow the procedures in "Before You Begin" on page 109. 2 Remove the hinge cover (see "Hinge Cover" on page 111). 3 Remove the keyboard (see "Keyboard" on page - Dell M2300 | User's Guide - Page 130
card on top of these antenna cables may cause damage to your computer. Also, do not install the FCM card in the WLAN card connector. The FCM card is designed to work in the WWAN card connector. Installing the card in the wrong slot may cause damage to your computer. 130 Adding and Replacing Parts - Dell M2300 | User's Guide - Page 131
• Network connectivity • Power management • Display • System information Depending on what you want to do in Dell™ QuickSet, you can start it by either clicking, doubleclicking, or right-clicking the QuickSet icon in the Microsoft® Windows® taskbar. The - Dell M2300 | User's Guide - Page 132
132 Dell™ QuickSet - Dell M2300 | User's Guide - Page 133
in the module bay with the Dell TravelLite™ module. • Fully charge the main battery and any spare batteries that you plan to carry with you. • Shut down the computer. • Disconnect the AC adapter. NOTICE: When the display is closed, extraneous items on the keyboard or palm rest could damage the - Dell M2300 | User's Guide - Page 134
drive to prevent loss of data. NOTICE: Do not check the computer as baggage. • Consider disabling wireless activity on your computer to maximize battery operating time. To disable wireless activity, use the wireless switch (see "Enabling/Disabling the Dell™ Mobile Broadband Card charged battery - Dell M2300 | User's Guide - Page 135
DRAM bus width Processor address bus width Flash EPROM Graphics bus PCI bus PC Card/ExpressCard CardBus controller PC Card connector Cards supported PC Card connector size PCI-E Card Flash Cache Module (FCM) Intel® Core™ 2 Duo Processors 32 KB per instruction, 32 KB data cache per core up to 4 MB - Dell M2300 | User's Guide - Page 136
Memory type Minimum memory Maximum memory Smart Card Read/write capabilities Cards supported Program technology supported Interface speed EMV level WHQL certification Compatibility Insert/eject cycles Ports and Connectors Serial Audio Mini-Card Modem Network adapter USB Video IEEE 1394 D-Dock - Dell M2300 | User's Guide - Page 137
, WWAN, and Bluetooth® wireless support (if optional cards are purchased) discrete on system board, hardware accelerated PCI-E graphics x16 nVIDIA Quadro FX 360M nVIDIA Quadro FX 360M - 128 MB of video memory (dedicated) at - Dell M2300 | User's Guide - Page 138
www.dell.com | support.dell.com Display (continued) Active area (X/Y) Dimensions: Height Width Diagonal Operating angle Viewing angles: Horizontal Vertical Pixel pitch Power Consumption (panel with backlight) (typical) Keyboard Number of keys Layout Touch Pad X/Y position resolution (graphics table - Dell M2300 | User's Guide - Page 139
batteries: Depth Height 9-cell lithium-ion batteries: Depth Height Weight Voltage Charge time (approximate): Computer off Operating time Life span (approximate) Temperature range: Operating Storage Coin-cell battery a Battery" on page 31 for more information on battery life. 300 charge/discharge - Dell M2300 | User's Guide - Page 140
Weight (with 6-cell battery and CD 2.27 kg (5 lb) drive) Environmental Temperature range: Operating Storage Relative humidity (maximum): Operating Storage Maximum vibration (using a random-vibration spectrum that simulates user environment): Operating Storage Maximum shock (measured with hard drive - Dell M2300 | User's Guide - Page 141
Environmental (continued) Operating Storage Altitude (maximum): Operating Storage Airborne contaminant level 143 G 163 G -15.2 to 3048 m (-50 to 10,000 ft) -15.2 to 10,668 m (-50 to 35,000 ft) G2 or lower as defined by ISA-S71.04-1985 Specifications 141 - Dell M2300 | User's Guide - Page 142
www.dell.com | support.dell.com 142 Specifications - Dell M2300 | User's Guide - Page 143
at Dell Support (support.dell.com) for help with installation and troubleshooting procedures. See "Online Services" on page 144 for a more extensive list of Dell Support online. 5 If the preceding steps have not resolved the problem, see "Contacting Dell" on page 147. NOTE: Call Dell Support from - Dell M2300 | User's Guide - Page 144
a broadband connection, diagnose your problem and repair it all under your supervision. For more information, go to support.dell.com and click DellConnect. Online Services You can learn about Dell products and services on the following websites: www.dell.com www.dell.com/ap (Asian/Pacific countries - Dell M2300 | User's Guide - Page 145
ordered, you can go to support.dell.com, or you can call the automated order-status service. A recording prompts you for the information needed to locate and report on your order. For the telephone number to call for your region, see "Contacting Dell" on page 147." Problems With Your Order If you - Dell M2300 | User's Guide - Page 146
that are missing any of the preceding requirements will be refused at Dell's receiving dock and returned to you. Before You Call NOTE: Have your Express Service Code ready when you call. The code helps Dell's automated-support telephone system direct your call more efficiently. You may also be asked - Dell M2300 | User's Guide - Page 147
Express Service Code: Return Material Authorization Number (if provided by Dell support technician): Operating system and version: Devices: Expansion cards: Dell. Error message, beep code, or diagnostic code: Description of problem and troubleshooting procedures you performed: Contacting Dell - Dell M2300 | User's Guide - Page 148
, or Dell product catalog. Dell provides several online and telephone-based support and service options. Availability varies by country and product, and some services may not be available in your area. To contact Dell for sales, technical support, or customer service issues: 1 Visit support.dell.com - Dell M2300 | User's Guide - Page 149
section, follow the safety instructions in the Product Information Guide. Computer, Keyboard, and Display CAUTION: Before you clean monitor's antistatic coating. • Wipe the keyboard, computer, and monitor plastics with a soft cleaning cloth moistened with a solution of three parts water and one part - Dell M2300 | User's Guide - Page 150
. CDs and DVDs NOTICE: Always use compressed air to clean the lens in the CD/DVD drive, and follow the instructions that come with the compressed-air product. Never touch the lens in the drive. If you notice problems, such as skipping, with the playback quality of your CDs or DVDs, try cleaning the - Dell M2300 | User's Guide - Page 151
not installed and used in accordance with the manufacturer's instruction manual, may cause interference with radio and television reception. This equipment has been tested and found to comply with the limits for a Class B digital device pursuant to Part 15 of the FCC Rules. This device complies with - Dell M2300 | User's Guide - Page 152
Macrovision Product Notice This product incorporates copyright protection technology that is protected by method claims of certain U.S. patents and other intellectual property rights owned by Macrovision Corporation and other rights owners. Use of this copyright protection technology must be - Dell M2300 | User's Guide - Page 153
dedicated graphics port that allows system memory to be used for videorelated tasks. AGP delivers a smooth, true-color video image because of the faster interface between the video circuitry and the computer memory. AHCI - Advanced Host Controller Interface - An interface for a SATA hard drive Host - Dell M2300 | User's Guide - Page 154
400 MHz. device - Hardware such as a disk drive, printer, or keyboard that is installed in or connected to your computer. device driver - See driver. DIMM - dual in-line memory module - A circuit board with memory chips that connects to a memory module on the system board. DIN connector - A round - Dell M2300 | User's Guide - Page 155
contacting Dell for assistance. Express Service Code service may not be available in some countries. extended display mode - A display setting that allows you to use a second monitor as an extension of your display. Also referred to as dual display mode. extended PC Card - A PC Card that extends - Dell M2300 | User's Guide - Page 156
by z colors. Graphics modes can display an unlimited variety of shapes and fonts. GUI - graphical user interface - Software that interacts with the user by means of menus, windows, and icons. Most programs that operate on the Windows operating systems are GUIs. H hard drive - A drive that reads and - Dell M2300 | User's Guide - Page 157
to hard drive storage, the term is often rounded to 1,000,000 bytes. MB/sec - megabytes per second - One million bytes per second. This measurement is typically used for data transfer ratings. media bay - A bay that supports devices such as optical drives, a second battery, or a Dell TravelLite - Dell M2300 | User's Guide - Page 158
and network adapters are common types of PC Cards. PCI - peripheral component interconnect - PCI is a local bus that supports 32-and 64-bit data paths, providing a high-speed data path between the processor and devices such as video, drives, and networks. PCI Express - A modification to the PCI - Dell M2300 | User's Guide - Page 159
automatically by the BIOS, that perform basic tests on the major computer components, such as memory, hard drives, and video. If no problems are detected during POST, the computer continues the startup. processor - A computer chip that interprets and executes program instructions. Sometimes the - Dell M2300 | User's Guide - Page 160
video graphics array - A video standard for video cards and controllers. Typical SVGA resolutions are 800 x 600 and 1024 x 768. The number of colors and resolution that a program displays depends on the capabilities of the monitor, the video controller and its drivers, and the amount of video memory - Dell M2300 | User's Guide - Page 161
video functions. Video memory is usually faster than system memory. The amount of video memory installed primarily influences the number of colors that a program can display. video mode - A mode that describes how text and graphics are displayed on a monitor. Graphics-based software, such as Windows - Dell M2300 | User's Guide - Page 162
a battery. For example, a 66-WHr battery can wireless wide area network. A wireless highspeed data network using cellular technology and covering a much larger geographic area than WLAN. WXGA - wide-aspect extended graphics array - A video standard for video cards and controllers that supports
-
 1
1 -
 2
2 -
 3
3 -
 4
4 -
 5
5 -
 6
6 -
 7
7 -
8
-
9
-
10
-
11
-
12
-
13
-
14
-
15
-
16
-
17
-
18
-
19
-
20
-
21
-
22
-
23
-
24
-
25
-
26
-
27
-
28
-
29
-
30
-
31
-
32
-
33
-
34
-
35
-
36
-
37
-
38
-
39
-
40
-
41
-
42
-
43
-
44
-
45
-
46
-
47
-
48
-
49
-
50
-
51
-
52
-
53
-
54
-
55
-
56
-
57
-
58
-
59
-
60
-
61
-
62
-
63
-
64
-
65
-
66
-
67
-
68
-
69
-
70
-
71
-
72
-
73
-
74
-
75
-
76
-
77
-
78
-
79
-
80
-
81
-
82
-
83
-
84
-
85
-
86
-
87
-
88
-
89
-
90
-
91
-
92
-
93
-
94
-
95
-
96
-
97
-
98
-
99
-
100
-
101
-
102
-
103
-
104
-
105
-
106
-
107
-
108
-
109
-
110
-
111
-
112
-
113
-
114
-
115
-
116
-
117
-
118
-
119
-
120
-
121
-
122
-
123
-
124
-
125
-
126
-
127
-
128
-
129
-
130
-
131
-
132
-
133
-
134
-
135
-
136
-
137
-
138
-
139
-
140
-
141
-
142
-
143
-
144
-
145
-
146
-
147
-
148
-
149
-
150
-
151
-
152
-
153
-
154
-
155
-
156
-
157
-
158
-
159
-
160
-
161
-
162
 |
 |

www.dell.com | support.dell.com
Dell Precision™ M2300
User’s Guide
Model PP18L