Dell PowerConnect J-SRX210 Hardware Guide - Page 113
Establishing Basic Connectivity, Con the basic settings such as Host Name, Domain Name
 |
View all Dell PowerConnect J-SRX210 manuals
Add to My Manuals
Save this manual to your list of manuals |
Page 113 highlights
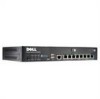
Chapter 16: Performing Initial Software Configuration on the J-SRX210 Services Gateway Establishing Basic Connectivity To establish basic connectivity: 1. Connect an Ethernet cable from any of the ge-0/0/1 or fe-0/0/2 to fe-0/0/7 ports to the Ethernet port on the management device (workstation or laptop). 2. Connect the power cable to the device and a power source. (We recommend using a surge protector.) Note the following indications: • Power LED (solid green): The device is receiving power. • Status LED (solid green): The device is operating normally. NOTE: The services gateway functions as a DHCP server and will assign an IP address to the management device. 3. Ensure that the management device acquires an IP address on the 192.168.1/24 subnetwork (other than 192.168.1.1) from the device. NOTE: If an IP address is not assigned to the management device, manually configure an IP address in the 192.168.1/24 subnetwork. Do not assign the 192.168.1.1 IP address to the management device, as this IP address is assigned to the device. 4. Access the J-Web interface: a. Launch a Web browser from the management device. b. Enter 192.168.1.1 in the Address box. c. Specify the default user name as root. Do not enter any value in the Password box. d. Press Enter. The J-Web Initial Setup page is displayed. 5. Configure the basic settings such as Host Name, Domain Name, Root Password, and IP Address for your services gateway. Ensure that you have configured the IP address, root authentication, and default gateway before you apply the configuration. NOTE: All network and management access settings are optional. 6. Click Apply to apply the configuration. NOTE: After configuring the basic settings, the Web session may timeout. Refresh or relaunch the page if the applied configuration page is not displayed . 97
-
 1
1 -
2
-
3
-
4
-
5
-
6
-
7
-
8
-
9
-
10
-
11
-
12
-
13
-
14
-
15
-
16
-
17
-
18
-
19
-
20
-
21
-
22
-
23
-
24
-
25
-
26
-
27
-
28
-
29
-
30
-
31
-
32
-
33
-
34
-
35
-
36
-
37
-
38
-
39
-
40
-
41
-
42
-
43
-
44
-
45
-
46
-
47
-
48
-
49
-
50
-
51
-
52
-
53
-
54
-
55
-
56
-
57
-
58
-
59
-
60
-
61
-
62
-
63
-
64
-
65
-
66
-
67
-
68
-
69
-
70
-
71
-
72
-
73
-
74
-
75
-
76
-
77
-
78
-
79
-
80
-
81
-
82
-
83
-
84
-
85
-
86
-
87
-
88
-
89
-
90
-
91
-
92
-
93
-
94
-
95
-
96
-
97
-
98
-
99
-
100
-
101
-
102
-
103
-
104
-
105
-
106
-
107
-
 108
108 -
 109
109 -
 110
110 -
 111
111 -
 112
112 -
 113
113 -
 114
114 -
 115
115 -
 116
116 -
 117
117 -
 118
118 -
119
-
120
-
121
-
122
-
123
-
124
-
125
-
126
-
127
-
128
-
129
-
130
-
131
-
132
-
133
-
134
-
135
-
136
-
137
-
138
-
139
-
140
-
141
-
142
-
143
-
144
-
145
-
146
-
147
-
148
-
149
-
150
-
151
-
152
-
153
-
154
-
155
-
156
-
157
-
158
-
159
-
160
-
161
-
162
-
163
-
164
-
165
-
166
-
167
-
168
-
169
-
170
-
171
-
172
-
173
-
174
-
175
-
176
-
177
-
178
-
179
-
180
-
181
-
182
 |
 |
