Dell PowerEdge 2161DS Dell 180AS/2160AS Analog Console Switch User's Guide - Page 14
To install the 1U four point switch mounting bracket:, CAUTION
 |
View all Dell PowerEdge 2161DS manuals
Add to My Manuals
Save this manual to your list of manuals |
Page 14 highlights
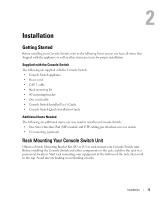
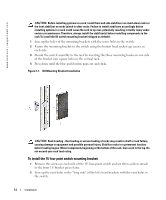
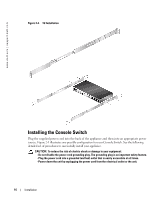
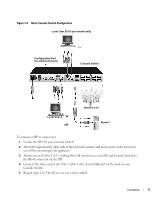
www.dell.com | support.dell.com CAUTION: Before installing systems in a rack, install front and side stabilizers on stand-alone racks or the front stabilizer on racks joined to other racks. Failure to install stabilizers accordingly before installing systems in a rack could cause the rack to tip over, potentially resulting in bodily injury under certain circumstances. Therefore, always install the stabilizer(s) before installing components in the rack.To install the 0U switch mounting bracket (shipped as default): 1 Line up the holes of the mounting brackets with the screw holes in the switch. 2 Fasten the mounting bracket to the switch using the button head socket cap screws on each side. 3 Mount the switch assembly to the rack by inserting the three mounting hooks on one side of the bracket into square holes in the vertical rack. 4 Press down until the blue push button pops out and clicks. Figure 2-1. OU Mounting Bracket Installation CAUTION: Rack Loading - Overloading or uneven loading of racks may result in shelf or rack failure, causing damage to equipment and possible personal injury. Stabilize racks in a permanent location before loading begins. Mount components beginning at the bottom of the rack, then work to the top. Do not exceed your rack load rating. To install the 1U four point switch mounting bracket: 1 Remove the screws on each side of the 1U four-point switch and set them aside to attach to the front 1U bracket pieces later. 2 Line up the vent holes in the "long side" of the kit's front brackets with the vent holes in the switch. 14 Installation
-
 1
1 -
2
-
3
-
4
-
5
-
6
-
7
-
8
-
 9
9 -
 10
10 -
 11
11 -
 12
12 -
 13
13 -
 14
14 -
 15
15 -
 16
16 -
 17
17 -
 18
18 -
 19
19 -
20
-
21
-
22
-
23
-
24
-
25
-
26
-
27
-
28
-
29
-
30
-
31
-
32
-
33
-
34
-
35
-
36
-
37
-
38
-
39
-
40
-
41
-
42
-
43
-
44
-
45
-
46
-
47
-
48
-
49
-
50
-
51
-
52
-
53
-
54
-
55
-
56
-
57
-
58
-
59
-
60
 |
 |
