Dell PowerEdge 2321DS User Manual - Page 8
U Mounting Locations, Cabling a KVM
 |
View all Dell PowerEdge 2321DS manuals
Add to My Manuals
Save this manual to your list of manuals |
Page 8 highlights
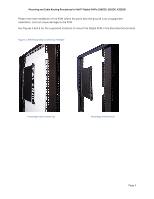
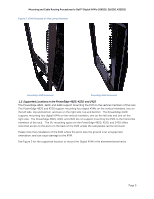
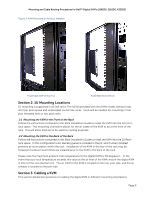
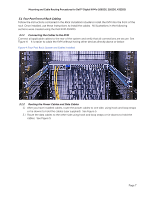
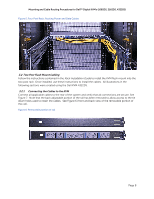
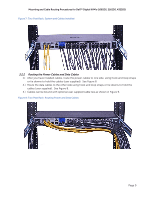
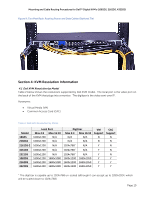
Mounting and Cable Routing Procedures for Dell™ Digital KVM's (1082DS, 2162DS, 4322DS) Figure 3: KVM Mounted on Vertical Member PowerEdge 4220 Vertical Top PowerEdge 2420 Vertical Section 2: 1U Mounting Locations 1U mounting is supported in all Dell racks. The rail kit provided with the KVMs installs without tools into four post square and unthreaded round hole racks. Tools will be needed for mounting in four post threaded hole or two post racks. 2.1 Mounting the KVM in the Front of the Rack Follow the instructions contained in the Rack Installation Guide to install the KVM into the 1U Frontrack space. This mounting orientation allows for the air intake of the KVM to be at the front of the rack. This will allow fresh air to be used for cooling purposes. 2.2 Mounting the KVM in the Back of the Rack Follow the instructions contained in the Rack Installation Guide to install the KVM into the 1U Rearrack space. In this configuration a 1U blanking panel is included in the kit, which when installed prevents air recirculation within the rack. Installation of the KVM in the rear of the rack may be hindered if vertical mount PDUs are installed prior to the KVM in the back of the rack. Please note the maximum ambient inlet temperature for the digital KVMs is 50 degrees C. In the event that your rack temperature exceeds this value at the air inlet of the KVM, mount the digital KVM in front of the rack (Section 2.1). The air inlet for the KVM is located on the non-port side, and the air exhaust is located on the port side. Section 3: Cabling a KVM This section details best practices on cabling the digital KVM in different mounting orientations. Page 6
-
 1
1 -
2
-
 3
3 -
 4
4 -
 5
5 -
 6
6 -
 7
7 -
 8
8 -
 9
9 -
 10
10 -
 11
11 -
 12
12 -
 13
13
 |
 |
