Dell PowerEdge 4600 Rack-to-Tower Conversion Guide - Page 14
Installing the Front Panel - hard drives
 |
View all Dell PowerEdge 4600 manuals
Add to My Manuals
Save this manual to your list of manuals |
Page 14 highlights
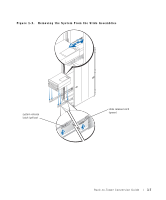
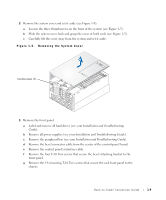
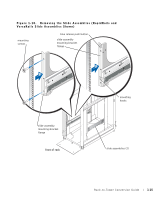
Figure 1-6. Installing the Trim Panel trim panel 6-32 x 0.25-inch hex-head Phillips screws (3) Installing the Front Panel To install the tower front panel (provided with the kit) to the chassis, perform the following steps: 1 Install the peripheral bay by attaching it to the hard-drive bay with the peripheral bay handle pointing away from the front fan assembly. 2 Secure the tower front panel to the chassis and trim panel with the 20 T-10 Torx screws (see Figure 1-7). Use the 14 T-10 Torx screws that you removed from the rack version's front panel and the six T-10 Torx screws provided with the kit. Rack-to-Tower Conversion Guide 1-11
-
 1
1 -
2
-
3
-
4
-
5
-
6
-
7
-
8
-
 9
9 -
 10
10 -
 11
11 -
 12
12 -
 13
13 -
 14
14 -
 15
15 -
 16
16 -
 17
17 -
 18
18 -
 19
19
 |
 |

Rack-to-Tower Conversion Guide
1-11
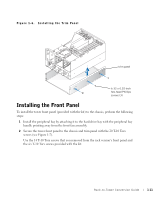
Figure 1-6.
Installing the Trim Panel
Installing the Front Panel
To install the tower front panel (provided with the kit) to the chassis, perform the following
steps:
1
Install the peripheral bay by attaching it to the hard-drive bay with the peripheral bay
handle pointing away from the front fan assembly.
2
Secure the tower front panel to the chassis and trim panel with the 20 T-10 Torx
screws (see Figure 1-7).
Use the 14 T-10 Torx screws that you removed from the rack version’s front panel and
the six T-10 Torx screws provided with the kit.
trim panel
6-32 x 0.25-inch
hex-head Phillips
screws (3)